You can change how AirPods respond when you double-tap on them while they’re in your ears. For example, if you want to be able to double-tap on the left AirPod to summon Siri, and double-tap on the right AirPod to play or pause audio, you can configure that easily.
There are a variety of double-tap customizations available for AirPods, including Siri, play/pause/stop audio, skip track, and go back a track, and you can set those double-tap controls separately for both the Left and Right AirPod.
To adjust settings on the AirPods, you must use the iPhone or iPad that the AirPods are setup and paired with.
How to Change AirPods Double-Tap Controls
Here’s how you can easily change AirPods double-tap controls:
- Open the AirPod case
- Open the Settings app on the iPhone or iPad that is paired with AirPods
- Go to “Bluetooth” and then tap on the (i) button next to the AirPods name
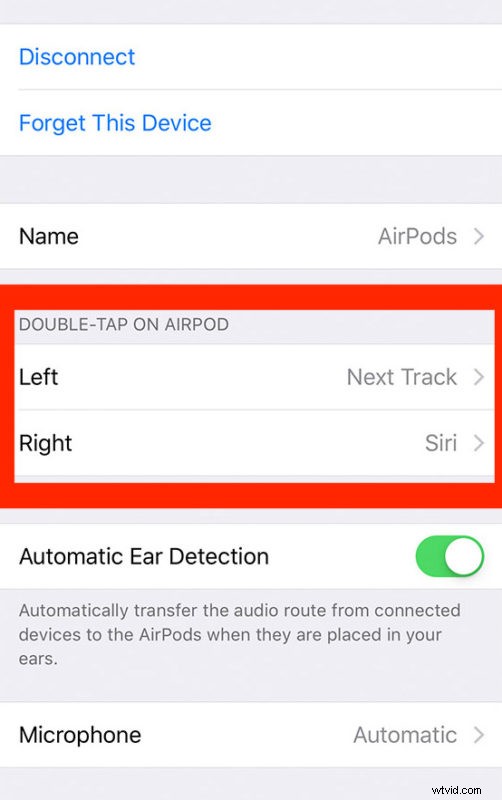
- Scroll down to find the “Double-Tap on AirPod” section and then tap on the Left or Right AirPod choice to select the desired action
- Choose the double-tap action for that AirPod; summon Siri, play, pause, or stop audio, skip to the next track, go back to the previous track
- Tap back and then optionally choose the other AirPod to customize the double-tap action for, again selecting from: Siri, play/pause/stop audio, skip, go back
- Exit out of Settings as usual when finished
The AirPods control changes will take effect immediately, and you can try them out right away by putting your AirPods in and double-tapping the left or right AirPods to confirm the settings change has taken effect.
For many users they’ll want one AirPod to be used for Siri and the other to be used for skipping a track, but if you listen to a bunch of music or podcasts then having each AirPod function as an audio control mechanism may be a better choice, and it’s pretty useful tone able to tap on one AirPod to skip a song or podcast and the other to reverse or pause and play a song or audio track.
Experiment with what works best for your specific AirPods use and flow.
While you’re in the AirPods settings you might also want to change the AirPods name or make other adjustments too. There aren’t a million different choices so the settings are easy to browse through to check out the options available to your AirPods.
Remember this is for standard AirPods, and not AirPods Pro which also use a squeeze rather than tap. Nonetheless you can change AirPods Pro squeeze behavior if you’re interested in that and have a pair of those.
Enjoying your AirPods? Then don’t forget to check out other AirPods tips to learn even more about the Apple wireless earphones.
As always, let us know if you have any particular tips, tricks, or thoughts about AirPods, tap controls, and the customization of the earbuds, by leaving a comment!