The ability to block people from calling or messaging an iPhone or iPad is an undoubtedly useful feature, but there may come a time where you wish to undo that block. Fortunately, unblocking a contact from iOS is straight forward and easy, so whether you have changed your mind, accidentally blocked someone, or have just decided you want to hear from whoever you blocked again, we’ll show you how to quickly unblock someone. By unblocking a contact or phone number from reaching your iPhone, iPad, or iPod touch, their attempts to contact you through phone calls, FaceTime, and messages will be resume again as normal.
We’re going to focus on the iPhone here since most users who are blocking numbers and people are likely doing so from an iPhone, though if you happen to be blocking from another iOS device you’ll find the process is the same.
How to UnBlock a Contact to Allow Calling, Messages, and FaceTime from Them Again in iOS
- Open the “Settings” app on the iPhone then go to “Phone” *
- Scroll down and tap on “Blocked” to see the current list of contacts blocked from reaching you
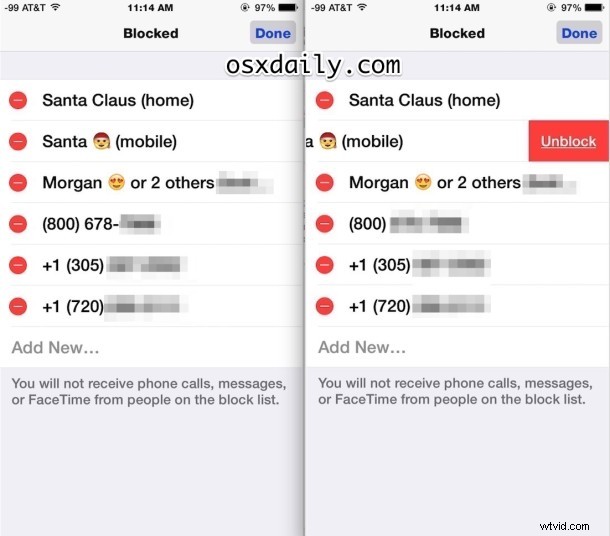
- Tap on the “Edit” button in the corner, then tap on the red (-) minus button alongside a contact name
- Confirm you wish to allow that person to reach you again by tapping on the big red “Unblock” button alongside the contact name
- Repeat for other contacts you wish to unblock as desired, then tap on “Done” to finish
- Exit out of Settings as usual, the contact or person can now reach your iPhone again through FaceTime, phone calls, and messages
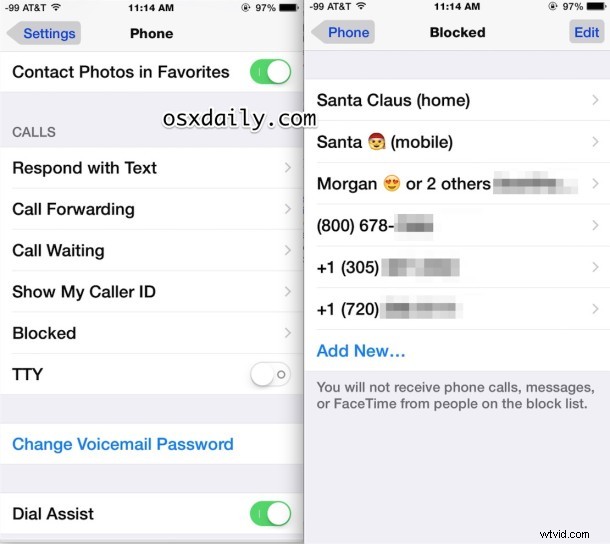
* Note on an iPad, iPod touch, or iPhone, you can find the same block list in the Messages settings and FaceTime settings, and unblocking a contact from those is identical
In the example screen shots, you’ll see ‘Santa mobile’ being unblocked (who really wants to block Santa anyway? It’s Santa, come on!), which would allow The Claus to be able to reach you again.
You can also just temporarily unblock a number or contact using this trick if you need to communicate with that person or thing, and then immediately block the number again if you want your peace and quiet returned. That’s a particularly helpful strategy for handling nuisance solicitations and sales calls, or if you’re trying to ask to be removed from a call list.
You can also unblock a person by selecting their contact information in the phone app list, and then choosing the “Unblock” option that way, though that’s really only useful for recently blocked people since if they have been blocked for a long time the calls will not show in the iPhone call list.
If you have any other tips or tricks about unblocking phone numbers, contacts, and callers on the iPhone or iOS, share with us in the comments below!