The iPhone Camera defaults to opening to Photo so that you can take pictures with the iPhone camera quickly. A new feature available in iOS lets you set the default camera mode to another option however, meaning you can default to opening the camera to Video, Square, Slow-Motion, Time-Lapse, Portrait, Panorama, or the standard Photo option.
You will need iOS 10.2 or later installed on the iPhone or iPad to have the preserve camera settings feature, which allows you to adjust the default camera mode. If you haven’t updated your device yet, do that to find this function.
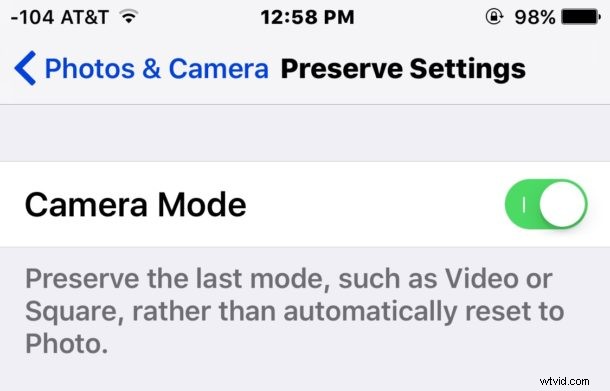
Set Default Camera Mode to Launch in iOS
- Open the “Settings” app and go to “Photos & Camera”
- Tap on “Preserve Settings”
- Toggle the switch next to “Camera Mode” to the ON position
- Open the Camera app on iPhone or iPad and choose the camera mode you want to use: video, square, slow-mo, time-lapse, pano, portrait, photos
Whatever the last used camera mode is will now stick to become the default when the camera is opened again. For example, if you used Photo last, opening Camera would default to opening Photo mode, but if you used Video last then the Video Recorder would be the default camera mode upon launching camera app.
This tip should be appreciated by those who use their iPhone camera predominately in one camera mode over another, whether it’s to shoot video or those who prefer the square format or whatever else.
Unfortunately, the default camera mode feature setting has no impact on HDR, which still turns itself off after it has been enabled regardless of how many times you turn it back on again. Long ago iOS used to preserve the HDR setting, but that feature was removed and the Camera app no longer preserves the HDR setting even with this settings adjustment enabled. Thus if you want to use HDR Photo mode often, you’ll still be toggling that setting repeatedly.