Videos often carry a lot of information in them and an average viewer can only grasp a tiny portion of all the information contained in a video. Video content creators must make sure that the details that are important are emphasized and clearly visible. One of the most effective ways to do this is to apply Pan and Zoom effect to your videos and direct the viewer's attention to the information that is crucial to the story of your video.
If you are creating online tutorials or running a vlog, this effect will be beneficial to you in many ways. In this article, we will show you how to add Pan and Zoom effect in Movavi video editor.
How to Pan and Zoom Videos in Movavi Video Editor
After you launched Movavi in 'Full Feature' mode and imported video files by clicking on the 'Add Media Files' button, you will see that your files are located on the 'Video Track'.
1.Applying the Zoom Effect
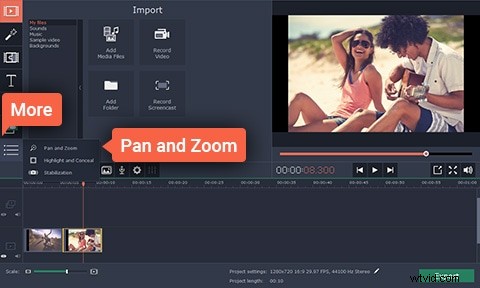
The 'More' option is located on the left side of the video editor's screen, click on it and then click on the Pan and Zoom option. From the menu that emerges select the Zoom feature and click on the 'Add' button if you wish to apply the effect. You can select the area of the shot to which the effect will be applied by modifying the orange frame on the preview window.
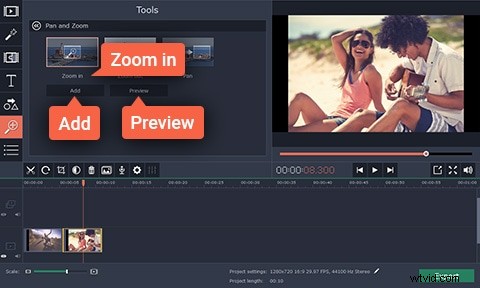
Once you've added the effect, an arrow that represents keyframes will appear on your video on the timeline. You can adjust the duration of the Pan and Zoom effect by simply dragging the arrow left or right or change the location of the effect by moving the arrow. If you would like to edit a keyframe further, right-click on a keyframe and select the 'Edit Keyframe' option. You can apply Pan and Zoom effect as many times as you want to any section of your video, just make sure that the effect is applied correctly.
2.Save and Export your video
Now that you successfully applied the Pan and Zoom effect you can save and export your video. In order to do this, just click on the Export, button, select the output format and the destination folder and click Start.
An easier way to create Pan and Zoom videos
Movavi may be a great choice for less experienced video makers, but applying the Pan and Zoom effect in this video editing software is far from easy. Wondershare's Filmora provides an alternative to video content creators who are looking for an easy way to create Pan and Zoom effect.
All you need to do is place your video on Filmora's timeline, right-click on the file and select the 'Crop and Zoom' option. Afterwards, you should select the Pan and Zoom feature, and this action will cause the keyframes to appear on the video. Adjust the Start and End frames and click OK to save the changes you made.