Audio clipping is an occurrence where your audio input is too high for an amplifier to output and the excess in signal causes a distortion. Clipping is often triggered due to too high gain settings, speaking too close or too loud into the microphone and increasing volume too high when editing.
When editing you can’t indefinitely add more volume to your audio recording as that will cause clipping. However, there is a way to make your overall audio recording sound louder without clipping audio by using a compressor.
Using a compressor you compress your audio recording making quieter parts louder and louder parts quieter. Essentially, compressor makes the whole recording’s volume more even.


Look at before and after pictures of the waveform in Audacity. I’ve checked ‘Make-up gain for 0 dB after compressing’ button which makes-up up for the loss in volume at the peaks, this option allows to maintain the same high volume at the louder parts of your audio while increasing the volume of quieter parts in your recording.
Using a compressor we can’t make the loudest parts of audio louder, but we can increase the volume of the quiet parts, which makes the overall audio recording louder.
The increase in overall volume can be measured by checking dB RMS which stands for ‘Root mean square’. It shows us the average volume of the recording.
In the example I’ve shown above, the RMS level went from -19.4dB before compression to -16.1dB after compression, which has made the whole audio recording 17% louder.
So here’s a step-by-step guide on how to increase audio volume without clipping audio in Audacity:
- Select your audio and go to Effect>Amplify
- Set the ‘new peak amplitude (db)’ to 0

- Go to Effect>Compressor.
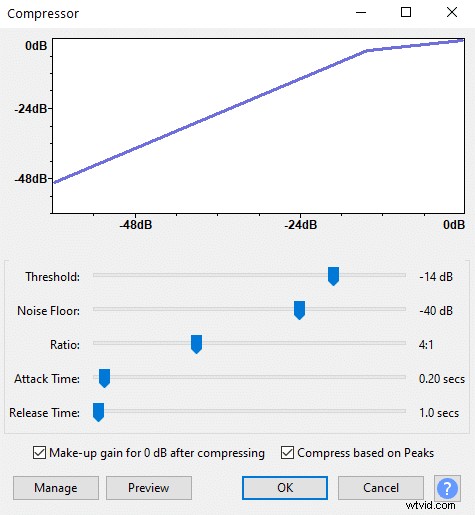
- Set your ratio up to 4:1. The higher the ratio, the more compression will be applied and the louder your recording will become.
- Set your threshold anywhere between -15 to -6, the lower the threshold the more compressed and louder your audio will become.
- Leave the rest of the settings as default.
- Click ok.
In any compressor threshold and ratio are the two most important settings that will determine how compressed your audio becomes.
The higher the ratio and the lower the threshold the more compressed and the louder your audio will become. However, with compression you lose the dynamics of your audio, therefore overly compressing the recording might make it sound dull.
Also, keep in mind that the threshold is valued in negative units, therefore, for example, -15dB is a lower threshold than -10dB.