Monophonic sound is a single-channel sound produced when all instruments are mixed into one signal. The listener experiences these sounds as emanating from a single position. In contrast, stereophonic sounds are two different audio signals in two separate speakers, creating a 3D listening experience.
Stereo sound has revolutionized overall listening quality by providing a more immersive, engaging experience. With its realistic and enjoyable sound, stereo sound has replaced flat, unidimensional mono audio. This article will cover how to convert mono to stereo using the prominent ways available.
In this article
- Offline Solutions: Converting Mono to Stereo Easily
- Online Solutions: Converting Mono to Stereo Quickly
- Quick Bonus Recommendation. Wondershare Filmora and Audio Editing at Its Finest
Part 1. Offline Solutions: Converting Mono to Stereo Easily
Whether it is a song or a movie, the invention of stereophonic sounds has set the bar high for experiencing audio. This type of sound lets you hear every frequency and nuance in the audio, making it more realistic. A good tool will convert mono to stereo sound by duplicating your sound and widening the original sound. The following are two of the tools that change mono to stereo with proficient results:
1. Audacity
This advanced audio editing tool is widely used to convert mono to stereo. Audacity is a versatile tool compatible with macOS, Windows, and Linux and supports multiple audio formats. This tool is multipurpose, where it has a Noise Suppression feature that cancels any background noise in your audio. Audacity can also be used for Music Separation, which splits your audio into its vocal and instrumental parts.
Step-By-Step Guide To Convert Mono to Stereo Using Audacity
Using Audacity, you can turn mono into stereo by learning how to generate stereo sound using these steps:
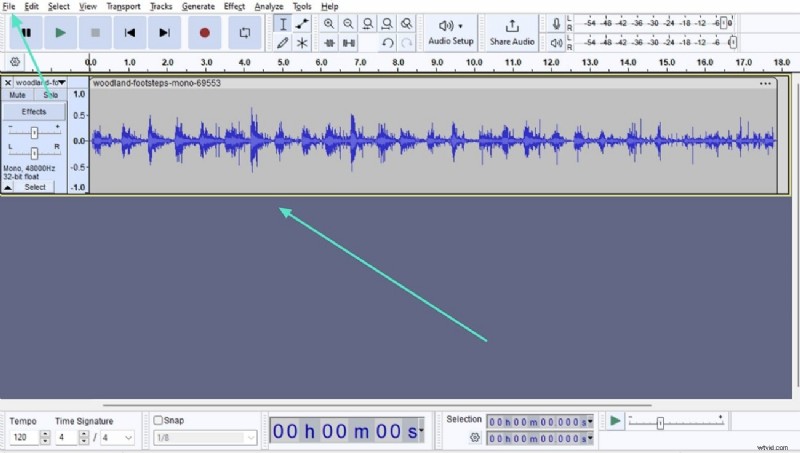
- Step 1. First, open the Audacity software, and a window will open in front of you. Here, go to “File,” click "Open," and select your desired mono audio from your device. The audio will appear in waveform on the timeline.
- Step 2. Double-click the file on your timeline and click the small arrow next to the file name on your timeline. Here, click "Split Stereo Track," and your audio will be split into two. Now, double-click your audio in the timeline and go to "Edit," and click "Duplicate."
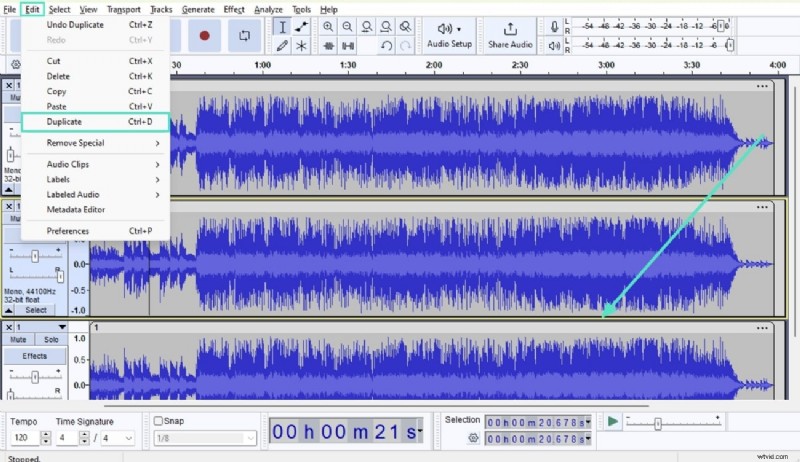
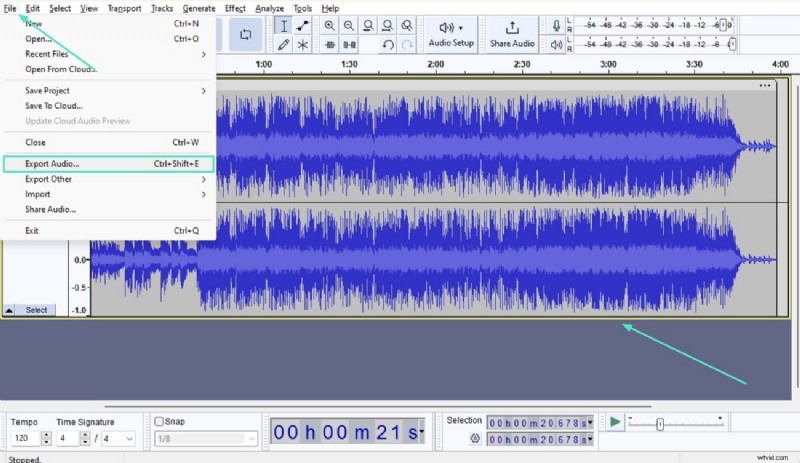
- Step 3. After this, you will have two mono tracks on your timeline. Now, click the small arrow next to the title of your upper track and from the menu, click “Make Stereo Track.” This track has been converted to stereo, which you can download by clicking “File,” followed by “Export Audio.”
2. Adobe Premiere Pro
Adobe Premiere Pro is an audio and video editing software that is utilized to change mono to stereo. Using this tool, you can enhance your audio quality or can instantly create your own remix using AI. In addition to that, it allows for canceling the background noise and adding clarity to your original audio. Overall, Adobe Premiere Pro can be utilized for managing videos as well as complete audio and its quality.
Step-By-Step Guide To Convert Mono to Stereo Using Premiere Pro
Stereophonic sounds are an indication of high-quality audio that provides an immersive experience. Follow the steps below to learn how you can convert mono to stereo using the Adobe Premiere Pro:
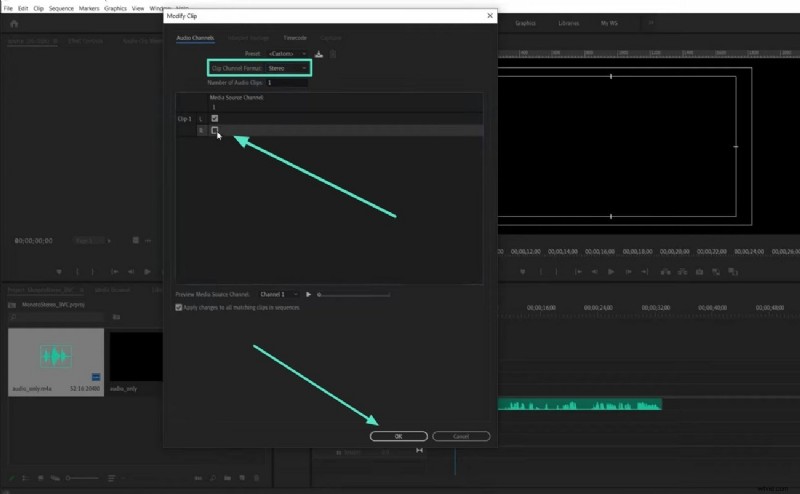
- Step 1. On starting Adobe Premiere Pro, import the respective mono audio file into the platform. After importing it successfully, right-click to select the “Audio Channels…” option on extending the “Modify” option in the drop-down menu.
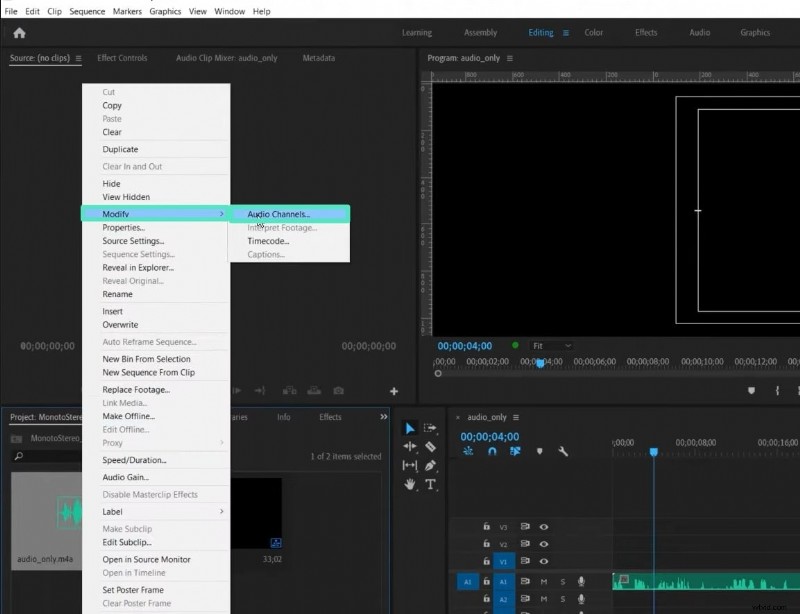
- Step 2. This will open a new window on the screen, where you need to change the “Clip Channel Format” from “Mono” to “Stereo.” Furthermore, you need to enable the second channel that appear in the “Media Source Channel” tab. Following this, click “OK” and confirm the process by tapping “Yes.” Once done, you can add this audio into the timeline and view two different channels.
Part 2. Online Solutions: Converting Mono to Stereo Quickly
In this digital era, audio quality is an essential aspect of a video to draw the viewer's attention. Therefore, audio editors rely on software to convert mono to stereo to offer an impression of the sound coming from different directions and also offer better audio quality. So, if you wish to improve the audio quality of your media, scroll down to learn about two top online mono-to-stereo software.
1. Online Convert
Online Convert offers an intuitive interface to convert mono to stereo in a few basic steps. This versatile tool supports the conversion of more than 50 audio formats. You just need to select the target format of your stereo audio file, and it will do the rest. Once the file is converted, it will be automatically downloaded to your device. Follow this simple guideline to convert mono to stereo with this tool:
- Step 1. Open the main interface of the Online Convert website and click on the “Audio Converter” feature. Then, select the target format of your stereo video file.

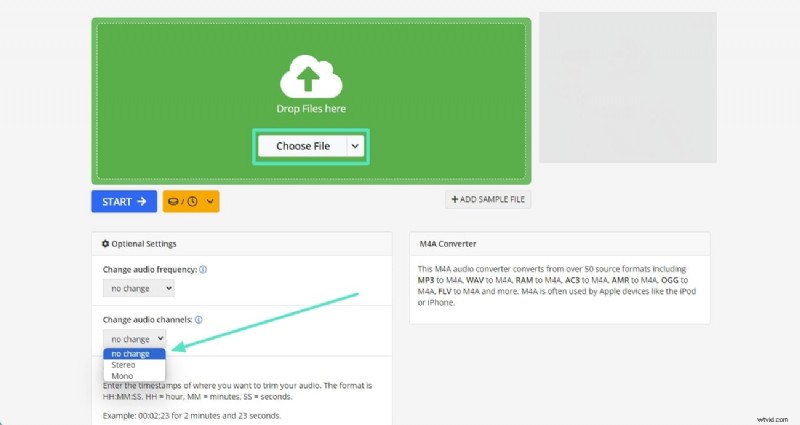
- Step 2. As the music converter window opens, click the “Choose File” button to add the mono audio file. Tap on the downward arrow of “Change audio channels” option and select “Stereo.” You can choose your desired parameters from the optional settings panel like audio quality, frequency, or loudness.
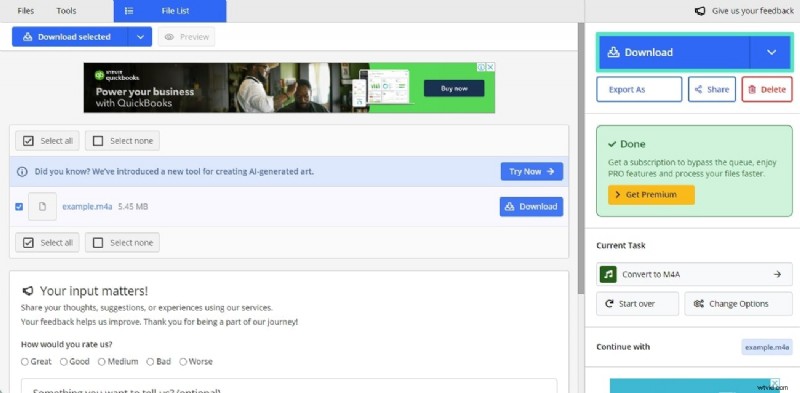
- Step 3. Press the "Start" button from the bottom of the settings panel to begin the conversion of mono to stereo. As a new window appears, click the "Download" button from that window to download the stereo audio to your device.
2. Free Online Converter
When talking about the top online mono to stereo converters, Free Online Converter is worth your attention. With this powerful application, you can also customize the format of your videos and resize the output files. Moreover, users can improve the quality of their audio files by choosing their preferred audio quality. Let's look into the step-by-step guidelines for using Free Online Converter to turn mono into stereo:
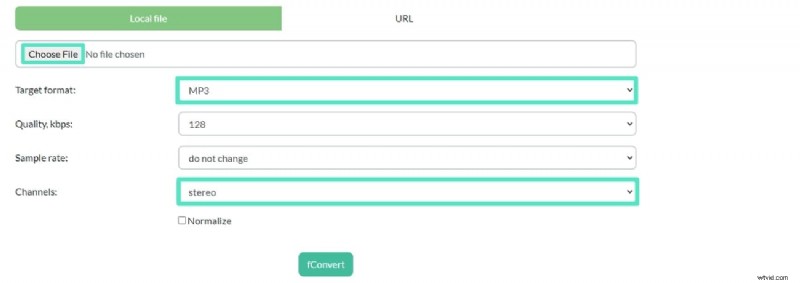
- Step 1. Open the main interface of Free Online Converter and click on the "Audio" option. As the “Online Audio Converter” window opens, click on the "Choose File" button, and select the mono audio file from your device. From the "Target format" option, select the target audio format of your stereo file and choose “Stereo” across the “Channels” option.
- Step 2. To start the conversion, click on the "fConvert" button. After a successful conversion, your stereo audio file will be displayed in the "Conversion Results" section. To download your file, click on the file name, and your stereo audio will be saved to your device.

Quick Bonus Recommendation. Wondershare Filmora and Audio Editing at Its Finest
Converting mono to stereo doesn't automatically make your audio sound professionally edited. While it creates a wider sound, it doesn't provide the depth and dimension of true stereo recordings. However, you might need a robust audio editing tool to manipulate the audio for a richer and wider stereo effect. Wondershare Filmora is an AI-based video editor that empowers users to edit videos and audio to create stunning videos.
With Filmora, it’s exceptionally easy to edit the audio tracks of the videos. You just need to import your video files, edit its audio track which will automatically save the video with modified audio track. Filmora is a fully featured rich application with its in-built audio editing features to mute the audio, add voice overs or add new soundtracks to the videos.
Striking Features of Wondershare Filmora To Upgrade Video Quality
To enrich your overall video quality, Filmora provides users with multiple videos and audio editing functionalities. Explore some of its remarkable features to generate studio-quality videos:
Top Features of Wondershare Filmora:
1. Silence Detection
2. AI Audio Denoise
3. AI Audio Stretch
4. Color Correction
1. Silence Detection
If you have a video with long, annoying pauses, Filmora's Silence Detection feature comes in handy. Its AI intelligently analyzes the audio in your videos, detects the silent parts, and trims them automatically. This helps you save time and effort as you don't need to manually locate the silent parts and trim them one by one.
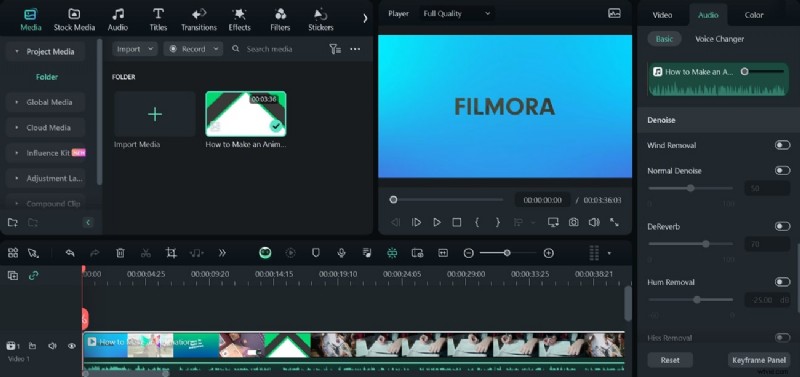
2. AI Audio Denoise
Removing unwanted noises from videos is essential, but finding and editing each part can be tiresome. Filmora’s AI Audio Denoise comes with 3 noise reduction options, including AI Voice Enhancement, Reverb Reduction, and Hiss Reduction. It helps in eliminating different noises completely and boost audio quality.
3. AI Audio Stretch
AI-powered AI Audio Stretch feature in Filmora allows users to stretch the audio tracks to fit the duration of the video. With this feature, users can retime audio tracks for any video, ranging from YouTube videos to movie clips. This tool also provides engaging remix versions of your audio tracks that perfectly suit your videos without any quality loss.

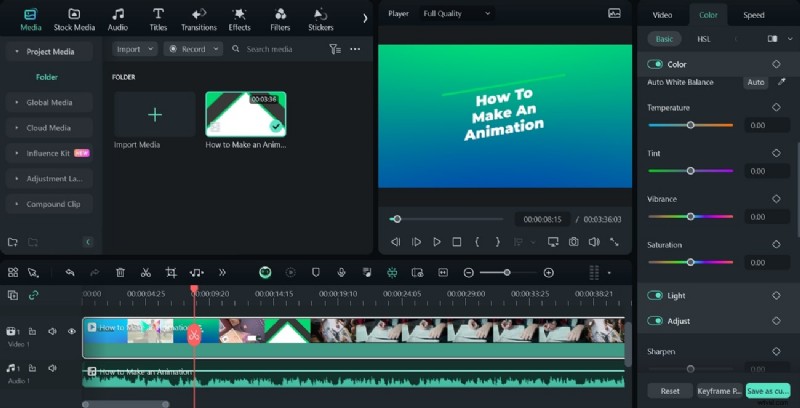
4. Color Correction
The feasible Color Correction feature is a blessing for novices with no previous color grading experience. With Filmora, video editors can work with their preferred color palettes. It includes color presets with over 40 color schemes that can be used for the videos simply with a drag-and-drop option. For creative color grading, you can also use 3D LUT filters within Filmora.
Steps To Boost Audio Quality With Wondershare Filmora
Filmora provides users with endless AI-powered audio and video editing features to upgrade their video quality. Follow the simple guideline below to create studio quality videos with Filmora:
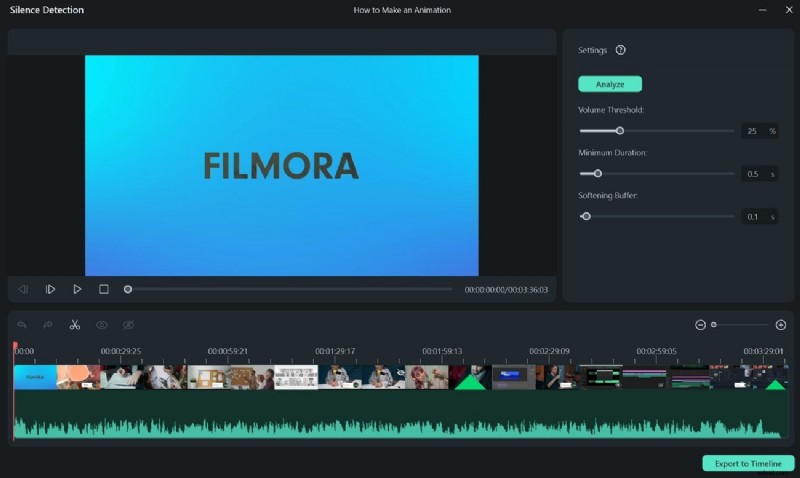
- Step 1. Import Video to Filmora and Find Silence Detection
Launch the latest version of Wondershare Filmora on your device and click on the "Silence Detection" feature from the main interface. Import your video to Filmora, and the "Silence Detection” editing window will appear.

- Step 2. Apply Silence Detection Feature to Video
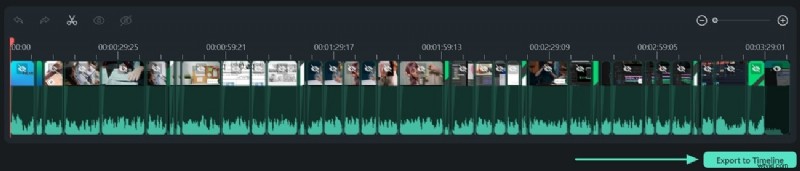
With a new window opened, you can adjust "Volume Threshold", "Minimum Duration," or "Softening Buffer," parameters according to your preference using the sliders. Click the "Analyze" tab to initiate the silence detection process.
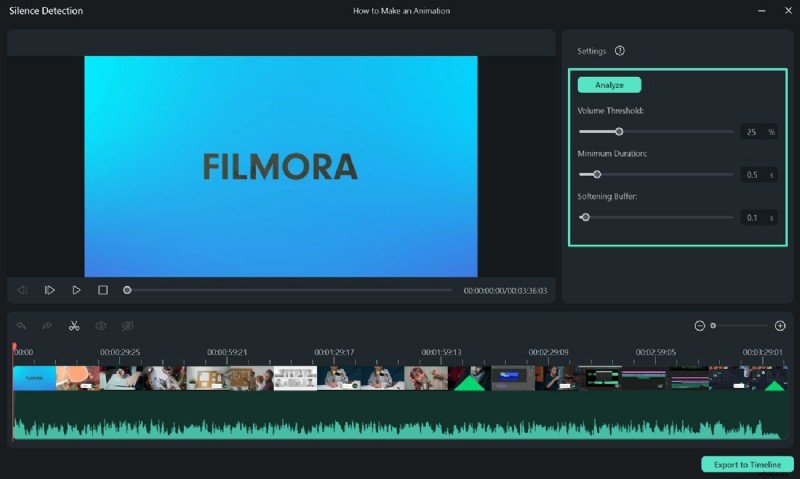
After that, click on the "Export to Timeline" button to bring the video to the timeline. The black parts show silent sections of the video, while the highlighted parts show the audible parts.
- Step 3. Apply Audio Mixer Feature
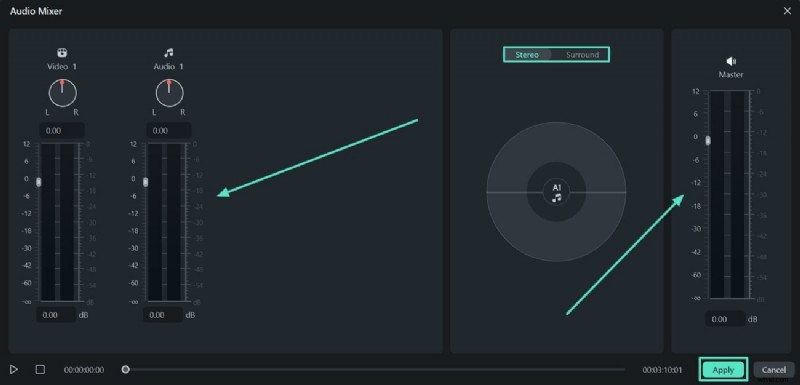
Click on the “Audio Mixer” icon in the toolbar to access the panel. You can adjust the volume of each audio track in your videos through sliders. Drag the "Pan/Balance Control" knob to adjust the position of the audio of a track.
Also, select your preferred panning mode from the two-mode options, "Stereo" and "Surround Mode." You can also adjust the overall volume of the video with the "Master Volume" slider. After selecting your adjustment, hit the "Apply" button to save the settings.
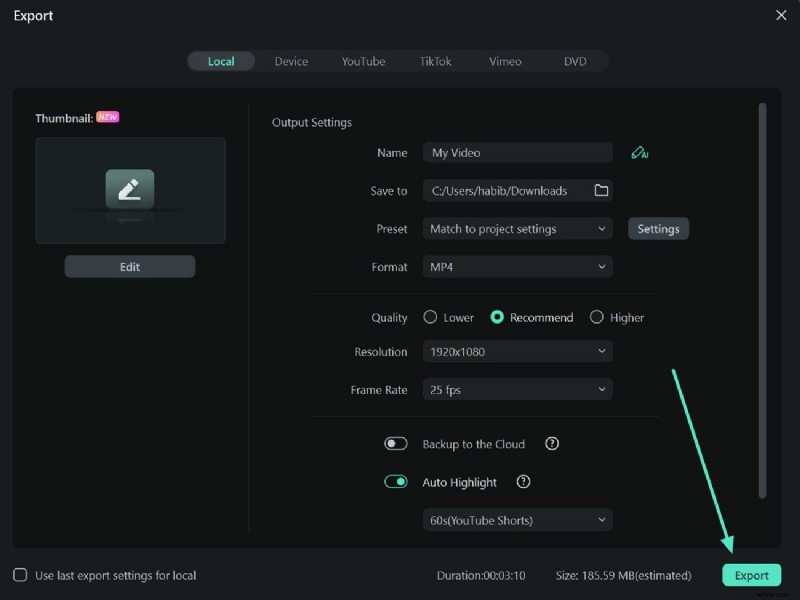
- Step 4. Export the Video After Completion
Click on the "Export" button in the total right corner of the interface. After the export window appears, customize the settings according to your choice and again tap on the “Export” button to save media to your device.
Conclusion
This article has presented a detailed guide on monophonic and stereophonic sounds. You learned how to convert mono to stereo using Audacity and Adobe Premiere Pro. Although there are lots of tools you can use to generate a stereo sound, Wondershare Filmora is the best option. It instantly converts your track to stereo, giving you an immersive, engaging listening experience.