Published on November 2, 2025
Adobe Premiere Pro Tutorials, Graphics Animations
Basic 3D Premiere Pro, logo animation tutorial, Premiere Pro logo animation, Premiere pro tutorial, Transform effect Premiere Pro
In this Premiere Pro tutorial I walk you through creating a smooth Windows-inspired logo animation using only built-in tools like the Transform effect, Basic 3D, nesting, and velocity curves for silky motion. I show how to build the four-square logo from rectangles, align everything with safe margins and guides, offset clips for a staggered pop, add motion blur by setting the shutter angle to 180°, and flip the nested group into a Premiere-style icon.
If you need the latest Premiere Pro version while following along, check the Adobe Premiere Pro official page for updates and system requirements.
1. What you need before you start
Before jumping into the timeline, make sure you have a basic Premiere Pro project set up with a sequence matching your intended export frame rate and resolution. A higher frame rate (like 60fps) gives you more room for smooth interpolation, but the steps work perfectly at 24 or 30fps as well.
Also prepare any assets you want to swap into the end result, like a custom logo or a PR placeholder card, and install any optional plugins if desired. I recommend keeping your workspace tidy and saving a project version before big changes so you can revert quickly if needed.
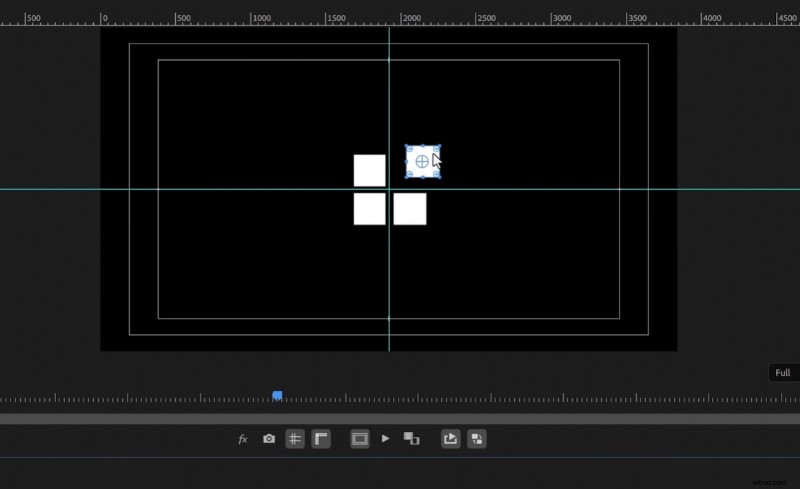 Adobe Premiere Pro interface showing four white squares arranged like a window logo with guides for alignment.
2. Step 1 – Create the four squares (Windows logo)
Start by selecting the Rectangle tool from the toolbar; if you don’t see it, click and hold the shape tool and choose Rectangle. Click and drag on the Program Monitor while holding Shift to make a perfect square, then set its fill to white in the Properties panel to match the style in this tutorial.
Duplicate the square by holding Alt and dragging, then position the copies to form the four-window layout. Use safe margins and rulers, drag guides from the top and left rulers to the center lines, and snap your squares so the center of the window is precisely aligned for clean animation pivots.
Quick alignment tips
Enable the safe margins and rulers to pull center guides from both axes, then disable them once your grid is placed to declutter the view. Aligning the shapes to the exact center ensures the subsequent rotations and 3D flips look symmetric and professional.
If anything feels off, nudge layers with the arrow keys or use Alt + arrow for finer offsets. Small alignment errors become very noticeable during 3D transforms, so take the extra minute to verify placement now.
3. Step 2 – Create the pop / zoom animation with Transform
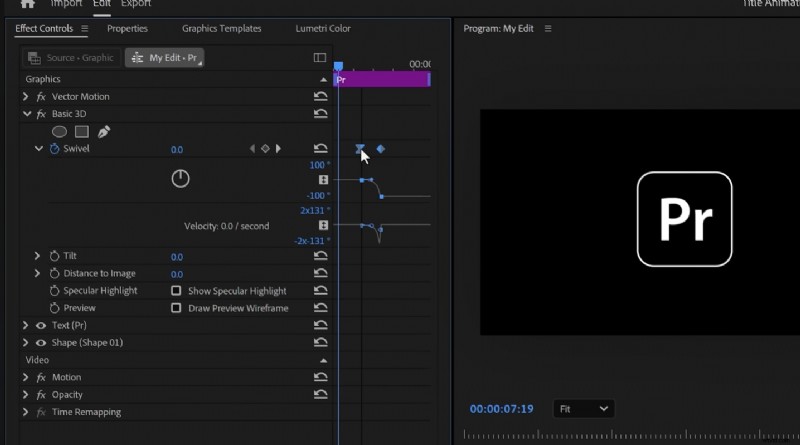 Adobe Premiere Pro interface showing keyframes and animation curves for a logo animation tutorial.
To create a popping zoom effect, offset each square by four frames so they animate in sequence and feel tactile. You can nudge clips on the timeline by holding Alt and pressing the right arrow key to shift them exactly four frames; this creates that staggered, organic appearance.
Apply the Transform effect to the first square, then in Effect Controls add a Scale keyframe near the start. Move roughly 15 frames forward and double the Scale value to create a clear pop-in; expand the velocity curve and ease the second keyframe to give a smooth acceleration into the popped state.
Copying the animation to other squares
Instead of redoing the animation for each square, copy the Transform effect and paste it onto the other shape clips. If you prefer simultaneous zooms, simply move the pasted Scale keyframes back to align with the first clip so they all reach full scale at the same moment.
Don’t forget to set the shutter angle to 180° inside the Transform effect to enable natural motion blur.
This small step dramatically improves perceived smoothness and makes the pop feel more cinematic.
4. Step 3 – Nest and add Basic 3D swivel
Select all your animated squares and choose Nest to combine them into one nested sequence; I usually name it “logo animation” so it’s easy to find in the timeline. Nesting lets you animate the group as a single object and apply 3D transforms cleanly on top of your per-square animations.
Apply the Basic 3D effect to the nested clip and set a Swivel keyframe right after your zoom finishes.
Move six frames forward and set the swivel to -90 to make the group rotate away; expand the velocity curves and pull the incoming handle to ease the motion for a smooth flip.
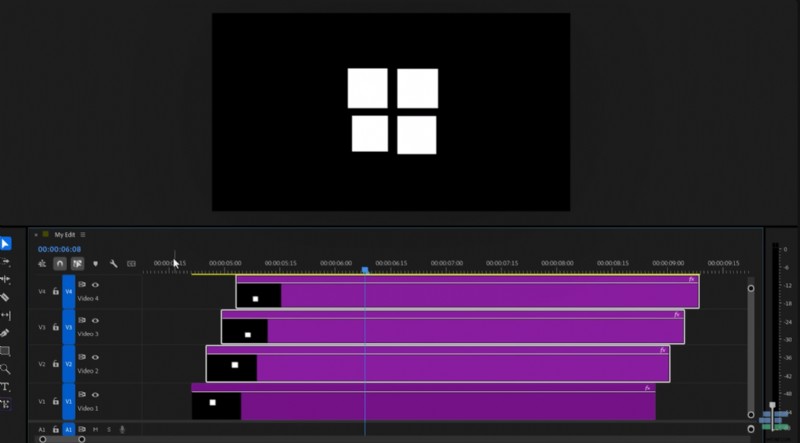 The image shows Adobe Premiere Pro with a timeline featuring four purple video tracks and a preview of a Windows-inspired logo animation in the program monitor.
Why nesting helps
Nesting preserves each square’s individual animation while allowing global transforms to act on the combined shape. This approach prevents keyframe conflicts and keeps your timeline organized, especially if you want to swap in more complex content later.
You can always double-click the nested clip to tweak the inner animations, then return to the parent timeline to adjust the group-level 3D flip. It’s a flexible non-destructive workflow that I rely on in most logo builds.
5. Step 4 – Create the Premiere icon and swap
To turn the Windows squares into a Premiere icon, build a rounded rectangle and type a bold “PR” on top, scaling it to match the nested group’s final size. Keep the typography solid and centered so the swap during the flip feels deliberate and readable.
Copy the Basic 3D keyframes from your nested sequence and paste them onto the PR layer.
Move the pasted keyframes to the beginning of the PR clip, then reverse or swap the values so the PR rotates in from the opposite side and lands perfectly where the squares left off.
Keyframe swapping technique
After pasting the 3D keyframes onto your PR layer, drag the last keyframe against the playhead and set the first value to 90 instead of -90. This effectively mirrors the motion so one element rotates out while the other rotates in, creating a clean morph effect between the two visuals.
Use the velocity curve handles again to ease into the final pose and avoid mechanical timing. Fine-tuning these handles is where the animation goes from OK to professional, so be patient and preview frequently.
6. Optional: Add rounded corners with a plugin
If you want the Windows logo to have rounded corners during the scale-up, a plugin like Film Impact gives a quick rounded-corner effect and simple crop controls. Drag the Rounded Corners effect to the nested sequence, then adjust the crop so the logo just fits and increase the corner radius until you have the look you want. Film Impact offers a 30-day trial if you want to experiment before purchasing, and applying the effect only at the zoom peak helps the rounded look read cleanly in the final shot.
I like to enable it only where it matters, keeping earlier frames clean and sharp. For more on Film Impact’s effects and trials, visit the official Film Impact download page to test rounded corner plugins on your nested sequence.
Film Impact official plugins
7. Step 5 – Make the logo disappear with paired tilts
To vanish the logo elegantly, apply two Basic 3D effects: one targeted at the text layer and one at the shape layer, each constrained to their respective groups. Use the Properties panel to create folders so each Basic 3D effect affects only its intended layer, keeping the motion isolated and predictable.
Set a Tilt keyframe on both groups near the hold frame, then move forward and set one tilt to -90 and the other to 90.
This causes the halves to rotate in opposite directions, splitting the logo and letting the pieces fall out of view while maintaining visual continuity.
Smoothing the hide animation
Expand the velocity curves for the Tilt keyframes and pull the incoming handle to ease the start of the rotation, which avoids abrupt stops. Subtle motion curve adjustments are essential for that polished, studio-level finish.
When you preview the whole sequence, ensure the timing between the flip into PR and the split-tilt hide is balanced so the viewer can read the logo before it departs.
Small timing tweaks can make a huge difference in audience perception.
8. Polish, tips, and performance
Always scrub and render previews at full resolution when tweaking motion blur, since real-time playback can be misleading with GPU-heavy effects. If playback drops, lower playback resolution to get the timing right and then render a high-quality preview to inspect motion blur and aliasing.
Keep a neutral background layer to check silhouettes and contrast, and export small test clips to verify the shutter angle and velocity curve choices translate outside of the Premiere UI. These checks protect you from surprises during final export or client review.
Actionable checklist before export
This section covers key information relevant to the topic. Understanding these concepts will provide a solid foundation for what follows. Let’s explore the details that make this topic important. The principles discussed here apply to many different scenarios and applications.
- Confirm squares are centered using rulers and guides.
- Set Transform shutter angle to 180° for motion blur.
- Nest animated layers and apply Basic 3D to the nest.
- Copy and swap keyframes for the incoming logo.
- Eased velocity curves on all primary keyframes.
9. Using stock footage and audio (sponsor workflow)
When producing many videos, I frequently use a stock library integrated with Premiere to speed editing and find high-quality clips without leaving the app. One great option is Storyblocks, which offers unlimited downloads and a plugin that lets you grab footage, templates, and audio directly in Premiere for a predictable subscription cost.
If you want to try unlimited stock media downloads and a Premiere Pro plugin workflow, check out the Storyblocks Premiere basics landing page for current plans and trial options.
Their curated collections of artist-created footage are especially useful when you want authentic-looking B-roll and sound that complements your logo animation.
10. Final render and export settings
For motion-heavy logo animations, export using H.264 with a higher bitrate to preserve clarity during motion blur. Choose a high-profile preset, set VBR 2-pass, and bump the target bitrate to keep crisp edges on text and shapes during fast movement.
If you need an alpha channel or intend to composite this animation elsewhere, export using a ProRes codec with alpha or QuickTime Animation depending on your delivery requirements. Test a short segment first to confirm transparency and color integrity.
11. Recap and creative variations
To recap, you built the windows squares, animated a pop with Transform, nested the group, added a swivel with Basic 3D, swapped in a PR icon, optionally applied rounded corners with a plugin, and finally animated a dual-tilt hide. Each step is modular, so you can replace the PR card with any logo or even a short video plate.
Try creative variations like changing timing offsets, using scale with rotation for a bouncier feel, or replacing motion blur with directional blur for stylized motion.
Small changes to easing and timing are what let you craft a unique brand animation from this basic workflow. Thanks for following along – if you want to explore more logo animation techniques, I made a lesson on a GTA-style title animation that builds on these same principles. And if you want to test rounded corner effects with a free trial, head to Film Impact to download their plugin and experiment with the look on your nested sequence.
Start Storyblocks Premiere basics If you enjoyed this tutorial and want the exact plugin I used for rounded corners, try Film Impact’s trial and see how it complements the Basic 3D workflow during scale-up and final export.