Published on October 29, 2025
Adobe Premiere Pro Tutorials, Audio Effects
beat syncing, EQ tips, music editing, Premiere Pro audio, Video editing
Summary: In this video I walk you through five essential audio editing tricks that make your edits feel professional fast.
You’ll learn how to cut a song to the last beat for seamless endings, use low-pass EQ to recreate muffled outdoor or club ambiance, leverage AI-powered music searches to find unique tracks, map markers and use Premiere Pro’s Automate to Sequence to edit on the beat, and apply EQ techniques to keep dialogue clear. These tips focus on audio editing, beat syncing, EQ adjustments and music selection to boost production value in Premiere Pro and improve overall sound design.
If you want to follow along in Premiere Pro, check out the official Adobe Premiere Pro product page for feature details and system recommendations.
1. Why audio editing matters more than you think
People often focus on visual polish like color grading and lens choice, but audio editing is the glue that makes a video feel finished. A mismatch between cuts, music and speech can make even great footage feel amateurish.
Invest a little time in audio and you’ll see an immediate bump in perceived production value.
Good audio editing does three main things: it supports the emotional rhythm of the scene, keeps dialogue intelligible, and avoids jarring transitions. In this article I’ll share practical steps you can apply right away in Premiere Pro to hit those goals.
Each trick below is actionable and replicable for both short-form and long-form projects.
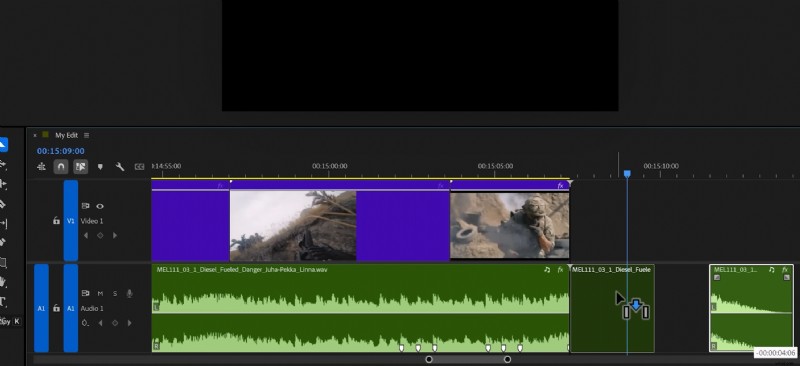 A video editing timeline showing two video clips on a purple background and an audio track with visible waveforms, illustrating precise editing techniques discussed in the article.
Trick 1 – Cut to the last musical beat for smooth endings
A common mistake is trimming a song to match the length of the footage and letting it fade out. Instead, find the last strong beat in the track – usually right before the natural fade – and add a cut just before that beat hits.
This gives you a clean musical anchor to align your cut against, which keeps the ending feeling intentional rather than forced. Once you slice out the excess, snap the trimmed audio to the last beat or marker in the timeline.
Don’t simply crossfade arbitrarily; you need to match the transient of that last beat to another beat in the song so the rhythm feels continuous. If you add markers (tap M while playing), you can visually match beats and make the edit unnoticeable to viewers.
Practical steps for trick 1
First, play through the song near the end and listen for the last punchy hit or transient – that’s your target beat. Add a cut just before that hit and delete everything after it, leaving you with a clean end point. Then match that end point to a similar beat earlier in the track or a beat marker so the loop or ending feels musical.
Finally, apply a very short crossfade only if there is a small spectral mismatch, but avoid long fades that betray the edit. This method works especially well for montages and vlogs where music should punctuate your visuals.
Practice on different genres; punchy electronic tracks behave differently than acoustic ballads.
Trick 2 – Make music sound distant or muffled using a low-pass EQ
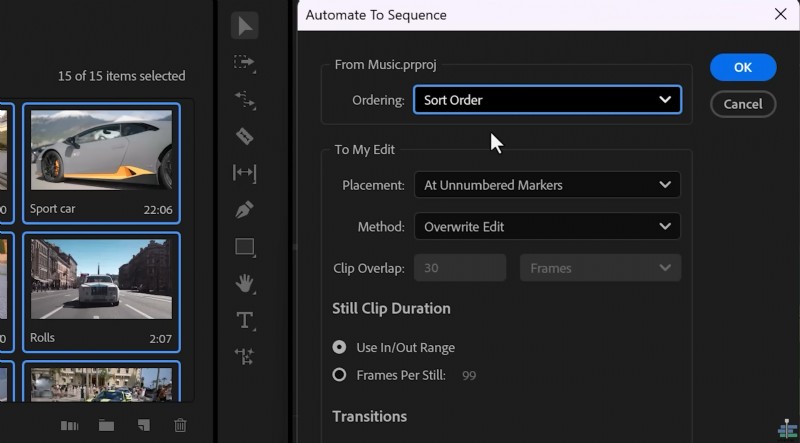 A screenshot of an audio editing interface showing options for automating sequences, relevant to video editing tricks discussed in the article.
When you want music to sound like it’s coming from outside a club or through a wall, the trick is to let through the strong low frequencies and remove the highs. In Premiere Pro use the Parametric Equalizer from the Effects panel and open the editor.
Enable a low-pass band or set a low-pass filter and sweep the cutoff point down until the high frequencies are tamed and the track sounds appropriately muffled.
Think about how bass travels better through walls than high frequencies do; replicate that by rolling off highs and slightly boosting low-mids if needed. This keeps the low energy of the music present without masking dialogue or ambient detail.
Use automation to adjust the effect dynamically if the scene moves from outside to inside.
Step-by-step: low-pass EQ settings
Drag the Parametric Equalizer onto your music clip and click Edit to open the filter graph. Enable the low-pass band and start with a cutoff around 3-4 kHz, then lower it until the song sounds muffled but still musical.
Increase the filter’s slope or resonance modestly to tighten the effect without creating obvious filtering artifacts. Adjust the filter amount and mix to taste; you can reduce the filter intensity when action or dialogue needs more clarity.
For realism, add a subtle reverb or room tone so the music feels like it’s passing through a real environment. Always A/B test with the original to ensure you’re improving, not degrading, the listening experience.
Trick 3 – Find unique music with AI-powered search tools
One of the biggest pitfalls is using the same 20% of music everyone else does – your edit will blend into a sea of similar-sounding videos. AI-driven music services let you search by mood, scene description or even upload reference tracks so the algorithm returns similar but less-used songs.
In the video I used a sponsor named Melody, which lets you paste YouTube or Spotify links and get copyright-free alternatives that match the vibe.
Searching by mood (for example, “walking through a rainy forest”) surfaces tracks that match atmosphere rather than genre keywords.
You can also build playlists per project inside these libraries, which saves tons of time when you’re managing multiple edits. If you want variety and fewer copyright hassles, learning a good music-search workflow is essential.
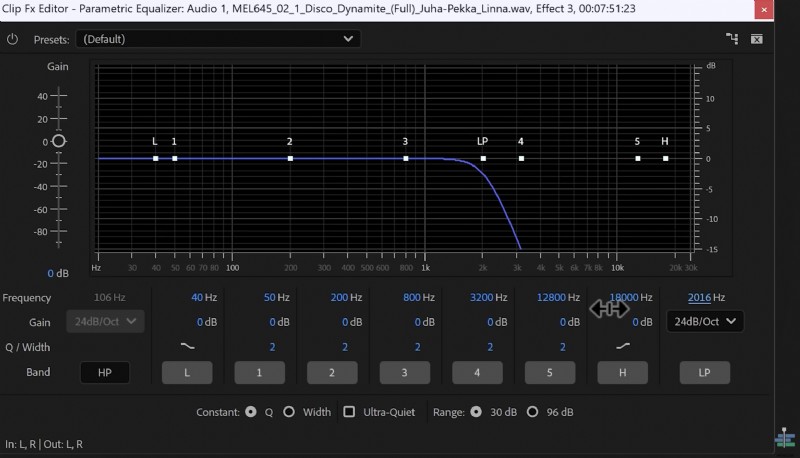 Screenshot of a parametric equalizer interface showing frequency adjustments, illustrating the audio editing technique discussed in the article.
How to integrate music discovery into your workflow
Start by creating a playlist per project with several mood options: intro, emotional, action, and outro. Use reference-track search to find close matches and then click the similar button or download stems if the library supports stems.
Keep a short list of backups so you can quickly swap tracks without redoing edits. Also, pay attention to track structure: note where verses, choruses and drop points occur so you can align visual cuts to musical transitions. If you use AI search, export example clips or save the track IDs so your team can audition them.
This speeds up client approvals and reduces guesswork during creative review.
Note: I mention Melody as a sponsor in the video, but there are several excellent libraries out there. Explore options and pick the one that matches your budget, licensing needs and search features.
Trick 4 – Edit on the beat using markers and Automate to Sequence
Editing on the beat transforms your cuts from random to rhythmic, and Premiere Pro makes this process straightforward. Play the song in your timeline and tap M on the keyboard to drop markers on every kick and snare.
These markers become the heartbeat of your sequence and serve as snap points for clips you want synced to the music. In the Project panel switch to the large clip view and set In (I) and Out (O) points for each clip you plan to use.
This lets you prepare clips ahead of time so dragging them into the timeline is quick and predictable. With all clips selected, use the Automate to Sequence feature and choose Placement: Markers and Ordering: Sort Order to snap your clips directly onto the marker grid.
Automate to Sequence – detailed checklist
1. Play the track and tap M to map beats across the entire section you’re editing. 2.
In the Project panel set In/Out points on every clip you want to use so they’re ready to be placed. 3. Select the prepared clips in the order you want and open Automate to Sequence. 4. Choose Sort Order and Placement: Markers, then click OK to place clips on each marker automatically.
This workflow is perfect for montage sequences, music videos, and fast-cut travel videos. It reduces micro-adjustment time and helps maintain musical continuity across many cuts. After automating, skim through and nudge a few clips if necessary to match transients exactly.
Trick 5 – Keep dialogue clear by cutting subfrequencies and highs
Even when you lower the music volume, some frequencies can still clash with dialogue making speech hard to understand. The solution is to remove subfrequencies (very low rumble) and reduce some high detail from the music so the human voice cuts through.
Use an equalizer on your music track to enable a high-pass or low-cut band to remove sub-bass content, and also apply a high-shelf reduction to tame bright elements that fight with vocals.
In Premiere Pro drag an EQ onto the music clip, then open its controls and enable the high-pass or low-cut band and the high-shelf or high-cut band. Start with a high-pass around 80-120 Hz to remove sub frequencies and then apply a modest high-shelf reduction above 5-8 kHz to reduce sibilance clash.
Use gentle slopes and small dB reductions rather than extreme cuts to maintain musicality.
Additional techniques to prioritize voice
If dialogue still fights with music, consider sidechain compression or automation: duck the music a few dB during speech using volume keyframes or an audio ducking tool. You can also use spectral editors or multiband compressors to notch out competing frequency bands only where the voice is present.
These methods ensure the voice always remains the focus without killing the energy of the soundtrack. This is an important aspect of the topic that deserves more attention.
Understanding these details will help you master the concepts discussed.
2. Putting it all together: a simple audio-editing checklist
Here’s a concise checklist you can follow for every project to ensure your audio elevates the edit. 1) Map beats and place markers.
2) Prepare In/Out points for clips. 3) Find the last beat for clean endings.
4) Apply EQ treatments for environmental effects and dialogue clarity. 5) Use AI music search to avoid overused library tracks.
Work in passes: do a rough music placement pass, then a beat-sync pass, and finish with EQ/ducking passes for dialogue.
Keep a consistent naming structure and playlist for music assets to speed up future projects. Over time these steps will become second nature and dramatically speed up your edit-to-publish workflow.
3. Final thoughts and resources
Audio editing is one of the highest-leverage skills you can learn as a video editor because it immediately changes how your audience perceives your work. Start with the simple beats-and-markers workflow, then layer in EQ tricks and smarter music searches as you get comfortable. Small, consistent improvements in how you handle music and dialogue lead to a much more professional final product.
For learning more about EQ techniques and practical audio tips, read this guide to using EQ by iZotope which explains filter types and common workflows in depth. If you want a music library with a strong search and playlist system, explore major royalty-free options and pick one that matches your creative needs.
I mentioned Melody in the video as a sponsor because it streamlines finding similar tracks from a single reference.
For other music resources and quick licensing options see a popular library like Artlist music library to compare features and pricing. Thanks for reading – now go open Premiere Pro, drop some markers, and make your next cut feel instantly more professional.
If you want more step-by-step walkthroughs, check out the rest of my videos and try these tricks on a short test project to build confidence quickly.