Published on November 6, 2025
Adobe Premiere Pro Tutorials, Tips and Tricks
After Effects CC Bend It, building effect, Masking, Photoshop Generative Fill, Premiere pro tutorial
In this Premiere Pro tutorial I show you two fast and easy effects you must know: a growing building effect and a bending earthquake effect that combines Premiere Pro and a little After Effects. I’ll walk you through making an empty background using Photoshop generative fill, precise masking and nesting in Premiere, animating with the Transform effect and motion blur, and finishing the bend using CC Bend It in After Effects. I used stock footage from Storyblocks’ curated stock library for my Eiffel Tower clip, so I’ll also explain why choosing the right clip matters for stability and realistic motion.
These steps are actionable, repeatable, and optimized for quick production workflows in Premiere Pro and After Effects.
1. Why this effect works and when to use it
This effect works because it combines three core techniques: masking to isolate subjects, background replacement to remove the original object, and transform-based animation to simulate movement. When you combine precise masks with nested sequences you preserve motion and color information while giving yourself creative control over position, scale, and motion blur.
I recommend this effect for shots without heavy camera movement because static or stabilized clips make the masking and background replacement much simpler. If your footage has handheld motion you can still attempt this, but you should plan for additional tracking or stabilization steps first.
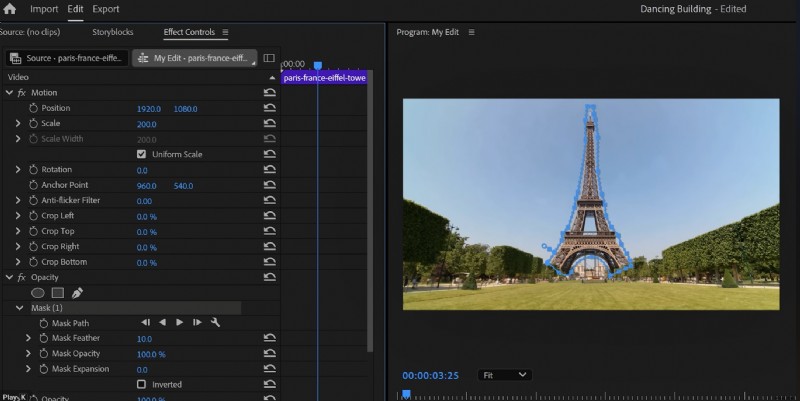 Premiere Pro interface showing the Eiffel Tower with effect controls for position and opacity adjustments, illustrating the growing building effect tutorial.
Preparing the right footage: what to look for
Choose a clip with minimal camera movement, clear foreground-background separation, and good resolution – 4K footage is ideal if you want a lot of detail. The original tutorial used an Eiffel Tower clip that had subtle movement in the frame but no dramatic pans or zooms, which makes the frame hold and mask workflow much easier.
Also look for unobstructed foreground elements if you want to composite parts of the scene in front of the animated building later. Clean foreground edges help when you create a third masked layer to sit over the animated object and sell the illusion of depth.
2. Step-by-step: creating the empty background using Photoshop generative fill
First, take a still from your clip using the Program Monitor’s camera button, name the file, and choose a lossless format like TIFF for the best quality. Then open that still in Photoshop to use the generative fill tool and remove the building; you don’t need to write any prompts – just select the building and hit generate to get several variants.
If you don’t use Photoshop often, remember to export the result in a high-quality format like JPEG or TIFF so you retain detail when you bring it back into Premiere.
For a guided introduction to Photoshop’s tools and generative features, check out this official Photoshop resource for download and tutorials on Adobe’s site: Photoshop generative fill and tools.
Tips for a cleaner generative fill
 A screenshot of Premiere Pro showing the Eiffel Tower in a video clip, illustrating the ‘growing building effect’ tutorial.
When you select the object in Photoshop, be slightly generous with the selection to give the algorithm enough context to produce realistic background content. Try the generative fill a couple of times and compare the variations; often one result will have better texture and matching color than the others.
Save the final empty-background image with the same resolution as your original clip so it matches perfectly in Premiere when you drop it on your timeline.
Consistent resolution prevents artifacts and makes masking alignment straightforward.
3. Masking in Premiere Pro: the frame hold and precise masks
Bring your original clip and the empty background back into Premiere and place the empty shot above the video. Create a frame hold from the original clip to pause the motion where the building is removed, then use the Opacity pen tool in Effect Controls to draw a rough mask around the removed area so the scene reads as if nothing is missing.
Next, duplicate the original video layer and place it above the empty background clip, then use the pen tool again to make a precise mask around the building itself. The cleaner your mask here, the better the final comp will look when you animate the building out of and into the ground.
Creating a foreground mask for depth
Duplicate the bottom video one more time and create a mask around all foreground elements that should appear in front of the building, like railings, trees, or people.
Place this foreground layer above the animated building layer to sell depth and avoid the appearance of the tower floating above the scene.
Keep the feather at zero while you do the initial placement to maintain crisp edges, then adjust the feather slightly later if you need to blend small imperfections. Maintaining separate layers for background, subject, and foreground is essential for believable composites.
 The Premiere Pro interface displays the Eiffel Tower video clip with effect controls on the left, illustrating the growing building effect tutorial.
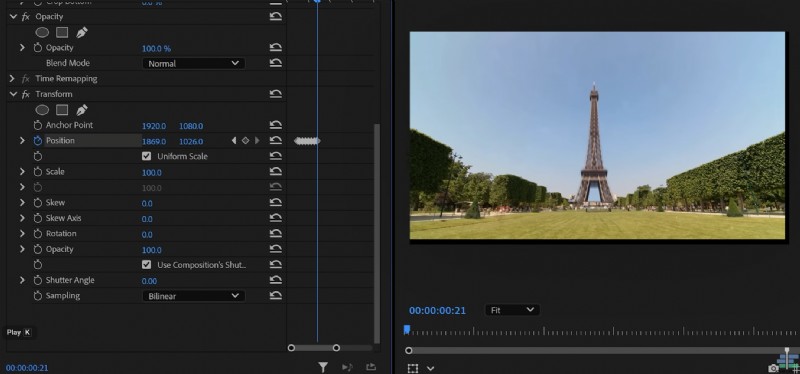
4. Animating the tower in Premiere Pro with Transform and motion blur
To animate the building, right-click the clipped building layer and choose Nest to turn it into its own sequence; the Transform effect works best on nested clips. Apply the Transform effect from the Effects panel, set a starting keyframe at the first frame of the animation, then move forward and adjust Position so the tower originates from below the ground plane.
Open the velocity curves and ease the second keyframe toward the motion to make the tower slide up smoothly, and increase the Shutter Angle to introduce natural-looking motion blur.
This motion blur is critical for making the movement feel weighty and integrated with the live-action plate.
Speed and timing suggestions
Keep your entrance relatively short – around 18 to 30 frames depending on your frame rate – for a snappy reveal that still reads believably.
If you want a slower, more dramatic lift, extend the keyframe distance and adjust the velocity curve so the movement accelerates and eases naturally.
Always preview with motion blur enabled to check if the shutter angle needs tweaking; too little blur looks robotic, while too much can smear details and expose imperfections in your masks. Incremental adjustments often yield the best balance.
5. Adding earthquake shake via nested transform
Once your building animation looks good, select all timeline elements that make up your composite and Nest them into a single sequence to create a unified shot. Apply the Transform effect to that nested sequence and add position keyframes on consecutive frames to simulate random shaking motion – small, jittery offsets create the earthquake illusion.
Increase the scale slightly at points to hide temporary black bars that appear as the shake moves the frame, and be sure to raise the Shutter Angle here as well so the shake blends smoothly. Little, randomized position changes over two to four frames will sell the quake without looking exaggerated.
Blending shake with the main animation
Time the strongest shakes to occur as the tower is entering or bending; that synchrony makes the whole effect feel physically connected. You can also keyframe opacity on small dust or debris overlays to accentuate peaks in the shake for more cinematic impact.
Keep your shake subtle on longer shots and more intense in quick cuts – the context of the edit will determine how aggressive you can be. Test playback at full resolution to ensure the shake isn’t producing distracting artifacts.
6. Bending the tower in After Effects with CC Bend It
For the bending building effect you need After Effects: select your original clip and the empty shot in Premiere, right-click and choose Replace with After Effects Composition. Inside After Effects, recreate the same mask layers: the empty background, the precise building mask, and the foreground mask for depth.
Pre-compose the isolated building clip and then apply the CC Bend It effect from the Effects & Presets panel. Position the Start and End points of the bend along the building, usually top to bottom, and animate the Bend property over time using keyframes to simulate the sway and snap of a bending tower.
Keyframe easing and curves
Once you’ve added several bend keyframes alternating direction for a wobble effect, select them and press F9 to ease them for smoother motion. Open the Graph Editor and switch to the Speed Graph; pull the handles to refine acceleration so the bend reads like a flexible structure responding to force.
Adding subtle motion blur to the pre-composed layer or enabling Timewarp-style blur will make the bend feel more dynamic and less digital. Remember to keep the foreground layer on top in your comp so elements in front of the tower occlude the bend correctly.
Exporting back to Premiere
When you’re satisfied with the bend animation, save the After Effects project and the composition will update automatically in Premiere via Dynamic Link. Check your nested sequences for any color shifts and render a short test clip to ensure the motion and blend look correct on the timeline.
Minor tweaks in After Effects are fast because changes propagate back into Premiere without re-exporting, which keeps your iteration loop efficient. Use this to your advantage when fine-tuning mask edges, bend intensity, or timing.
7. Final polishing: feathering, color and sound cues
After the core animation is done, go back to Premiere and adjust mask feather, opacity, and color grade to match the tower’s color and lighting with the surrounding plate. Small lift and shadow adjustments on the animated tower can help it feel grounded in the scene.
Don’t forget sound: add low rumbles, cracking elements, and a subtle quake whoosh that syncs to your key visual hits. Sound sells motion better than almost anything else, and a well-timed audio cue will boost the impact of the animation dramatically.
8. Quick checklist and actionable steps
Here is a condensed checklist you can follow quickly when you recreate this effect to save time and reduce errors. Use this list as a practical, step-by-step reminder while you work so you don’t miss a layer or keyframe.
Follow these action items in order and tick them off as you go; that will keep the workflow smooth and reproducible across projects. After the list I’ll add a few final workflow tips you may appreciate.
- Capture a still from the program monitor and export as TIFF or high-quality JPEG.
- Use Photoshop generative fill to remove the building and export the empty background.
- Import both clips into Premiere and create a frame hold and rough background mask.
- Duplicate and mask precisely around the building for the animated layer; create a foreground mask on another duplicate.
- Nest the building clip and apply Transform for position animation with eased keyframes and high shutter angle.
- Nest the full composite and apply randomized Transform keyframes for earthquake shake; adjust scale and blur as needed.
- Replace with After Effects composition to apply CC Bend It on the building pre-comp for bending animation.
- Polish with feather, color correction, and sound design; render and review at full resolution.
9. Conclusion and where to learn more
These techniques – frame hold, precise masking, nested transforms, motion blur, and CC Bend It – combine to create convincing “buildings that dance” effects that you can reproduce quickly in Premiere Pro and After Effects. With practice you’ll be able to adapt the workflow to other objects and environments for creative VFX shots.
If you want to dive deeper into After Effects techniques and visual effects tutorials, resources like Video Copilot offer excellent walkthroughs on bending, compositing, and advanced motion blur techniques: Video Copilot After Effects tutorials and plugins. Thanks for watching, and if you try this effect tag me so I can see your growing and bending buildings!