Switching music services can feel risky—will your carefully curated playlists survive the move? Manual transfers are tedious, time‑consuming, and often incomplete. Fortunately, a handful of reliable third‑party tools let you migrate entire libraries in seconds, preserving track titles, artists, and even album art.
In This Article
- Tools To Transfer Playlist Between Music Services
- 1. TuneMyMusic
- 2. FreeYourMusic
- 3. SongShift
- 4. Soundiiz
- Best Playlist Transfer Tool Between Music Services
- Bonus Video Tutorial: How To Make Videos To Promote Your Music On Instagram, YouTube, & TikTok
Tools To Transfer Playlist Between Music Services
Let’s dive into the leading options that make cross‑platform playlist migration effortless. Each tool offers unique strengths—whether you’re a casual listener or a professional DJ.
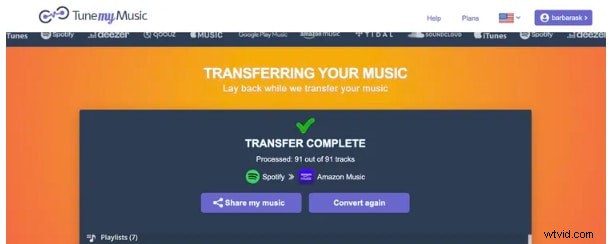
1. TuneMyMusic
TuneMyMusic is a browser‑based service that supports Spotify, Apple Music, SoundCloud, YouTube, and more. With a clean interface and robust search capabilities, it can move your entire library with just a few clicks.

- Compatibility: Web browser only; works on Windows, macOS, iOS, and Android.
- Pricing: Free tier (up to 500 tracks) and premium plans: $2 / month (annual billing) or $4.5 / month (monthly).
- Export Formats: TXT or CSV for offline backup.
- Transfer Speed: Roughly 38 seconds per playlist.
- Accuracy: 96% match rate; slight discrepancies arise from unavailable tracks or missing metadata.
- Languages: English, Spanish, Italian, Portuguese.
How to Transfer a Spotify Playlist to Amazon Music
- Open TuneMyMusic in your browser and sign in. Select Spotify as the source.
- Paste the playlist URL or choose a saved playlist. Then select Amazon Music as the destination and enable auto‑sync if desired.
- Click “Cool! Got it” and wait for the transfer to complete.
- Open the Amazon Music app to verify the playlist’s arrival.
2. FreeYourMusic
FreeYourMusic is a downloadable desktop app that connects to 20+ streaming services, including Apple Music, Deezer, Pandora, Spotify, YouTube Music, Amazon Music, and Tidal.
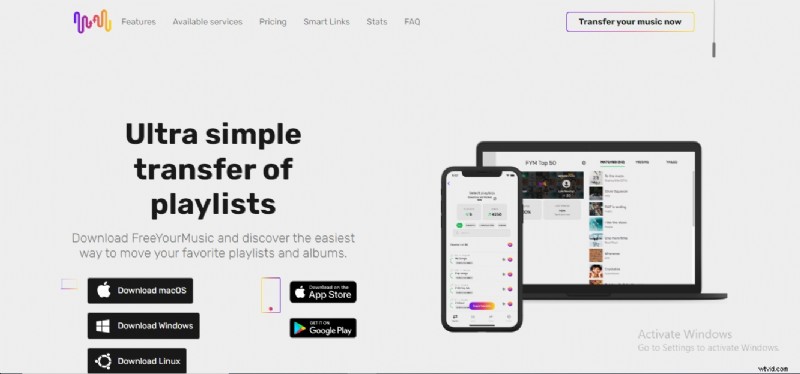
- Platforms: iOS, Android, macOS, Linux.
- Pricing:
- $4.17 / month (auto‑sync & lifetime updates).
- $14.99 (one‑time) for the Basic package with lifetime updates.
- $249.99 (Lifetime) includes auto‑sync and lifetime updates.
- Free Tier: Single playlist transfer, max 100 tracks.
- Transfer Speed: ~50 seconds per playlist.
- Accuracy: 91%—some mismatches and missing descriptions.
- Language: English only.
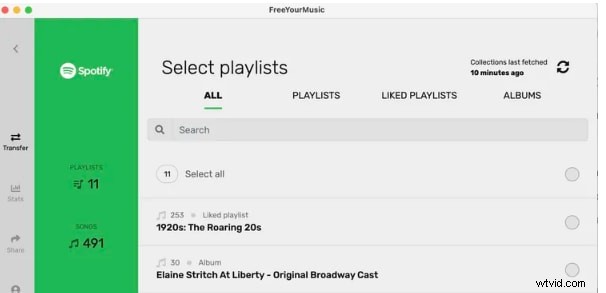
How to Transfer a Spotify Playlist to YouTube Music
- Navigate to the FreeYourMusic website and log in.
- Select a Spotify playlist, click “Begin Transfer.” Then open YouTube Music to find the new playlist under Library > Playlists.
- Free users may be prompted to provide an email to unlock 200 additional tracks.
3. SongShift
SongShift is tailored for iOS and macOS users, offering free unlimited transfers across 40 services.

- Compatibility: iOS and macOS only.
- Pricing:
- $4.99 / month.
- $19.99 / year.
- $39.99 one‑time for advanced features (sharing, syncing, export).
- Transfer Speed: ~40 seconds; faster with Pro.
- Accuracy: 96%—handles albums and song mismatches but omits playlist descriptions.
- Languages: English, Italian, Spanish, Japanese, French, German, Portuguese.
How to Transfer a Spotify Playlist to Apple Music
- Open SongShift, enable Sync Library in iOS Settings.
- Connect Spotify and Apple Music; click “Get Started.”
- Choose the source (Spotify) and destination (Apple Music). Select the desired playlist and hit Done.
- Wait for the transfer to finish; the playlist will appear in Apple Music.
4. Soundiiz
Soundiiz is a web‑based portal that offers rapid playlist migration across a broad range of services.

- Compatibility: Browser‑based; works on any device with internet access.
- Pricing: Pro: $4.50 / month or $36 / year; Free tier supports 200 tracks.
- Transfer Speed: ~28 seconds per playlist.
- Accuracy: Up to 98%—includes playlist descriptions but cannot auto‑fix mismatches.
- Languages: English only.
- Usability: UI can feel cluttered; better suited for tech‑savvy users.
How to Transfer a Spotify Playlist to Tidal
- Open Soundiiz, sign in, and click “Let’s Go.”
- Connect to Spotify and Tidal; the platform will display playlists from both services.
- Choose Transfer Link, select Playlists as the transfer type, and pick Spotify as the source.
- Confirm and select Tidal as the destination; wait for the migration to complete.
Best Playlist Transfer Tool Between Music Services
After evaluating each option, the decision hinges on your priorities: speed, accuracy, price, and platform coverage. While all four tools perform admirably, Soundiiz emerges as the top choice—offering the highest accuracy (98%) and a competitive pricing model. Its web interface also eliminates the need for downloads, making it convenient for users who prefer a quick, browser‑based solution.
Bonus Video Tutorial: How To Make Videos To Promote Your Music On Instagram, YouTube, & TikTok
In addition to playlist migration, sharing your music on social media can boost visibility. Watch our short tutorial—created with the user‑friendly Filmora editor—to learn how to craft engaging videos that spotlight your tracks across Instagram, YouTube, and TikTok.
Conclusion
Transferring playlists between streaming services no longer has to be a daunting task. By choosing the right tool—whether it’s TuneMyMusic for quick browser‑based moves, FreeYourMusic for cross‑platform flexibility, SongShift for Apple ecosystem users, or Soundiiz for the highest accuracy—you can keep your musical journey uninterrupted.
Explore the options above, match them to your specific needs, and enjoy your favorite songs wherever you prefer to listen.