Capturing your Mac’s screen with high‑quality audio is essential for tutorials, presentations, gaming streams, and more. A reliable recording process saves time and enhances the viewer’s experience.
In this guide you’ll learn how to record both visuals and sound using Wondershare Filmora and the built‑in tools QuickTime Player and the macOS Screenshot Toolbar. By the end, you’ll be equipped to produce polished recordings for any audience.
In this article
- Why Filmora Is the Preferred Choice
- How to Record with Audio on Mac Using Filmora
- QuickTime Player: A Simple Built‑in Option
- macOS Screenshot Toolbar: Fast Access for Mojave and Later
- Choosing the Right Tool for Your Needs
Part I: Screen Capture With Sound on Mac Using Wondershare Filmora
Filmora is more than a screen recorder; it’s an all‑in‑one video editor that empowers both novices and professionals. With 3,591,664 downloads, it’s trusted by creators worldwide.
Key strengths include:
- Professional‑grade audio and video quality
- Built‑in editing tools—trim, cut, annotate, and apply effects
- User‑friendly interface that’s intuitive for first‑time users
- AI noise reduction for crystal‑clear sound
- Automatic beat sync, audio visualizer, and ducking features
- Silence detection and AI audio stretch

How to Record with Audio on Mac Using Filmora
- Open Filmora, select Create Project, and set your desired aspect ratio (e.g., 16:9, 9:16, or Custom).
- Navigate to File > Record Media and choose your recording mode: Webcam, PC Screen, or Voiceover.
- Select the capture area—Full Screen, Custom, or Target Window—and adjust the resolution if needed.
- In the recorder window, enable Microphone to capture your voice. You can also toggle Camera and System Audio as required.
- Open Settings to fine‑tune parameters such as frame rate and audio levels.
- Click the red Record button. Use the countdown or the Start Directly option to begin immediately. Pause, stop, or restart as needed.
- After recording, edit the clip directly in Filmora—trim, add annotations, adjust audio, and more.
- Export your finished video by selecting Export, choosing the format, resolution, and frame rate, then click Export again.
Filmora’s integrated workflow eliminates the need for multiple programs, making it an ideal choice for anyone aiming for high‑quality, professional‑looking recordings.
Part II: Record Screen and Audio on Mac Using Built‑in Tools
If you prefer a no‑cost solution, macOS offers two straightforward options: QuickTime Player and the macOS Screenshot Toolbar. Both provide essential recording capabilities without the overhead of third‑party software.
QuickTime Player
QuickTime Player comes pre‑installed on all Mac computers and offers a quick, lightweight screen‑recording experience.
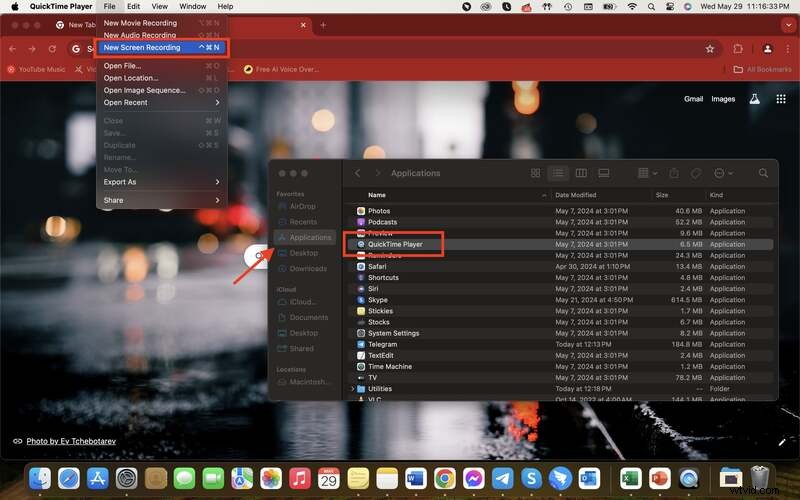
- Launch QuickTime Player from the Applications folder.
- From the menu bar, select File > New Screen Recording.
- Click the small Options arrow next to the record button, choose your microphone, and enable or disable system audio as needed.
- Press Record to start, then select the area to capture or click the screen to record the entire display.
- Stop recording by clicking the stop icon in the menu bar or pressing Command + Control + Esc. QuickTime automatically opens the file and saves it to the Desktop.
Pros:
- Built‑in and free.
- Intuitive interface.
- Basic trimming available.
Cons:
- No advanced editing or customization.
- Manual audio selection can be confusing for newcomers.
macOS Screenshot Toolbar (macOS Mojave and Later)
The Screenshot Toolbar provides a unified interface for capturing screenshots and recording the screen.
- Press Shift + Command + 5 to open the toolbar.
- Select the recording option—entire screen, selected portion, or window.
- Click Options, choose your microphone under the Microphone section, and adjust other preferences.
- Click Record to start and Stop via the menu bar icon or Command + Control + Esc.
- The recording plays automatically and saves to the Desktop.
Pros:
- Integrated, no extra download.
- Flexible capture areas.
- User‑friendly toolbar.
Cons:
- Limited editing features.
- Audio source must be selected each session.
While both QuickTime and the Screenshot Toolbar are convenient for quick tasks, they lack the advanced controls and polish that dedicated software like Filmora offers.
Conclusion
Choosing the right recording tool depends on your needs. For casual use or simple tutorials, QuickTime Player or the Screenshot Toolbar may suffice. However, if you require high‑quality audio, powerful editing, and advanced features, Wondershare Filmora stands out as the best option.
Ready to elevate your screen recordings? Visit the Filmora website and start creating professional videos today.