How to Create Snow Effects in Filmora 12
Elevate your footage with a realistic snowy backdrop. This step‑by‑step guide walks you through color grading, masking, and overlaying snowflakes to achieve a convincing winter scene.
Tools Required
- Windows or macOS computer
- Filmora 12 video editor
- Your video footage
Preparation
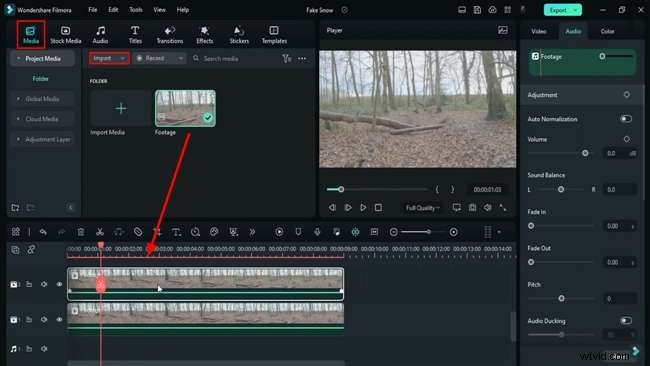
Before you begin, install Filmora 12 and launch a new project. Import your footage from the Media tab and drop the clip onto both Track 1 and Track 2 in the timeline.
Step 1: Apply the B&W Film Preset
On Track 2, open the Colors panel and select the B&W Film preset from the Preset menu. Fine‑tune the following settings:
- Exposure: 16.2
- Brightness: -25.4
- Contrast: 50
- Vibrance: -5
- Highlight: 30
- Shadow: -40
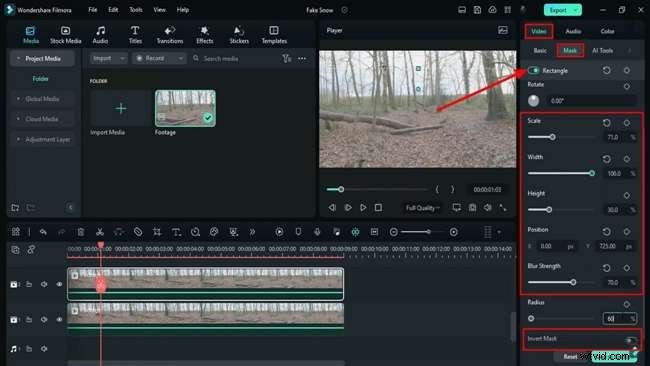
Step 2: Add a Square Mask
Navigate to the Video tab, click Mask, and choose the Square mask. Adjust:
- Scale: 71
- Width: 100
- Y Position: 725
- Blur Strength: 70
- Radius: 60
Enable Invert Mask to apply the effect to the upper portion of the frame.
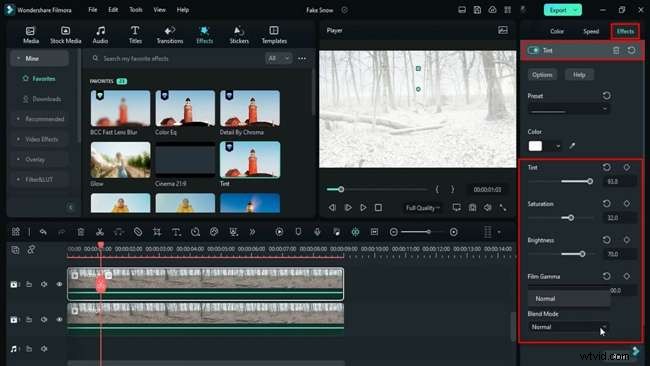
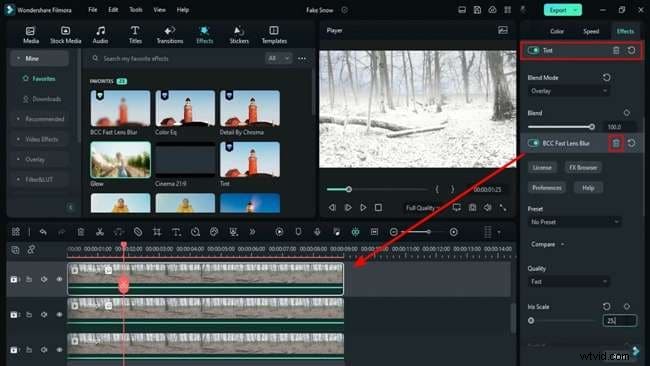
Step 3: Enhance Color with Tint
From the Effects panel, add Tint to Track 2. Set:
- Tint: 94
- Saturation: 32
- Brightness: 70
- Film Gamma: 100
- Blending Mode: Overlay
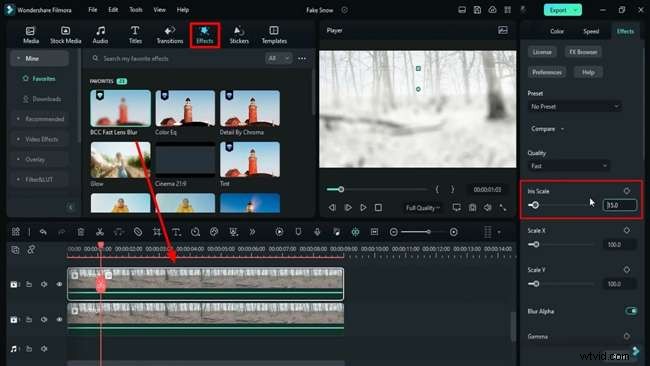
Step 4: Create a Blurry, Glowy Sky
Apply BSS Fast Lens Blur to Track 2 and set Iris Scale to 0.3. Then add Glow with 50% opacity. Switch the Blending Mode in the Video panel to Lighten to reveal a subtle blue winter sky.
Step 5: Duplicate for Depth
Duplicate Track 2 onto Track 3 to simulate distant snowfall. In the Mask settings, use:
- Scale: 78.8
- Y Position: 400
- Blur Strength: 20.5
- Radius: 44
Adjust the Y Position until the fog appears natural. Fine‑tune Blur Strength for optimal density.

Step 6: Refine Shadows and Glow
On Track 3, set Shadow to -27 and Brightness to -34. Increase Iris Scale to 25.3, set Glow opacity to 100%, and change Blending Mode to Overlay with 27.3% opacity.
Step 7: Duplicate and Adjust Opacity
Copy Track 3 onto Track 4. Set Blending Mode to Normal and Opacity to 30%. Remove the mask and tweak Exposure, Highlight, Shadow, White, and Black to -100. Adjust Opacity as needed.
Delete BCC Fast Lens Blur. Update Tint saturation and brightness to 100 each. Enable the Curve tool and shape the Alpha line to match the scene.

Step 8: Add Detail and Color EQ
On Track 4, apply Detail by Chroma with green hue, range 50, strength 58. Follow with Color EQ: white, Range 92, Fade 66, Soften 50, Saturation 53, Brightness -19, Contrast 100.
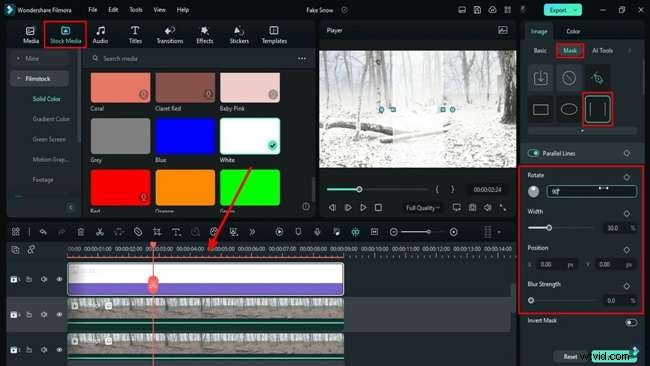
Step 9: Create a Hazy Atmosphere
Drag a solid white color from Stock Media → Solid Colors onto a new track. Set Blending Mode to Screen. In Mask, choose Double Lines, rotate 90°, set Y Position to 570, and Blur Strength to 70.
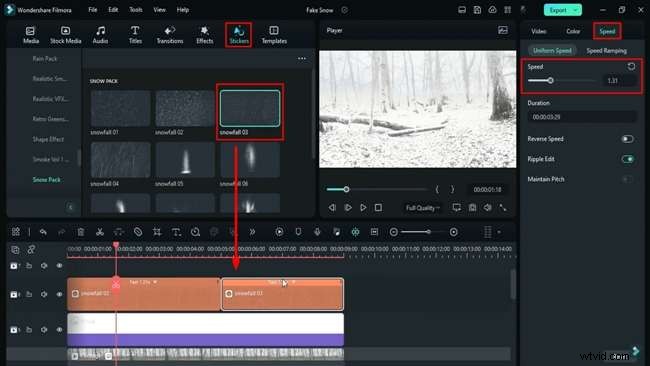
Step 10: Add Snowfall Stickers and Auto‑Enhance
Insert Snowfall 03 from the Stickers panel onto Track 6. Adjust Speed to 1.5x and duplicate the clip on the same track.
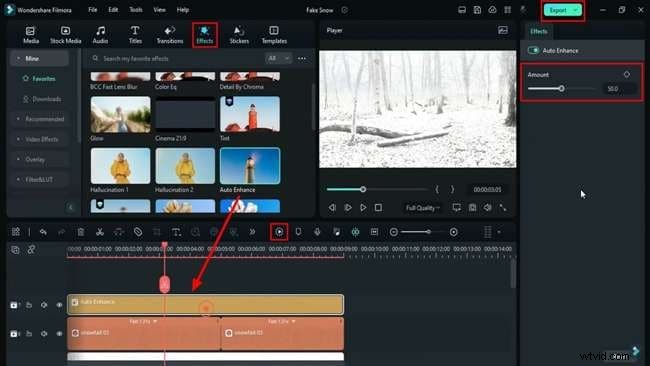
Finally, apply Auto Enhance with an amount of 100% to sharpen the overall image. Fine‑tune the snow intensity via Track 2. Render to preview, then export once satisfied.
Summary
Mastering video editing demands both skill and patience. By following these steps, you can transform ordinary footage into a stunning snowy scene, showcasing Filmora’s powerful creative tools.