How to Add Lyrics to Video in Filmora
Adding lyrics to a video is common, but you can elevate the effect with a polished luma‑style transition. Follow this guide to produce professional‑looking music videos in Filmora.
Tool
Transcript
00:12 – In this video, we will teach you how to create a luma lyric transition in Wondershare Filmora. First, drop your footage on the timeline, split it, and trim as desired. Then go to the “Stock Media” and add a black solid color on track 2 at frame 4. Split it at frame 19 and delete the remainder. Enable the “Transform” panel, add a keyframe, and move the solid color off screen. Adjust the “Video → Scale” if needed.
00:43 – At frame 18, bring the solid color back to the target position. Copy it and paste onto track 3. Add a negative sign to the X value on the start keyframe and again on the second keyframe, creating a mirrored motion.
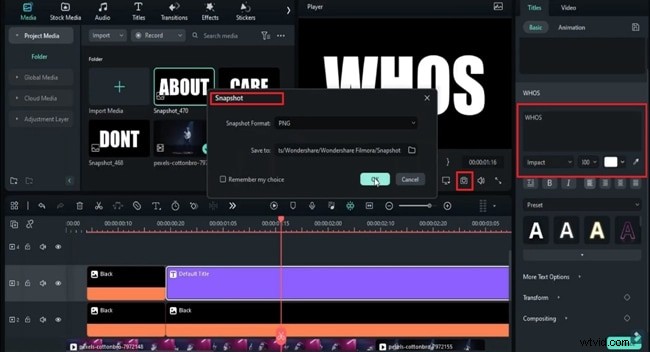
01:02 – Create lyric text. Place the black solid on track 2, then add a “Default Title” on track 3. Set the font to Impact, size 300, and type the first lyric word. Take a snapshot, then repeat for the remaining words. For long words, edit in the “Advanced” panel before deleting the title and solid color from the timeline.
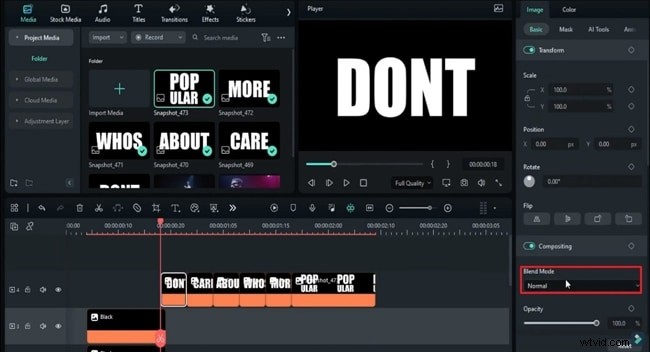
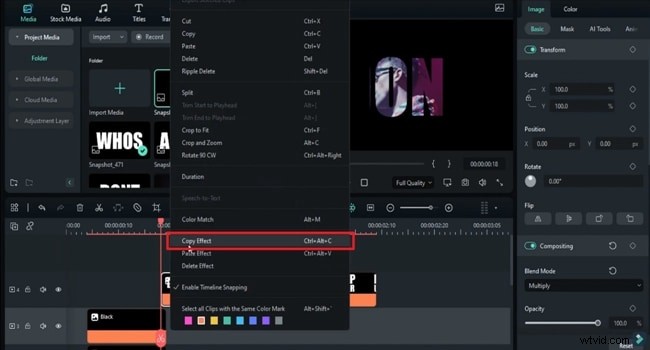
01:35 – Drop each snapshot onto track 4, timing each for 5 frames. For the final word “Popular,” split at 2 seconds 9 frames, set its blending mode to “Multiply,” and copy that effect to all words.
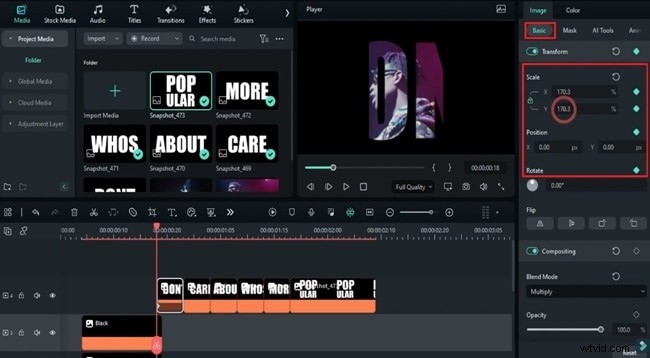
02:03 – Keyframe the first word “Don't”: lock scale ratio, set scale to 2100, then move two frames forward and reduce scale to 100 and X to 100. Add a blank keyframe one frame later and finish with scale 105.
02:26 – Repeat the keyframe process for each subsequent word, gradually increasing scale from 105 to 120, then 125 for “Popular.” Use a pop‑up effect by scaling up to 1300, then 2200 to fade the word away.
03:23 – Add a two‑frame “Leak Light” transition before the next clip to create a bright flash, then preview the final result.
How to Add Luma Lyric Transition in Videos by Using Filmora
Preparation
What you need:
- A computer (Windows or macOS)
- Your video footage
- Filmora video editor
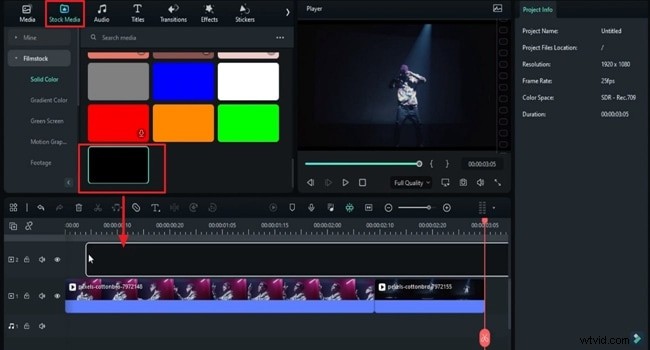
Step 1: Launch Filmora and Add Solid Color from Stock Media
Import your footage into the main timeline, split it as required, then add a black solid color from the “Stock Media” panel onto track 2.
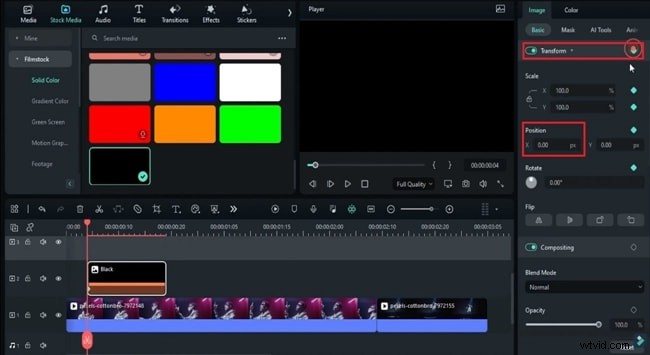
Step 2: Add Keyframes and Adjust Position
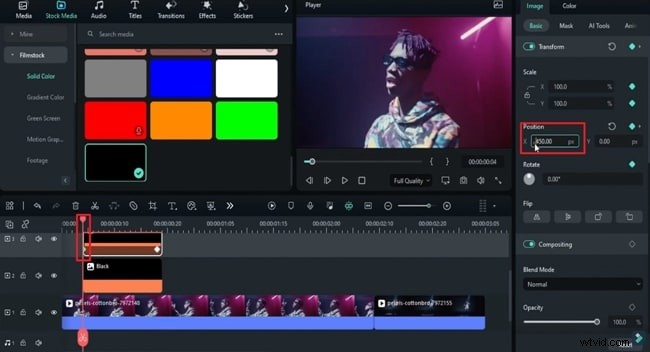
Split the solid color at the desired frames. In the right‑hand panel, enable the “Transform” option to add keyframes. Adjust the video scale and move the solid color off screen if necessary. Then bring it back at the specific position a few frames later.
Copy the color layer, paste it onto another track, and tweak its position on each keyframe to achieve the opening effect.
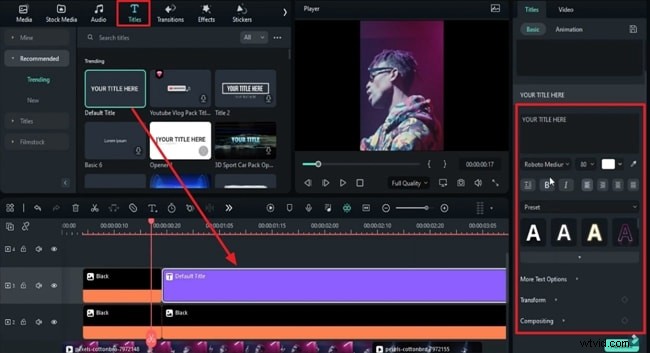
Step 3: Add Default Title and Background of Text
Place the solid color on the second video layer as a background for the text. In the “Titles” tab, add a “Default Title” to track 3 and configure the font, size, and color as needed.
Step 4: Enter the Lyric Text and Take Snapshot
Enter each lyric word into the title, taking a snapshot for each. If a word is too long, use the “Advanced” panel to edit it. After capturing all snapshots, delete the original title and solid color from the timeline.
Step 5: Change the Mode of Words and Copy‑Paste It
Place the snapshots on the desired track at the correct keyframes. Change the “Blending Mode” of each word to “Multiply” via the “Blend Mode” option in the Basic tab. Right‑click the first word, select “Copy Effect,” and paste it onto the remaining words.
Step 6: Add Keyframes and Adjust the Settings
In the Video tab, enable keyframes for Scale and Position. Set custom Scale values for X and Y, lock the aspect ratio if required, and adjust the position across multiple keyframes.
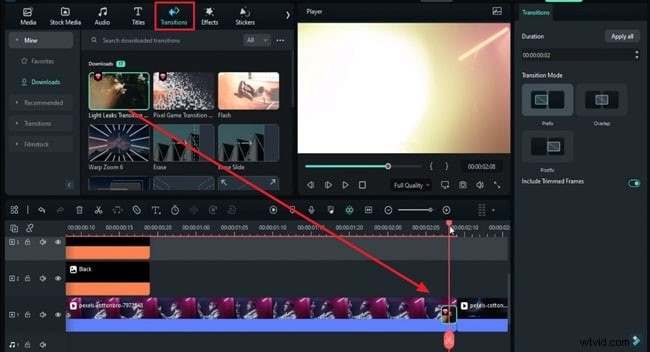
Step 7: Add Transition and Playback the Video
To smooth the transition between clips, add a transition from the “Transition” tab to the timeline. Place it before the next clip and preview the finished video.
Summary
Adding lyrics can be routine, but with Filmora’s luma lyric transition technique, you can create eye‑catching, dynamic music videos. Filmora’s built‑in tools make it easy to achieve professional results without the need for complex software.