If you own a GoPro, you also own a solid webcam. Here’s what you need to set up a GoPro for your next Zoom call.
Like many people who fell for GoPro’s cool-outdoor-sports-guy marketing, I bought a camera for a trip and then never used it again. Don’t get me wrong, I think the GoPro is a decent piece of kit with several cool video, photo, and time-lapse modes that are useful for creating captivating action content. Still, I don’t find myself surfing, climbing, or riding dirt bikes in remote deserts often enough—or at all.
After buying it for a trip abroad, I did what many others have done when the vacation ends—I put the GoPro in a drawer, never to be used again. Until now, that is.
Congratulations! Your GoPro Is a Webcam
Video calls have become the new norm for work, school, and catching up with friends and relatives, making webcams a necessity. With such a high demand for webcams, retailers have had trouble keeping them in stock, and shortages have been common in the past year. However, for those with a GoPro, there’s no need to buy a webcam.
Setting up newer GoPro models as a webcam is easier thanks to GoPro’s webcam software. Older models do require a video capture device, which can range between $20-$100, depending on the brand. Whether you have a new or old model, basically every GoPro from the GoPro 4 onwards works as a webcam. (However, the Hero 5 Session and the Max are the outliers.)
The GoPro webcam works with several videoconferencing platforms, but, for the sake of this article, we’ll be focusing on Zoom due to its popularity. If you already have a compatible GoPro, here’s what you need and how to set it up.
Setting up the GoPro Hero 8 and 9 as a Webcam
The GoPro 8 and 9 models provide the best video quality, and thanks to the available software from GoPro, they’re the easiest to set up. The macOS version is compatible with more videoconferencing platforms, and has the option to switch resolutions between 720p and 1080p via the desktop utility icon.
In the video below from Danny Black, you can see the difference in quality between the different GoPros, with the GoPro 9 clearly having the best quality. Even compared to the Sony a6500, which costs well over $1000, the GoPro 9 holds up, making it the perfect pickup for anyone who wants the best video quality for their Zoom calls.
Turning one of the new GoPros into a webcam takes only a few steps and requires no extra components.
Here’s how to set up a GoPro 8 or 9 as a webcam for Zoom calls:
- Update the GoPro to the latest firmware update.
- Download the GoPro Webcam desktop utility, which is available for macOS and Windows devices. After downloading the software, an icon for the software should appear in the status bar.
- Connect the GoPro to the computer via USB-C cable. The icon in the status bar should have a blue dot to signify it detects the GoPro.
- To see a preview of the video feed and check the field of view, right-click on the icon and select Show Preview. If you’re not happy with the default wide lens FOV, you can right-click the software icon again and select Digital Lens, where you’ll find the Wide, Narrow, and Linear lens options.
- Open Zoom, and click the up-facing arrow next to Start Video, which will open a menu listing the several camera options. If everything is working as it should be, you’ll see the GoPro Camera option listed. When you select it, the GoPro’s front-facing screen will display the word Webcam, and you’ll see a red light.
- Your GoPro should now be outputting its video signal to Zoom.
While these newer models have better video quality and are easier to set up, they’re also expensive. The GoPro 9 sells for $450 and the 8 for $300. Those who already have one should use it, but buying an older GoPro model may be a better option for most.
Setting up Older GoPros as a Webcam for Videoconferencing
Unlike the previous method, you’ll have to purchase some other components and download third-party software. Also, this method only works with the GoPro 4, 5, 6, and 7. Unfortunately, if you have an older model or the 360-degree GoPro Max, it won’t work. Before moving on to the setup process, you’ll need a:
- Compatible GoPro (GoPro 4-7)
- HDMI to Micro HDMI cable to connect the GoPro to the capture device
- USB-C charging cable to power the GoPro during a video call
- Capture device
- Tripod or another mount for the camera
The GoPro and the capture device will be the two biggest expenses. If you don’t have a compatible GoPro, Amazon carries refurbished GoPro models that vary by price depending on the model. This renewed GoPro 4 sells for $120, and a renewed GoPro 5 sells for $175. They’re not cheap, but they’re about the same price as a high-end webcam.
If you’re looking to pay as little as possible, trying your luck on eBay may be an option. In my research, I found dozens of Hero 5 Black models sold for around $120. That’s pricier than several low-end webcam models, but those may still be hard to find. Plus, the video quality won’t be nearly as good.
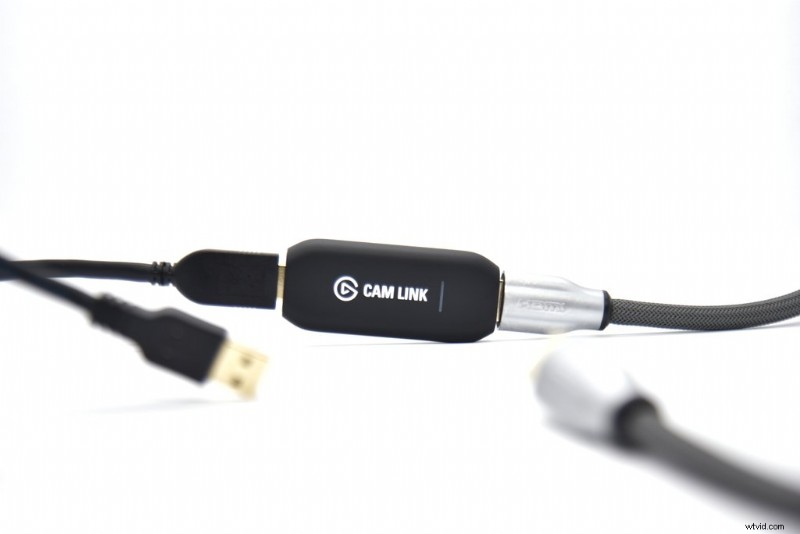
With a GoPro secured, getting a capture device is the next step. If buying a capture device is a deal breaker, consider that you can use it with other cameras in the future. In my case, I’m using the Elgato HD60 Pro capture card, which is installed on my PC’s motherboard. However, the roughly $100 Elgato Cam Link 4K is compatible with any computer, not just desktop PCs, and it’s much easier to install. The Cam Link 4K plugs into a USB 3.0 port, and it’s slightly larger than a flash drive.
Alternatively, The Verge recommends a no-name Cam Link clone that sells for around $20 on Amazon, doing the same job as Elgato’s device for a fifth of the price. It won’t capture 4K footage, but, according to The Verge, it’s worth considering.
Setting up GoPro Webcam Without Software

If you want to use the GoPro as a webcam without downloading any software, try this method:
1. To get started, turn on the GoPro and find the Preferences menu, then you’ll need to find the Input/Output (I/O) submenu. There should be a setting labeled HDMI Output, which you should change to Live. This setting cleans up the video output from the camera and hides any U/I elements.
2. While it’s optional, mounting the GoPro on a tripod or other mount is the best way to position the camera to your liking. If your GoPro uses a cage to mount, make sure the cage isn’t blocking the HDMI and power ports. On the Hero 5 Black, it’s possible to remove the door covering the ports easily.
3. Next, connect the capture device to the computer via a USB 3.0 port, and then connect the HDMI from the GoPro to the capture device. You’ll also want to make sure to connect a charging cable to the GoPro to keep it powered during use.
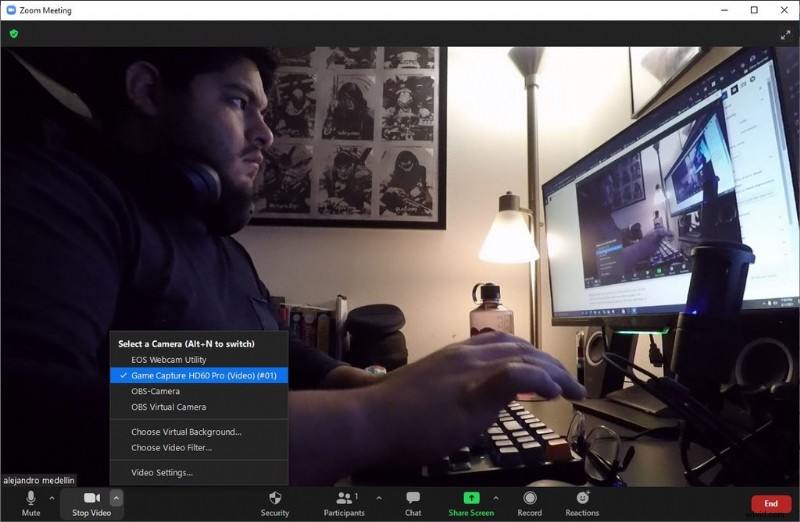
4. With the GoPro turned on and connected to the Cam Link, go ahead and open Zoom. (I used the Zoom web client on Google Chrome, as well as the desktop version.) Click on the up-facing arrow, and you should see an option labeled Cam Link. If you used the cheaper device listed above, you should see USB Video. Click on it.
5. If everything is working properly, you should see the video feed from the GoPro on Zoom.
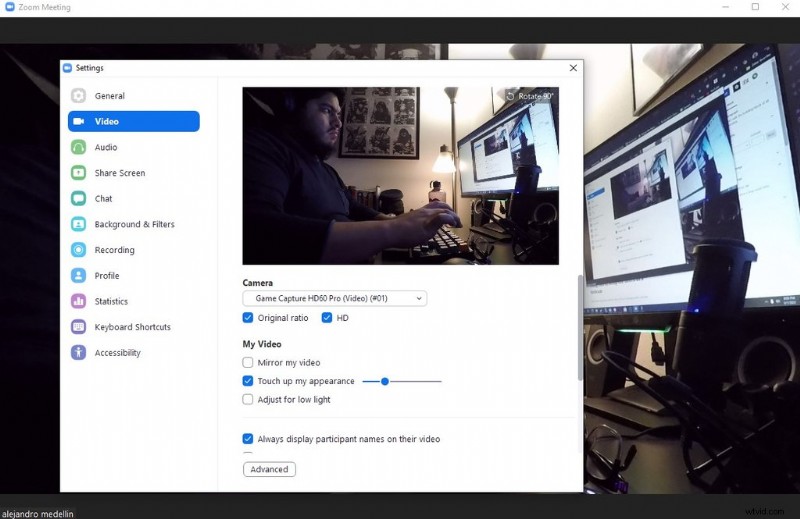
6. The video may look weird at first, so you may need to go in the Video Settings, which you can access by clicking the arrow again. Once there, turn on Original Ratio or HD to get the video looking right. The Touch up my appearance setting didn’t work on me, so results may vary.
Using OBS to Setup the GoPro as a Webcam
If the above steps don’t work for you, or you’re having issues, you may need to download a third-party open-source software popular with streamers called Open Broadcaster Software (OBS) Studio. OBS Studio, or simply OBS, is free to download and available on Windows, macOS, and Linux devices. The software looks a bit daunting on first use, but I’ll guide you through the basic steps to setup your GoPro as a webcam.
Let’s get started:
1. Download OBS and an OBS plug-in called Virtual Cam. Virtual Cam will allow you to broadcast what’s showing on OBS to Zoom and other videoconferencing platforms.
2. In OBS, create a new scene by clicking the “+” sign in the Scenes box. Label it something like GoPro.
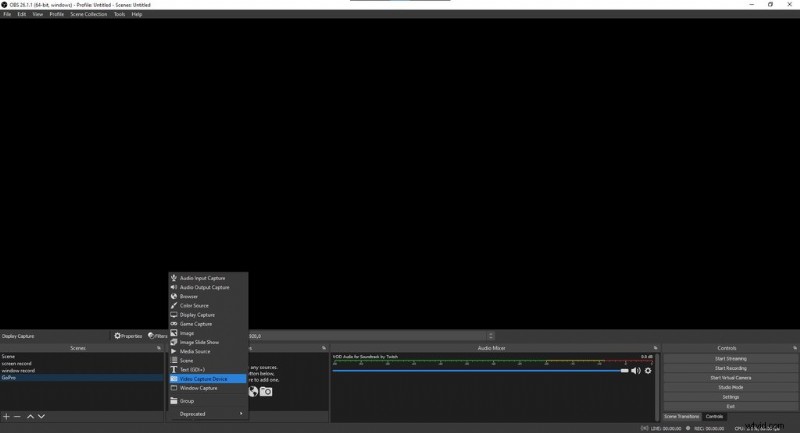
3. Next, add a new source to the scene by clicking the “+” sign in the Sources box next to the Scenes box. Choose Video Capture Device and label it GoPro Cam or something similar. Adding the source brings up a Properties window.
4. Click the dropdown menu labeled Device in the Properties window and select your capture device. You should now see your GoPro’s video output.
5. Follow the first three steps from the previous section. When you’ve done that, you should see the GoPro’s video feed on OBS.
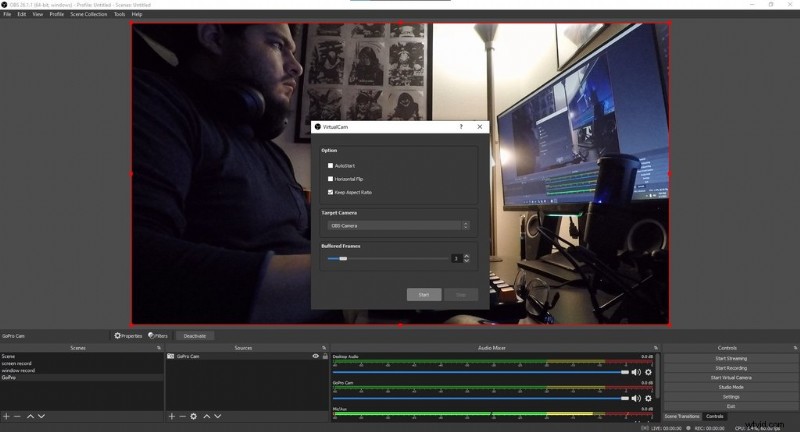
6. Head to the menu bar, select Tools, and select Virtual Cam. This opens up a small window. In the Target Camera dropdown menu, select OBS-Camera. Click on the Start button and exit out of the window.
7. Open up Zoom, click on the upward-facing arrow next to Start Video, and you should see an option labeled OBS-Camera. Click on it.
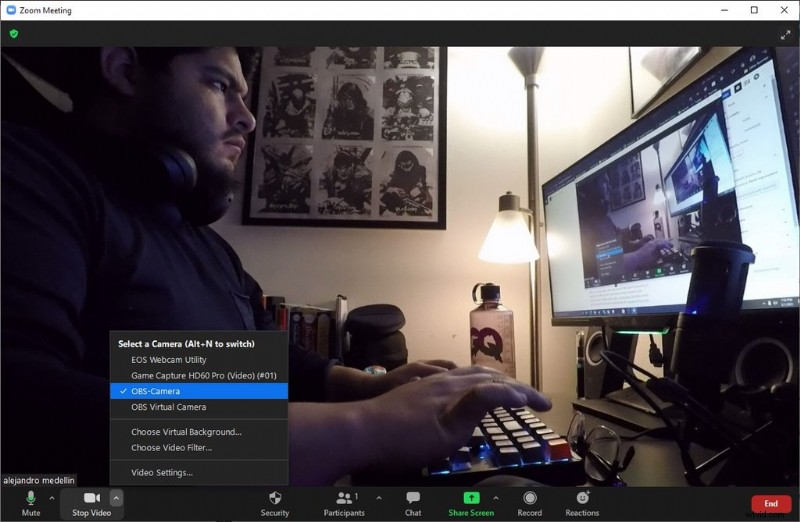
8. What you’re seeing on OBS should now show up on Zoom.
While the steps above focus on using Zoom, I also tested the GoPro with Google Meets, and it worked flawlessly on the Google Chrome browser. For some reason, I couldn’t get Google Meets to work on the new Chromium-based Edge browser, so compatibility may depend on the browser.
While this last process requires extra steps, the added functionality of OBS makes it worth doing. With OBS, you can create custom scenes, transition to other scenes, and add multiple sources. We’ve written about OBS before, and it’s not only great for videoconferencing but also for streaming and capturing video game footage.
Hopefully, you can find that old GoPro collecting dust on a shelf and put it to good use. With many older used GoPro models available on eBay, it’s an option worth considering since it may save you money and improve the video quality of your Zoom calls. Regardless of the model or setup, using a GoPro as a webcam is a great alternative to buying a dedicated webcam, and setting it up is easy.
Cover image via Enrique Alcala.
Need more Zoom tips and advice? Check out these articles:
- Lighting the Virtual Workspace: A Beginner’s Guide
- How to Make Zoom Backgrounds for Video Chatters Everywhere
- Zoom Virtual Backgrounds During Social Distancing
- Tips and Tricks for Making a Film with Zoom Technology
- How to Create Zoom Virtual Backgrounds with Shutterstock Editor