In this video tutorial, learn how you can improve your video editing by using these five tips for incorporating still images.
Working with photos in Premiere Pro can be confusing, especially if you’re new to the program. Even if you’ve already mastered working with video clips in Premiere, still images can throw you a curveball. Knowing the ins and outs of how to properly control stills will speed up your workflow and boost confidence in your projects. Let’s take a look at these five tips.
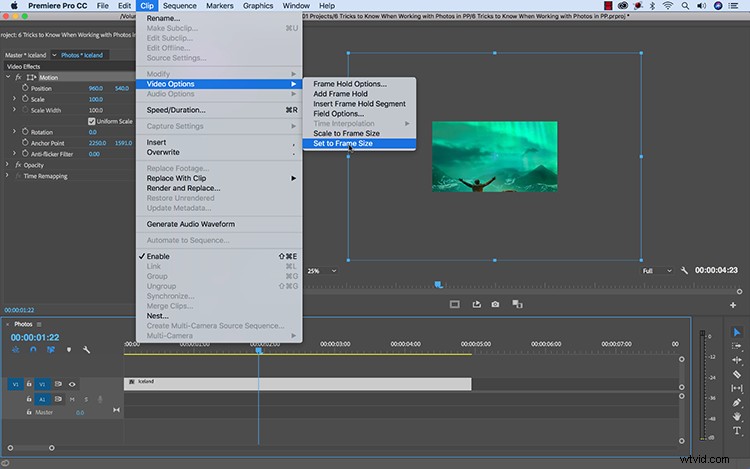
1. Set to Frame Size
When you bring a photo into a Premiere Pro sequence, it will automatically retain its original size. For example, if I take a photo with a pixel dimension of 4500×3182 and drag it into a 1920×1080 sequence, I’ll only see a small portion of the photo because it’s very large. To fix this, I can grab the clip and select Clip > Video Options > Set to Frame Size. If you’re working with many photos, you can change the default in Preferences > Media > Default Media Scaling.
2. Change the Still Default Duration
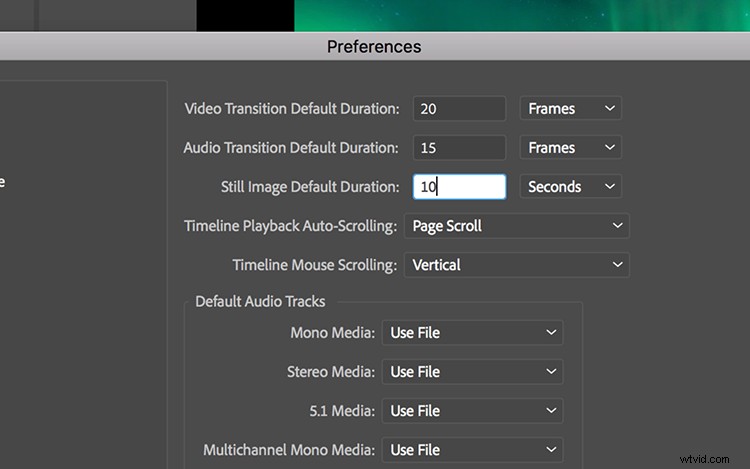
Let’s say you’re trying to create a slideshow using Premiere Pro. You’re working with a lot of images, and you want each photo up for at least ten seconds. The problem is that the default length of a still image file in Premiere Pro is 5 seconds. This means you will waste a lot of time changing the duration of each photo after you bring it into the timeline. A smart way around this is to simply change the default duration by going to Preferences > Timeline > Still Image Default Duration.
3. Use the Proper Color Space
It’s important to understand that print-friendly CMYK files don’t work well in the video world. In fact, you will most likely get an error message if you try to import a CMYK image into Premiere Pro. This is because that video works in an RGB color space. To import CMYK images smoothly into your Premiere Project, you’ll need to switch them over to RGB in Photoshop. To do this, in Photoshop simply go to Image > Mode and select RGB Color.

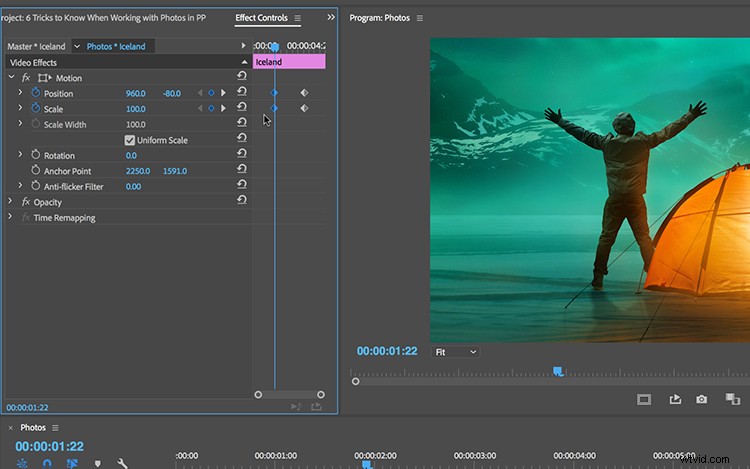
4. Simulate Camera Movements
A still image is just what it sounds like — still. But since you’re working in the wonderful world of video, you now have a lot of opportunities to add motion. If you want to bring a little life to your photograph, open up the Effect Controls panel and add a few property keyframes. Quickly simulate a pan, tilt, or dutch camera movement by simply animating the Scale, Position, and Rotation properties. Some basic start and end keyframes is all it takes, and suddenly you have more control over how the viewer sees your image.
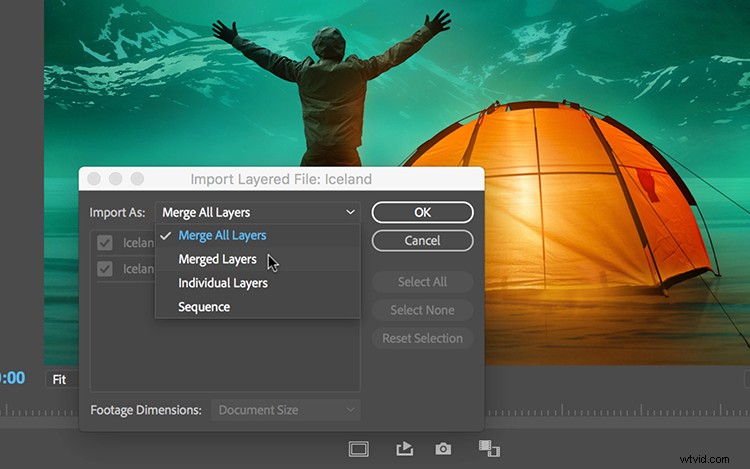
5. Importing PSD Files
Last, but certainly not least, it’s good to know how to work with Photoshop files. It’s no surprise that Photoshop works seamlessly with Premiere Pro, since both of these programs are in the Adobe Creative Cloud family of apps. When importing a PSD file, Premiere gives you a number of different methods. You can choose to merge all of your Photoshop layers into one still image file or bring the layers in as separate assets. I created an entire tutorial on this topic, so be sure to go check it out here.
For more information on working with photos in Adobe Premiere Pro, be sure to check out this article from Adobe.
Looking for more video tutorials? Check these out.
- How To Properly Expose An Image: Understanding ISO
- How To Properly Expose An Image: What Is Shutter Speed?
- How To Properly Expose An Image: All About the Iris
- Video Editing Fundamentals: Exporting Projects for the Web
- DIY Filmmaking on a Budget: Building a Homemade Dolly Setup
Top image by icemanphotos.