Like indie filmmaking? This might just be the cheapest DIY video camera rig in the world.
All images via thefrugalfilmmaker.
When it comes to indie filmmaking, it’s not uncommon to need a little creativity when it comes to your rigs. Shopping-cart dollies and Rollerblade sliders are common in the indie world. In fact, there’s an entire Instagram channel dedicated to celebrating terrible camera rigs.
In this post, we’re going to take a look at a rig created by the FrugalFilmmaker.
DIY Stabilizer Rig
There are a lot of reasons why you may want a handheld stabilizer rig. If you shoot a lot of action scenes or skateboarding videos, you don’t want to get caught without one, but even affordable rigs will run you at least $70. Luckily for us, the following video outlines how to create a DIY Handheld Stabilizer Rig for less than $5. Here’s what you’ll need:
- 4 x 1/2″ PVC pipe, 6″ in length
- 4 x 1/2″ PVC pipe, 4″ in length
- 1 x 1/2″ PVC pipe, 3 3/4″ in length
- 1 x 1/2″ PVC pipe, 1 1/2″ in length
- 5 x 1/2″ PVC T-joints
- 4 x 1/2″ PVC 90-degree elbow joints
- 1 x 1/2″ PVC plug
- 1 x 1/4″-20 machine screw, 2 1/2″ in length
- 2 x 1/4″ nuts
- 1 x spring
This rig is somewhat compact, so it’s likely that you will only want to use this technique for DSLR or lightweight-camera options. This compact design helps those who want to adjust camera settings mid-shot, as you can adjust settings with your thumb while the holding the rig with your fingers.
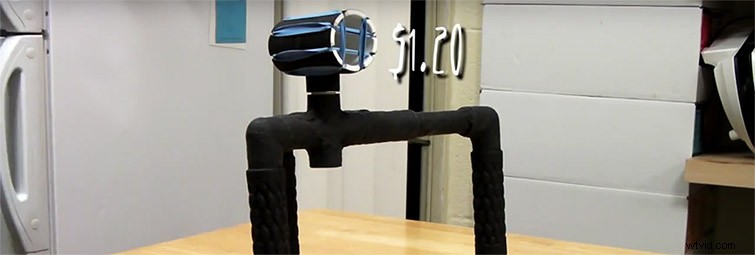
The video shows an alternate version of the rig that uses rubber bands to create a shock mount for a shotgun mic. If you don’t have a dedicated audio engineer, this mount could be quite handy. Plus, it only costs $1.20 to build, so it won’t break the bank.
It’s worth noting that this rig isn’t going to remove all shake and movement from your video. Instead, this is simply a helpful tool that reduces the camera shake associated with handheld cinematography by about 50 percent. Here’s the video:
After you’re finished shooting with this rig, you can stabilize the footage with the warp stabilizer plug-in in either Premiere Pro or After Effects. Warp stabilizer works by analyzing your footage and stabilizing it using an algorithm. Specifically, warp stabilizer generates pseudo-cinematic shots from even the bumpiest footage. This video from Adobe demonstrates how to use the warp stabilizer in Premiere Pro.
One of my favorite things about the warp stabilizer is that you can adjust how smooth you want your footage to be. This is a great tool for dialing in the right amount of camera shake.
If you want to learn more about DIY filmmaking, check out the DIY section of the blog here at PremiumBeat. From fake rain to track dollies, we have DIY tutorials for just about every type of production.
Have you created your own camera rig? Share the details in the comments.