Reflection photography turns ordinary scenes into visual masterpieces. By spotting subtle mirrors in water, glass, or metal, you can add depth, symmetry, and intrigue to your iPhone shots. The following guide gives you proven techniques and simple Filmora edits that elevate your images from good to unforgettable.
Reflection Photography Tips for iPhone
- Use Symmetry
Mirror your subject to create natural balance. Position an element at the top of the frame and let its reflection occupy the bottom, producing a harmonious composition that feels effortless.
- Mind the Composition
Apply the rule of thirds to the reflected area. Place the horizon or the primary reflected element on a third line, then shift the remaining scene accordingly. This simple adjustment gives the photo a professional feel.
- Simplify the Frame
Less clutter, more impact. A single focal point and its reflection draw the viewer’s eye. Use a neutral background to create negative space that highlights the subject.
- Balance Reality and Reflection
Don’t let the reflection dominate. Capture both the actual scene and its mirror image in a single frame. Burst mode on iPhone makes this easy—just hold the shutter and let the camera record every angle.
- Frame with Mirrors
Place a mirror strategically to create a “picture within a picture.” Focus on the reflected image, blur the background, and experiment with tilt to add layers and drama.
- Get Low to the Surface
For water scenes, shoot from ground level to fill the frame with reflective details—sunlight glinting on ripples, sky colors, or clouds. A low angle keeps the background minimal and accentuates the surface.
- Leverage Weather Conditions
Cloudy skies, mist, or stormy weather can dramatically alter reflections. Sunny light with cool shadows or a storm’s intensity can add mood and contrast to your images.
- Shoot During the Golden Hour
The warm, soft light before sunrise or after sunset casts a golden glow on water and glass. Capture silhouettes and vibrant color reflections that are perfect for shareable moments.
Enhance Your Reflection Photography with Filmora
Filmora’s mobile editor turns your raw shots into polished works of art with just a few taps. Below is a step‑by‑step workflow that focuses on brightness, filters, background blur, and text overlay.
1. Adjust Brightness and Contrast
Open Filmora, create a new project, and import your photo. Select the image, tap Adjust, then fine‑tune Brightness, Exposure, and Contrast until the reflection stands out. Experiment with Shadows and Highlights to bring depth.

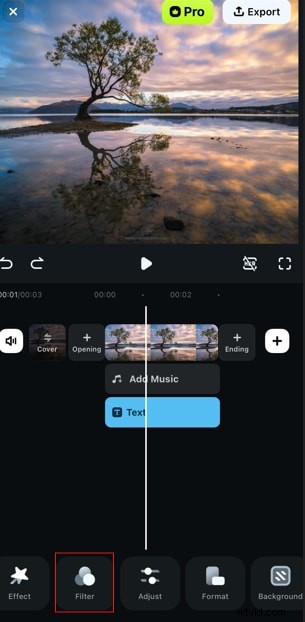
2. Apply Filters
Choose a filter that complements the mood. Browse the library, preview each option, and tap to apply. Filters can instantly change the tone and atmosphere of a reflection shot.
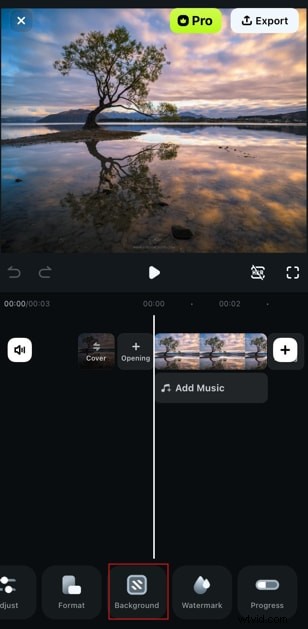
3. Blur the Background
Open the Background tab, select an appropriate blur intensity, and apply it to isolate the subject. This creates a professional depth‑of‑field effect without manual cropping.
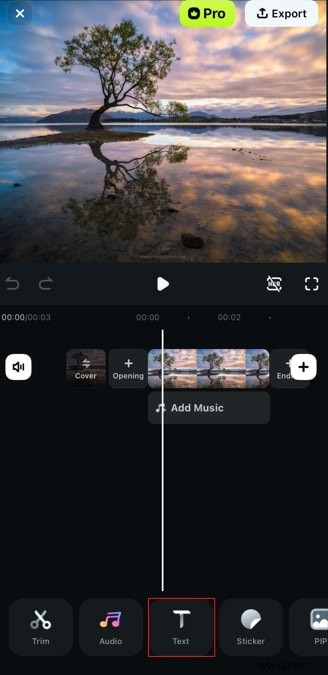
4. Add Text or Titles
Use the Text tab to add captions, titles, or branding. Choose a template, adjust font, size, and placement, and finalize your design.
Conclusion
By combining the reflection techniques above with Filmora’s intuitive editing tools, you can produce striking images that capture light, mood, and geometry. Experiment with different surfaces, lighting conditions, and creative compositions—your iPhone is a powerful tool for reflective photography.