Introduction
This tutorial is from the Lightroom 4 Workshop Collection. Including 27 hours of A to Z Lightroom 4 education and the industry standard Lightroom 4 Preset System. DPS users can get 10% off by using the DPS10 coupon code upon checkout. Click the link above to learn more/purchase.
Overview
In this tutorial, we will give you a quick tip when importing image into Lightroom that will eliminate the need to search around for import and destination folders.
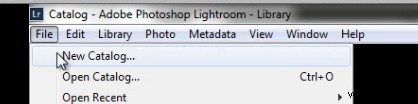
Step 1. Create Your Catalog
If you don’t already have a Lightroom catalog created, then let’s go ahead and create one now. Simply open Lightroom and go to File -> New Catalog.
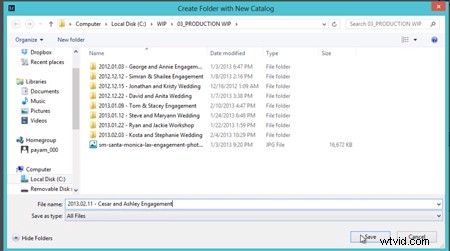
Give your Catalog a descriptive name and a destination folder of your choice. Remember to keep your naming conventions consistent to have an efficient and organized workflow. Our naming convention is as follows:
YEAR.MONTH.DAY – NAMES PHOTOGRAPHY TYPE
So, for this example we have the following:
2013.02.11 – Cesar and Ashley Engagement which is typed into the File name location shown in the image below.
After you hit “Save”, Lightroom will close and re-open with the New Catalog which is ready for images to be imported.
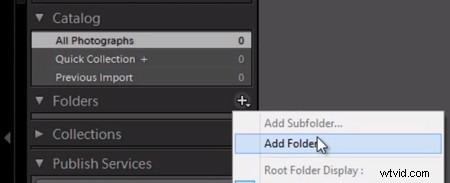
Step 2. Creating the “Folders”
We will be directly importing the images into a folder on the left-side Panels called “Folders.” But, first we have to create a folder for the images to be imported into. On the Folders Panel, simply click the “+” icon to create a new folder as shown below.
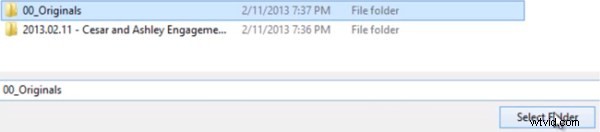
Now, select the same folder where we saved our catalog to create the folder where we want to place the original images. We do this to ensure that the images always move with the catalog if the catalog is ever transferred.
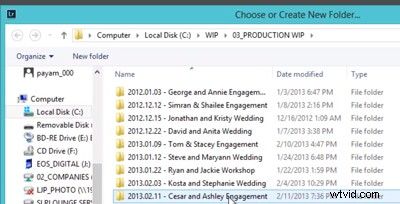
To create new Folder for your original images, right-click within the Folder content area and select “New Folder”. Remember, we are doing this all from the “Add Folder” dialogue in Lightroom, not in the Operating System.
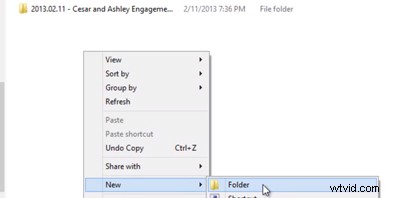
Type in “00_Originals” or the name of your choice for the Folder to contain your original images. Again, keep your naming conventions consistent for better organization. Then click “Select Folder”.
Step 3. Importing Directly to Folders
Now that we have our folder created. We have two options to import. Option number 1 is to Right-click on the Folder that shows up under the Folders Panel and select “Import to this Folder” as shown below.
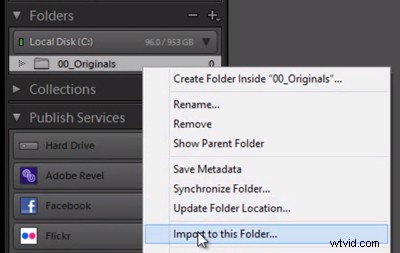
This will pull up our Import Dialogue and automatically set the destination to the “00_Originals” Folder without having to manually select our destination as we normally would.
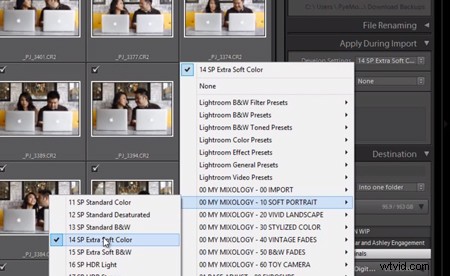
Workflow Tip: Apply a Workflow Preset on Import
Before you begin the Import process, we always select an import preset that is most applicable to the type of images being imported. In our studio, we generally use the “Extra Soft Color” Preset for portrait sessions from the Lightroom 4 Preset System by SLR Lounge as shown below.
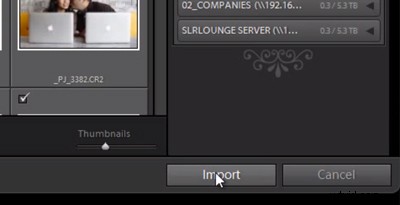
When you are finished, select “Import” located on the bottom-right in Lightroom.
And that’s it! Hopefully this little quick tip on importing will help you to import images just a bit more efficiently.
Learn More with the Lightroom 4 Workshop Collection!
This was a sample tutorial from the Lightroom 4 Workshop Collection. A collection of nearly 30 hours of video education teaching everything from Lightroom basics to advanced raw processing techniques.
The LR4 Workshop Collection also includes the critically acclaimed Lightroom 4 Preset System which is designed to enable users to achieve virtually any look and effect within 3-5 simple clicks. From basic color correction, vintage fades, black & white effects, tilt-shift effects, faux HDR, retouching, detail enhancing, and so much more. Click the links above to learn more.