In professional filmmaking, audio quality often outstrips what on‑camera microphones can deliver. That’s why most crews record sound separately and then sync the files in post‑production. Premiere Pro offers three reliable methods to align your audio and video: timeline sync, merge clips, and manual sync.
Pre‑Production: The Foundation of Successful Sync
Great sync begins before you even open Premiere. Two simple tools will save you hours of headaches later: a clap sync and a take number.
Clap Sync
When you clap or use a clapboard, a sharp spike appears in the waveform. This spike acts as a reference point that Premiere can match between the camera’s scratch audio and your separate audio recorder.

Even if the camera’s built‑in mic is unusable, you can still sync by matching the visible clap in the video frame to the same clap in the audio waveform.
Take Numbers
Before rolling the camera, hold up a paper or clapboard with the take number and read it aloud after the mic starts. This way the take number appears in both the first frame of the video and the beginning of the audio file, making file matching trivial.
Method 1: Syncing Directly in the Timeline
- Drag the video file (with camera audio) and the separate audio clip into the timeline.
- Select both clips.
- Right‑click and choose Synchronize.
- In the dialog, ensure the Audio option is checked and confirm.
Premiere automatically aligns the audio to the camera track. You can then delete the redundant camera audio.
Method 2: Merge Clips
This method is ideal when you have dozens of take pairs. It consolidates each video and audio pair into a single file, keeping your timeline tidy.
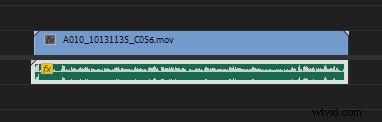
- In the Media Browser, hold Ctrl and select the video and its corresponding audio file.
- Right‑click one of the selected files and choose Merge Clips.
- In the merge dialog, tick Audio and click OK.
- A new file named “original‑name – Merged” appears. Drag it into your sequence.
For large projects, create a dedicated folder called merged clips to store all synced files.
Method 3: Manual Sync
Manual sync is your fallback when scratch audio is missing or corrupted. It’s straightforward but requires careful attention.
- Place the video and audio clips in the timeline.
- Locate the clap spike in the audio waveform.
- Zoom in until you see the clap frame in the video.
- Drag the audio clip so the spike aligns exactly with the clap frame.

Common Sync Issues & Quick Fixes
Clap Doesn’t Line Up Precisely
When the audio appears to “snap” between frames, switch the timeline to audio time units:
- Open the three‑bar menu in the timeline and choose Show audio time units.
- Zoom in closely and fine‑tune the alignment.
- Turn off audio time units when you’re finished.
Waveform Visibility Problems
Double‑click the empty space in the audio track to expand it. In the timeline settings, enable Logarithmic waveform scaling and uncheck Rectified Audio Waveforms for clearer visualization.
Accidentally Moved the Synced Audio
Restore the sync by:
- Selecting the video clip in the timeline.
- Going to Sequence > Match Frame to locate the original file in the media bin.
- Dragging the camera audio back onto the timeline and re‑synchronizing if needed.
Conclusion
Premiere Pro’s sync tools are powerful yet simple when used correctly. By planning your takes with clap sync and take numbers, and choosing the method that fits your workflow—timeline sync, merge clips, or manual sync—you’ll ensure crisp audio that matches every frame. For more expert tips on mastering Premiere Pro, explore our beginner’s guide and advanced workflows.