
Jul 14, 2025 • Proven solutions
Adobe Premiere Pro is the industry standard for video editing, and its latest updates provide a streamlined workflow for 360° VR content. While stitching 360° footage requires a separate tool, Premiere Pro accepts equirectangular files and lets you edit them just like any other video clip, complete with color correction, transitions, and more.
Related article: How to Stitch GoPro Clips into 360 Videos >>
Editing 360° Video in Premiere Pro
Follow these essential steps to import, adjust, edit, and export your 360° footage.
1. Import Your 360 Footage
Open Premiere Pro and import your equirectangular clip by double‑clicking the project panel or pressing Command + I. The file will appear in the timeline just like a standard video.
2. Adjust Project Settings
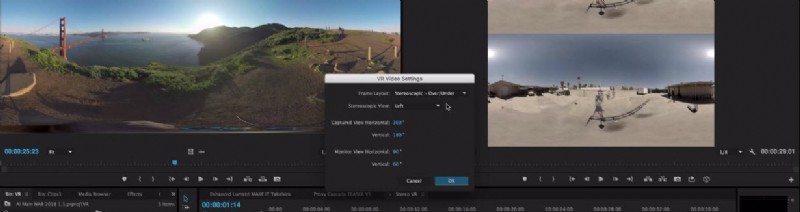
Right‑click the clip in the project panel and choose Properties. Click the wrench icon in the bottom right, then navigate to VR Video > Settings to configure resolution, field of view, and other VR parameters. This step ensures your preview displays correctly.
3. Enable VR Preview Mode

Set the preview window to VR mode in one of two ways:
- Click the wrench icon, then select Video > VR Mode.
- Press the + icon in the preview panel and choose VR Mode.
4. Edit Your Footage
With settings and preview configured, treat the clip like any other timeline asset. Trim, cut, and apply color grades. Note that some effects—such as Warp Stabilizer—are unavailable for equirectangular footage. Keep your edits within the spherical boundaries to avoid distortion.
5. Export Your VR Footage
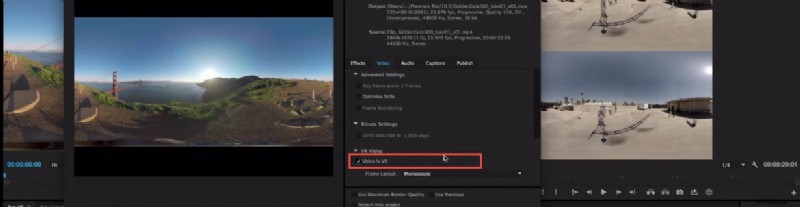
Export by selecting File > Export > Media or pressing Command + M. In the Export Settings, choose a codec that supports 360° (e.g., H.264). Under the Video tab, check the VR Video box to embed metadata. Adobe now handles YouTube and other VR platform compatibility directly within Premiere Pro.
Best Video Editor: Wondershare Filmora


Benjamin Arango
Benjamin Arango is a writer and a lover of all things video.
Follow @Benjamin Arango