A very simple, yet very effective effect is changing the speed of a video clip. This could be a simple still-frame (also called "Freeze Frame") or playing a clip in slow or fast motion.
This article shows you how to do this using Final Cut Pro X.
For more tutorials on slow-motion please refer to this article: Top 10 Slow Motion Video Editing Software.
Freeze-Frames and Slow Motion in Final Cut Pro X
1. STILL FRAMES
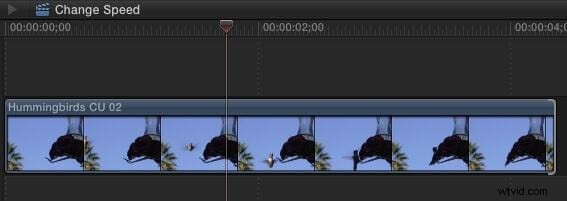
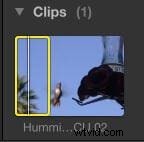
A still-frame freezes action. For instance, here is a clip of a hummingbird getting ready to land on a bird feeder. I want to create a freeze-frame of the bird in flight. (Um, yeah, I use "freeze-frame" and "still-frame" interchangeably.)
In Final Cut Pro X, put the playhead (or skimmer) on the frame you want to freeze and type Option+F.
This creates a two-second freeze-frame at the position of the playhead.
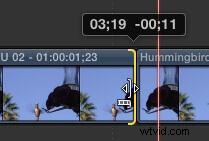
Adjust the duration of the frame by trimming the edge; just like any other clip. Here, for example, I'm making the duration of the freeze-frame 11 frames shorter.
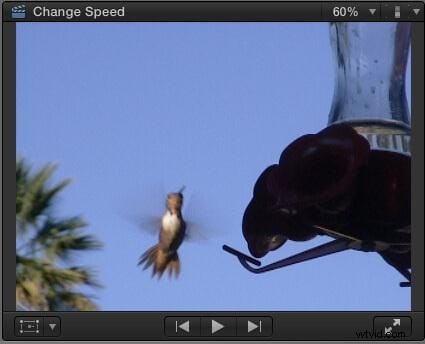
In case you were wondering, this is what the freeze looks like. It freezes the flight of the hummingbird in the middle of playback, allowing us to add graphics or other text then resume the action as though nothing had happened.
Very cool, except....
Well, the good news is that this is fast and easy. The bad news is that we can't change the location of the still frame.
So, here's another way to do this.
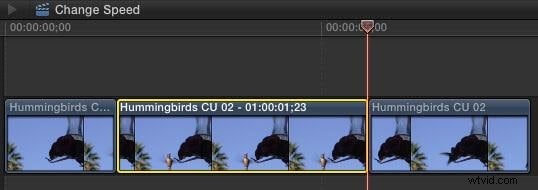
Put the playhead (or skimmer, but I prefer the playhead) on the frame you want to freeze, select the clip, then type Shift+F.
This locates the source clip in the Browser, selects both the Browser and the clip, and matches the position of the In, Out, and playhead.
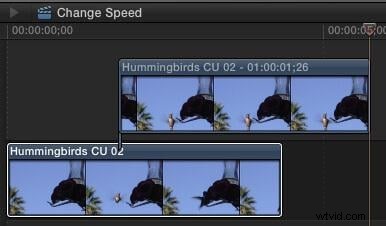
Now, with the Browser selected, type Option+F. This creates a freeze-frame of the Browser clip and places it at the location of the playhead as a connected clip in the Timeline.
As a connected clip, we can move this new freeze-frame wherever we want. However, be careful in moving the clip, because, unless you mark the original frame with a marker (type "M"), there's no easy way to match the still frame with the source frame, once the still frame is moved somewhere else.
I use both these techniques in many different projects.
2. HOLD FRAME
A Hold Frame is similar to an in-line still frame, but with more flexibility.
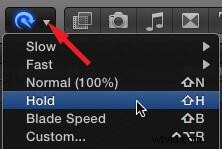
Put the playhead (or skimmer) on the frame you want to hold. Then, Then, using either Modify > Retime or the "Smurf-on-a-headset" Toolbar icon, choose Hold Frame (or type: Shift+H).
This displays the orange Retime editor bar above the clip, with a small red portion indicating the Hold frame.
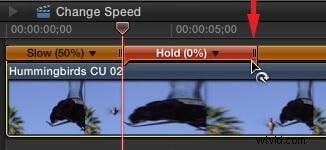
Change the duration of the Hold frame by dragging the small thumb at the right end of the red bar.
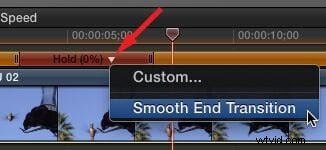
Add a speed ramp transition at the end of the Hold frame by clicking the downward-pointing arrow next to the word "Hold" in the Retime Editor.

To change the actual frame being held, double-click the bar icon to the LEFT of the red Hold section and choose Source Frame (Edit). This allows you to slide the Hold frame selection left or right.
NOTE: Changing the source frame is a feature that I like a LOT!
3. SLOW (or FAST) MOTION
We use slow-motion to show events that are too fast for the unaided eye to see. And fast motion to speed up very slow events. Both of these effects use what's called a "constant speed change," where the entire clip changes by the same amount - either faster or slower.
WE create either effect using the same tools, just different values. Here's how.
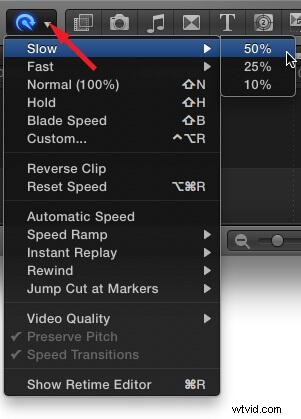
Select the clip who's speed you want to change. Then, using either Modify > Retime or the "Smurf" Toolbar icon, select Slow (or Fast).
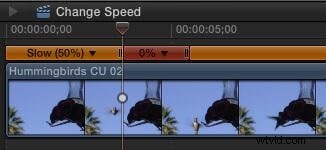
Choose one of the available speeds; in this case, 50%. (Yes, you can change this to any value you want, I'll show you how in a minute.)
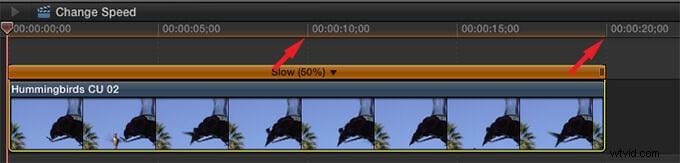
Three things happen at once:
- The duration of the clip changes
- The orange Retiming bar appears over the top of the clip
- The speed of the clip changes
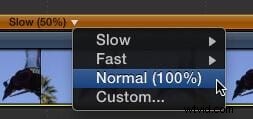
To reset the speed back to normal (100%), click the downward-pointing arrow in the Retiming bar and choose Normal (100%).
There are two ways to change the speed of a clip.
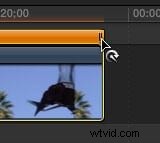
The easy way is to grab the small handle at the end of the clip and drag left or right. The speed will change as you drag it.
Or, for more precision, click the downward-pointing arrow in the Retiming bar and choose Custom.
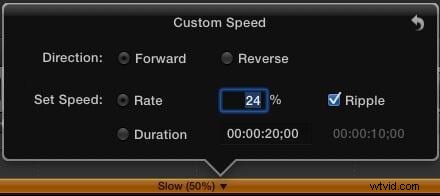
This opens a new dialog allowing a number of changes:
- Reverse. Plays the clip in reverse.
- Rate. Select a specific speed change as a percentage of normal speed for a clip. Less than 100% is slow-motion. More than 100% is fast-motion.
- Duration. Select a specific duration for a clip and FCP X will calculate how fast or slow it needs to go.
- Ripple. When checked, adjusts the duration of a clip based upon the speed. When unchecked, the clip duration remains fixed even when speed changes.
You will get the smoothest speed changes when the percentage you choose divides evenly into 200. For example, 100, 66, 50, 40, 33, 25, 20, 10 and so on.
4. EXTRA CREDIT
There is one more setting to consider when slowing a clip. (This does not apply when creating fast motion.)
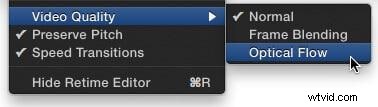
Using, again, either Modify > Retime or the "Smurf" menu, select Video Quality.
- Normal. This is the best choice for speeds of 50% or faster.
- Frame Blending. This is the best choice for speeds of about 20% to 50%.
- Optical Flow. This is the best choice for speeds slower than about 20%.
Frame blending puts a short dissolve between frames when running in slow motion to improve the illusion of motion. Optical Flow invents in-between frames to minimize the jerkiness of extremely slow motion.
Frame blending is relatively fast and easy. Optical Flow will look better in most cases, but takes a long time to render.
This is a basic tutorial about Apple Final Cut Pro X, a professional video editing software. However, if video editing is new to you, consider Wondershare Filmora for Mac. This is a powerful but easy-to-use tool for users just starting out. Download the free trial version below.
SUMMARY
Whether you want your clips to speed up, slow down or just plain stop, Final Cut Pro X makes the entire process easy.