
Wondering how to create an authentic behind‑the‑Scenes (BTS) video that showcases your creative process? This guide walks you through four essential stages—from story planning to polished editing—using the beginner‑friendly MiniTool MovieMaker.
Quick Navigation :
- What Is a Behind‑the‑Scenes Video
- How to Make a Behind‑the‑Scenes Video
- Conclusion
Behind‑the‑Scenes videos give viewers an inside look at the effort, collaboration, and challenges that shape a project. By highlighting raw moments, team interactions, and even the occasional mistake, BTS content feels authentic and relatable.
In this guide, I’ll walk you through the process step by step, from planning the narrative and capturing footage to editing the final result with MiniTool MovieMaker.
What Is a Behind‑the‑Scenes Video
A behind‑the‑Scenes (BTS) video reveals what happens during production. Rather than focusing solely on the finished product, it showcases idea development, set‑up, and the integration of various elements—often with unfiltered footage that captures both triumphs and setbacks.
Because BTS videos are natural and unedited, they provide a closer look at the creative journey. This makes them especially valuable for filmmakers, marketers, content creators, and social‑media brands seeking to deepen audience connection.
In short, a BTS video tells the story behind the story, helping viewers connect on a deeper level.
How to Make a Behind‑the‑Scenes Video
Below are four detailed steps to create a compelling BTS video.
Step 1: Plan the Narrative
Before you pick up the camera, define the story you want to tell. A clear narrative ensures every clip serves a purpose and reinforces your brand message.
Apply classic storytelling structure—beginning, middle, and end—so viewers can follow the process effortlessly.
Decide on the tone early on, whether it’s informative, casual, or entertaining. This decision will guide your filming style and editing choices.
Step 2: Record Behind‑the‑Scenes Footage
Once you have a plan, record as much relevant content as possible.
Film from multiple angles—wide, close‑up, and over‑the‑shoulder—to add visual variety.
Document key moments: preparation, set‑up, filming, and any pivotal actions that drive the project forward. Include small details—adjusting equipment, brainstorming, reviewing shots—to enrich the narrative.
For instance, if you’re shooting a product launch, show the planning stages and on‑site production to give the audience a fuller understanding of the workflow.
Step 3: Capture Key Shots
In addition to general footage, include these essential shots to elevate your BTS video:
- Time‑lapse – Perfect for illustrating long processes like set‑up or scene preparation.
- Interviews & reactions – Short clips of team members explaining or reacting add personality.
- Team collaboration – Show discussions, coordination, and problem‑solving to highlight teamwork.
- Candid moments – Spontaneous mishaps or humor make the video relatable.
Step 4: Edit the Video
After filming, organize the clips into a cohesive story through editing. MiniTool MovieMaker offers a balance of power and simplicity, making it ideal for beginners.
MiniTool MovieMaker features:
- Intuitive interface for trimming, splitting, cropping, flipping, and rotating clips.
- Advanced tools like picture‑in‑picture, video collages, and smooth 4K editing.
- Built‑in transitions, effects, stickers, and royalty‑free music to enhance production value.
- Export options in multiple formats, with customizable resolution, frame rate, and bitrate—up to 4K for free.
Follow these step‑by‑step instructions to create your BTS video with MiniTool MovieMaker.
Step 1: Download and Install
Ensure MiniTool MovieMaker is downloaded and installed on your computer.
MiniTool MovieMaker – 100% clean & safe
Step 2: Import the Media
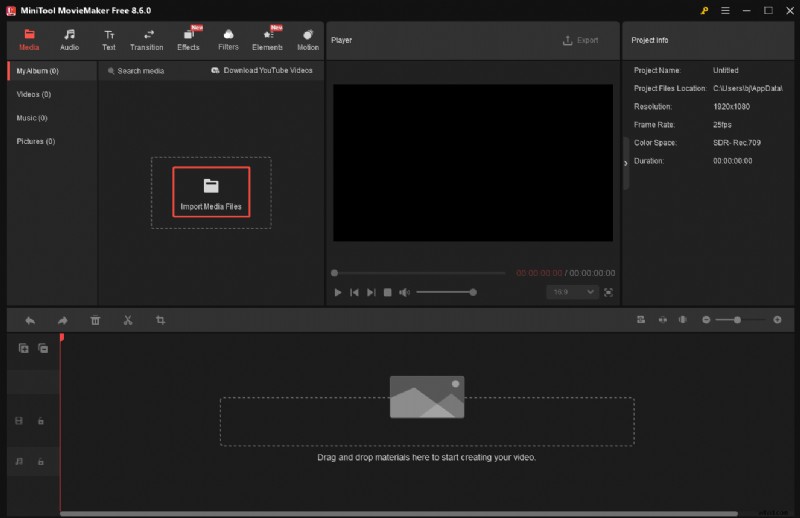
Open MiniTool MovieMaker and click New Project to launch the editing interface. Then click Import Media Files to upload your footage, and use the + icon to add clips to the timeline.
Step 3: Adjust the Video Properties
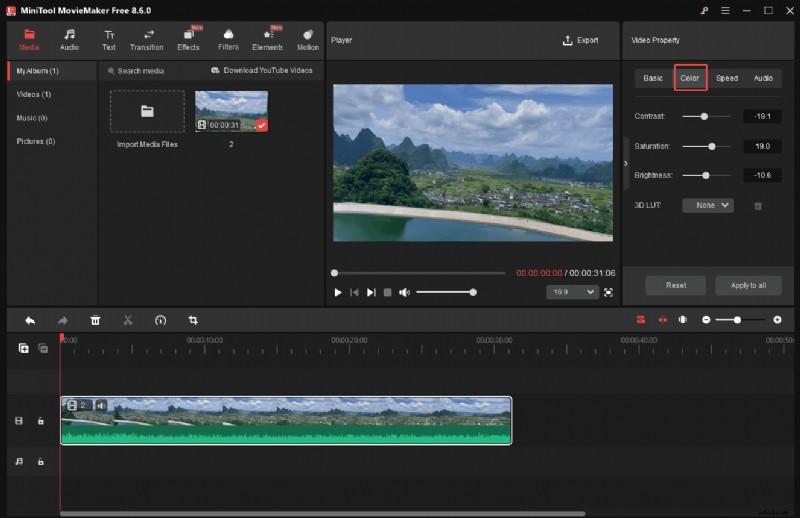
Select a clip on the timeline to open the Video Property panel. Here you can flip, scale, rotate, and adjust playback speed. Use the Color tab to tweak contrast, saturation, and brightness in real time.
Step 4: Organize and Rearrange the Clips
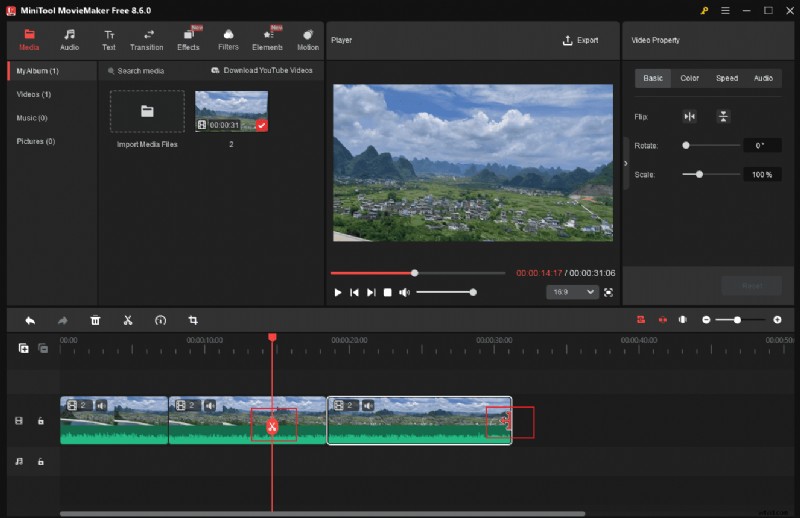
Trim unwanted sections by dragging the clip edges, or split a clip to remove a middle section. After cleaning, drag clips to arrange them into a logical sequence.
Step 5: Add Transitions
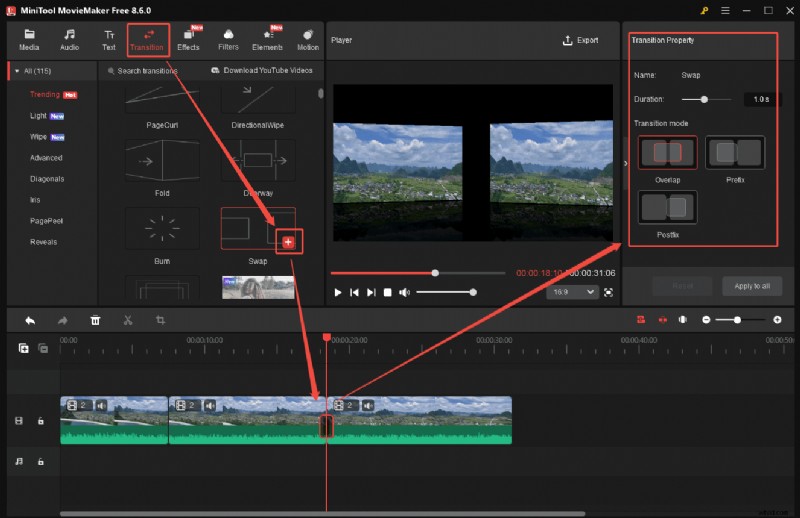
Choose the Transitions tab, select a transition, and click + to add it between clips. Adjust duration (max 2 s) and mode (overlap, prefix, postfix) in the property panel.
Step 6: Add Stickers
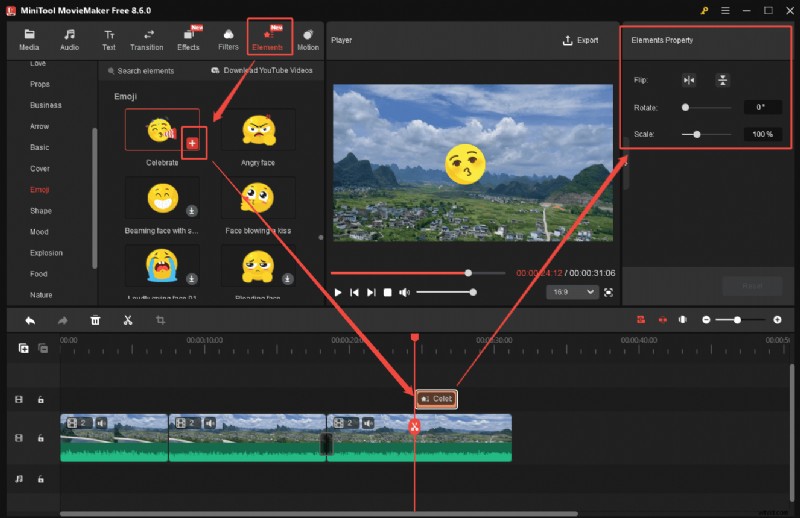
Navigate to the Elements tab, pick a sticker, preview its animation, and add it to the timeline. Resize or rotate it via the property panel.
Step 7: Add Text
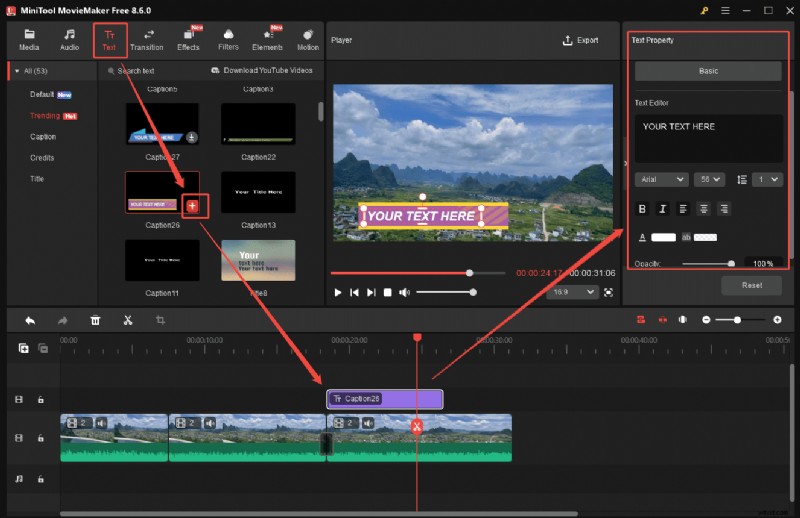
Use the Text tab to insert titles or captions. Drag the text layer onto the timeline, enter your content, and customize font, color, size, and duration.
Step 8: Add Music
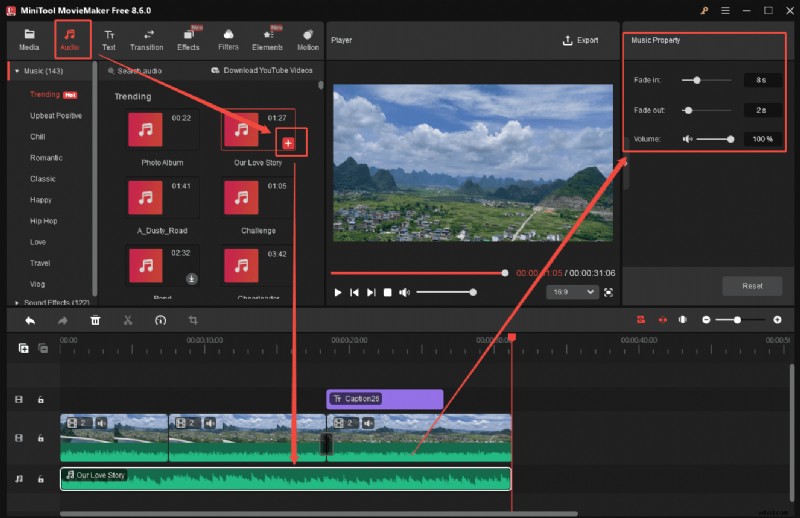
Open the Audio tab to browse royalty‑free tracks. Download your chosen music and drag it to the timeline. Trim, fade, or adjust volume as needed.
Step 9: Export the Final Video
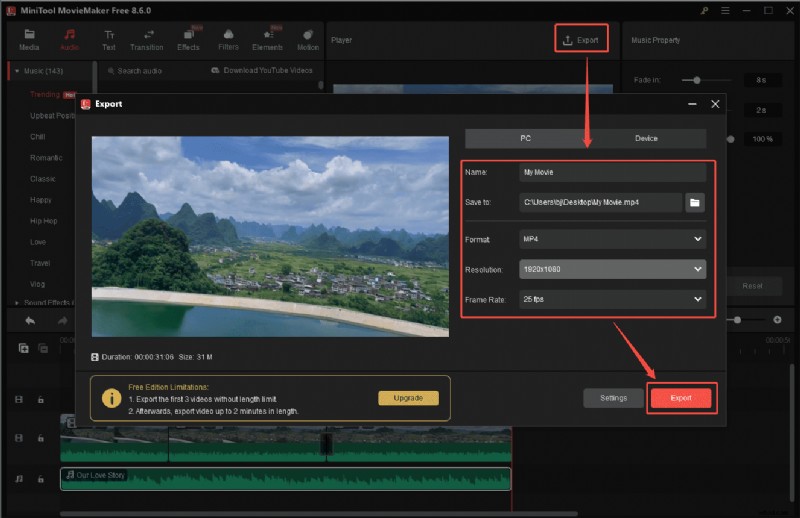
Click Export above the player. Name your file, select the destination folder, and adjust resolution, frame rate, and bitrate. Click Export to save.
Now that you know how to craft a BTS video, it’s time to put these steps into practice.
MiniTool MovieMaker is a reliable, feature‑rich editor that simplifies the creation of polished behind‑the‑Scenes videos. Try it today.
Got questions about MiniTool MovieMaker? Email us for assistance.
Conclusion
BTS videos are a powerful way to showcase the creative journey and strengthen audience connection. This guide walked you through the four key stages—planning, recording, capturing essential shots, and editing—so you can produce a compelling story.
With a beginner‑friendly tool like MiniTool MovieMaker, creating a professional BTS video is straightforward. Start filming today and share your authentic process with the world.
For any MiniTool MovieMaker issues, contact support.