Reading Time: 7 minutes
Published: December 19, 2025

What is a histogram? Definition & Meaning
A histogram is a graph that shows how many pixels in your image sit at each brightness level, from pure black on the left to pure white on the right, so you can spot clipped highlights, crushed shadows, and overall exposure balance.
The histogram is a fast reality check. It helps you see exposure problems even when your screen looks “fine.” You still need to decide what matters in the shot, since the histogram cannot tell you where tones sit in the frame.
What the histogram shows
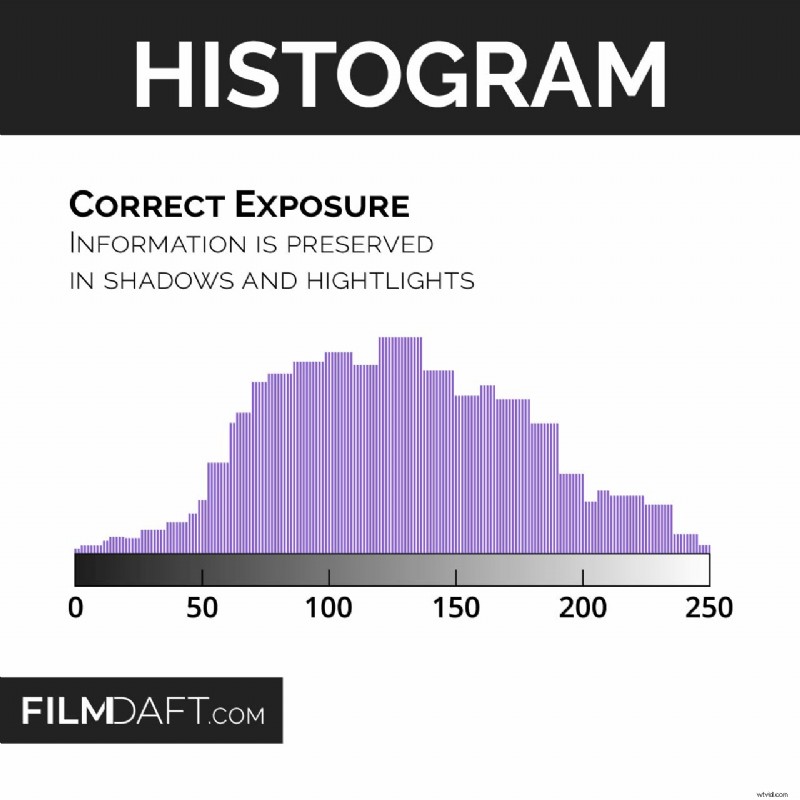 The Histogram: Correct Exposure (2025) illustration shows most tones sitting in the middle range, with data in both shadows and highlights, without the graph slamming into 0 or 255. Image Credit: FilmDaft.com
Think of the histogram as a tone count. It measures brightness values and stacks them into a simple graph.
- Left side is shadows and blacks.
- Middle is midtones.
- Right side is highlights and whites.
- Height shows how many pixels sit at that brightness.
One important detail gets missed a lot. The histogram shows counts, so a small bright window can clip and only create a small bump near the right edge. Your subject can be fine and your highlights can still be breaking.
How to read the edges first
The edges are where images fail. If the graph hits the walls, you are at risk of losing detail.
Highlight clipping
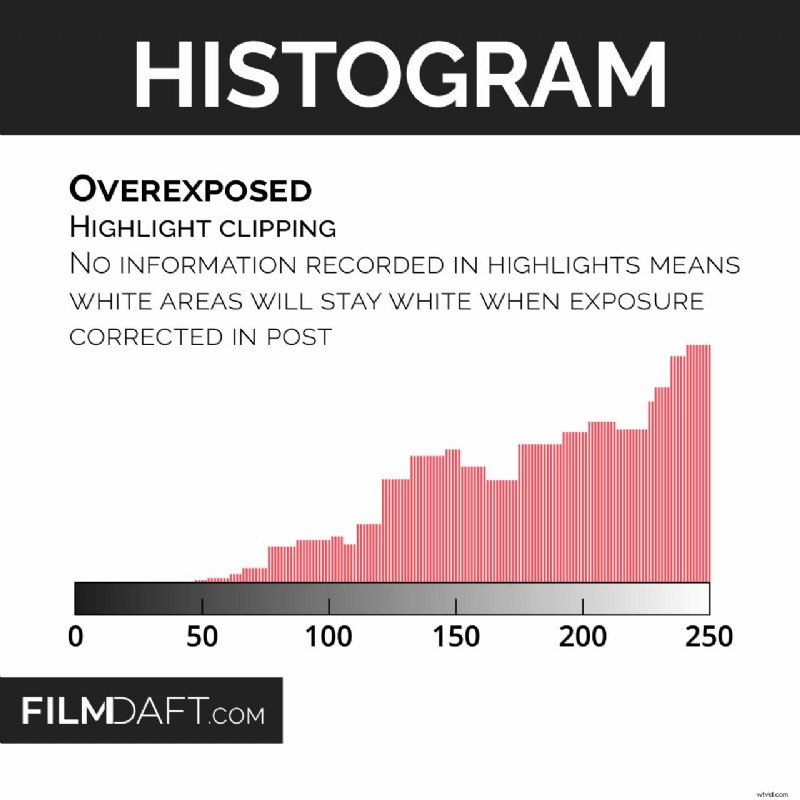 The Histogram: Overexposed (2025) illustration shows the graph pushed to the right and pinned near 255, which signals highlight clipping and lost detail in bright areas. Image Credit: FilmDaft.com
Highlight clipping happens when the graph hits the right wall. Those pixels can turn into flat white with no texture.
- A good example is: You frame a face near a bright window. The window detail disappears even though the face looks okay.
- What to do: Lower exposure until the graph pulls away from the right edge. If the face gets too dark, add bounce or a soft key instead of raising exposure.
Shadow clipping
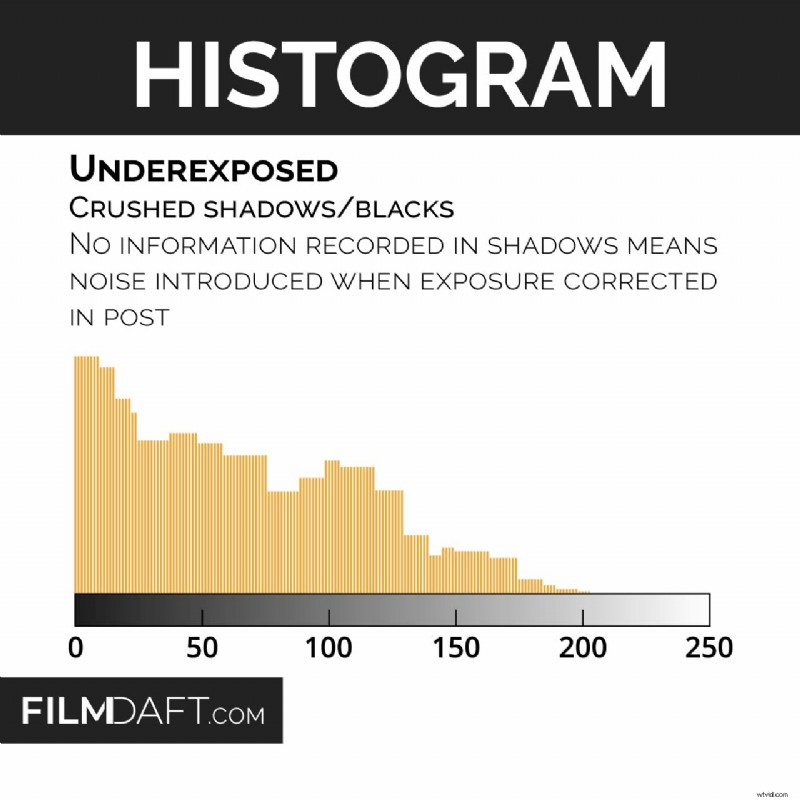 The Histogram: Underexposed (2025) illustration shows the graph piled up on the left near 0, which signals crushed blacks and missing shadow detail that will turn noisy if you lift exposure in post. Image Credit: FilmDaft.com
Shadow clipping happens when the graph hits the left wall. Those pixels can turn into solid black with no texture.
- A good example is: A dark jacket in a night scene. The fabric turns into a flat silhouette.
- What to do: Raise exposure slightly or add controlled fill so shadows lift off the left edge.
Quick warning: The histogram can miss small trouble spots because it only shows counts. If a face, a sky, or a practical must stay safe, confirm with zebras or a waveform. If you want a deeper guide to clipping and these tools, see crushed shadows and blown highlights.
How to use a histogram to set correct exposure
A histogram helps most when you follow a routine. You make a decision, check the edges, then adjust light so your subject stays where you want it. If you need a refresher on the controls that change exposure, start with the exposure triangle.
Here’s a good video explaining how to read and use a histogram to set correct exposure.Step 1: Decide what must keep detail
Before you touch exposure, pick your non-negotiables. This keeps you from “fixing” the wrong thing.
- Faces usually come first.
- White clothing, paper, and product labels often need texture.
- Reflections on chrome or water can clip and still look normal, so decide if you care about that detail.
Step 2: Protect one side, then manage the other
Many real scenes force a tradeoff. Protect highlights or protect shadows first. After that, change the scene so the other side behaves.
- Highlight priority example: A white shirt in sun. Lower exposure until the histogram stops pinning on the right.
- Shadow priority example: A dark interior where black fabric must keep texture. Raise exposure until the histogram stops pinning on the left.
If you see data pinned to both edges at the same time, the scene contrast is beyond what exposure alone can solve. You need to reduce contrast or capture more than one exposure.
- On set fixes: Add fill, flag the highlights, use diffusion, change angle, or use a neutral density (ND) filter to hold highlights without changing depth of field.
- Stills option: Bracket exposures for HDR when one frame cannot hold the range.
Step 3: Place the subject with lighting
Exposure moves everything at once. Lighting lets you target your subject without pushing the whole image into clipping. A light meter can help you repeat the same face exposure across setups, then you use the histogram and other tools to confirm nothing breaks.
- A good example is: A backlit interview. You protect the window, then add bounce or a soft key to lift the face.
- Another common case: A night exterior. You lift shadows with fill instead of raising exposure until streetlights clip.
Expose to the right (ETTR) and when it makes sense
ETTR is popular because brighter exposure can reduce shadow noise. It only works when you can keep important highlights from clipping, and it gets easier to mess up in uncontrolled video.
Expose to the right (ETTR) is a technique where you record the image as bright as you can without unacceptable highlight clipping, so shadow detail records cleaner.
- ETTR works best in stills, RAW workflows, and controlled lighting.
- ETTR is risky in video with changing light, moving subjects, or uncontrolled highlights.
If you try ETTR, use a strict stop point. That keeps you from drifting into overexposure. It also helps to understand how your camera color profile affects what you see on the monitor.
- Raise exposure until highlights sit close to the right edge.
- Stop before important highlights clip, like skin hotspots, white fabric, or windows you need to hold.
- Confirm with zebras or waveform if your camera offers them.
Why your camera histogram can be misleading
Many cameras build the histogram from a processed preview image. That preview often follows your picture style settings, and it can also reflect LUT preview choices. The histogram can shift even when the RAW data has not changed in the same way.
This matters in two common cases. First, the camera can look “clipped” even though the RAW file has a bit more recoverable headroom. Second, a contrasty preview can make the image look safer than it is in the shadows. Your preview pipeline ties into settings like Log and monitoring LUTs, so it helps to understand Look, Log, LUT, and RAW. If your issue shows up mostly after you start grading, see color correction vs color grading.
How to test your camera: Shoot a highlight-heavy scene. View the histogram on camera. Then open the RAW file in your editor and check clipping there. Do this once and you will learn how conservative your camera display is.
RGB histograms and channel clipping
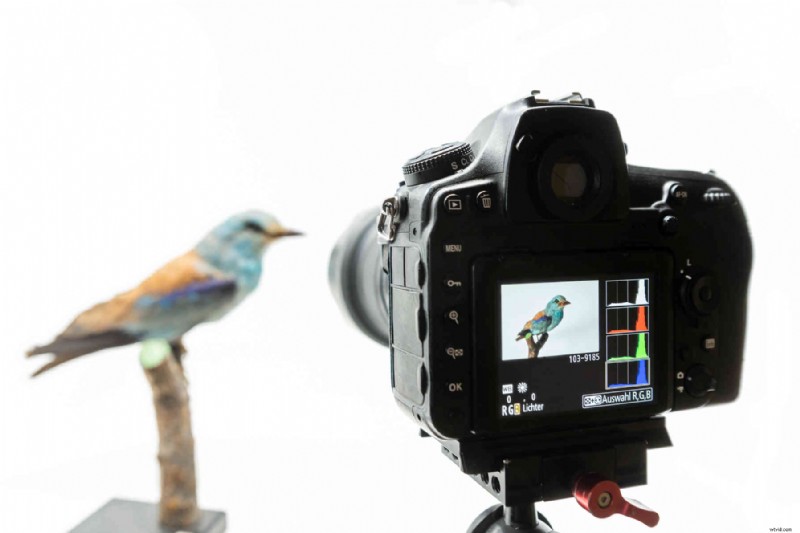 Here, you see a camera screen with separate red, green, and blue histograms, which helps you catch single-channel clipping (like red neon or blue LEDs) even when the overall brightness histogram still looks safe.
A single brightness histogram can hide color channel problems. Strong colored lights can clip one channel first, even when the image still looks “okay.”
An RGB histogram shows red, green, and blue channels separately.
- A good example is: A red neon sign clips the red channel. The sign turns into a flat block of red with no texture.
- What to do: Lower exposure, dim the source, add diffusion, or change angle until the channel stops clipping.
RGB views also help you spot color casts. If one channel sits much higher across most of the range, check white balance. If you want a physical on-set reference for color, a color checker tool can help you match shots in post.
Histogram vs waveform, zebras, and other scopes
The histogram is fast, but it is not precise about subjects. Scopes help when you must protect a face or hold a background element at a specific level. If you want a practical walkthrough of waveform and zebras, see crushed shadows and blown highlights.
- Waveform shows exposure values across the frame. This helps you judge a face versus a bright background.
- Zebras mark pixels above a threshold you set. This helps you catch highlight risk during motion.
- Vectorscope helps you judge hue and saturation. It is especially useful for skin and mixed lighting. See what a vectorscope is.
A simple workflow works well. Use the histogram for a quick scan. Use scopes when you need to protect a specific subject. If you also want the broader context of monitoring and standards, see color space explained.
How to view a histogram on your camera and in editing
You can usually check a histogram in two places. One is on camera and the other is in post, where you can confirm what you captured.
- On camera: Cycle your display overlays until you see the histogram. Many cameras show it live and in playback.
- In editing: Open the histogram panel. Turn on clipping indicators if your software supports them.
If you want a bigger “settings overview” reference for video, see camera settings for video production.
Common mistakes that make histograms feel confusing
 The Histogram Quick Guide (2025) illustration shows what to do when the graph piles left (raise exposure to save shadows), sits inside range (hold exposure and protect what matters), or piles right (lower exposure to stop highlight clipping). Image Credit: FilmDaft.com
Most histogram confusion comes from one assumption. People expect one “correct” shape. Exposure does not work like that.
- Centering the graph every time: Night scenes lean left. Snow scenes lean right.
- Ignoring the edges: Clipping shows up at the walls first.
- Fixing contrast with exposure: If both edges pin, change lighting or capture multiple exposures for stills.
- Trusting the LCD alone: Glare and brightness settings can fool you.
- Forgetting shutter side effects: If you change shutter speed to “fix exposure,” you also change motion blur. See motion blur explained.
Summing Up
A histogram is a brightness count of your pixels from black to white. Read the edges first to spot clipping risk. Set exposure by protecting what must keep detail, then use lighting to place your subject. Treat ETTR as an optional technique with a strict stop point. When you need precision for a face or a practical, confirm with waveform, zebras, and other scopes.
Read Next: Want to get confident with your camera?
Start with our main Cinematography hub to see how lenses, lighting, movement, and exposure work together to create the final image.
Then explore the full Camera section for guides on camera bodies, sensors, white balance, file formats, and the technical tools you work with on set.
You can also visit our Camera Shots & Angles pages to learn how framing and shot choice drive mood, pacing, and meaning.