Split‑screen video editing allows you to showcase multiple clips simultaneously, giving viewers a richer, multi‑perspective experience. This technique is a staple in tutorials, reaction videos, and narrative storytelling, helping creators engage audiences by juxtaposing complementary visuals.
While the concept seems straightforward, beginners often find the practical steps a bit daunting. This guide walks you through everything you need to know to craft polished split‑screen videos in Wondershare Filmora, from creative inspiration to advanced polish.
In this article
- Creative Ideas for Split‑Screen Videos
- Step‑by‑Step: Creating Split‑Screen in Filmora
- Advanced Tips to Elevate Your Split‑Screen Footage
Part 1. Creative Ideas for Split‑Screen Videos
Split‑screen layouts open up a world of storytelling possibilities. By presenting several scenes side by side, you can compare, contrast, or simultaneously narrate events that would otherwise feel disjointed. Below are proven scenarios where split‑screen shines.
Side‑by‑Side Comparisons
Place two clips adjacent to each other to highlight differences or similarities. Ideal for:
- Product Reviews: Compare features, pros, and cons of two similar items in real time.
- Before‑and‑After Transformations: Showcase a makeover, renovation, or any visual change from start to finish.
Simultaneous Storytelling
Show multiple storylines or events occurring concurrently, adding depth and keeping viewers hooked.
- Event Coverage: Highlight various moments of a wedding, sports game, or concert from different angles.
: Interweave two plotlines that intersect or run in tandem, creating intrigue.
Tutorials & Demonstrations
Split‑screen is a staple for instructional content, allowing you to display the process and the outcome side by side.
- Cooking Guides: Show the cooking steps on one side and the finished dish on the other for clear guidance.
- DIY Projects: Pair close‑up details of the craft with an overall workspace view to aid comprehension.
Collaborations & Interviews
When participants are in separate locations, split‑screen keeps the conversation engaging.
- Remote Interviews: Display both interviewer and interviewee simultaneously, preserving the dialogue flow.
- Virtual Duets: Feature musicians or performers side by side, showcasing their synergy even when apart.
Experimenting with these concepts will help you craft compelling split‑screen videos that capture and retain audience attention.
Part 2. Step‑by‑Step: Creating Split‑Screen in Filmora
Filmora’s intuitive interface makes split‑screen creation a breeze. Follow these steps to add a dynamic multi‑clip layout to your project.
Step 1 – Insert the Split‑Screen Effect
Open your timeline and navigate to the point where you want the split‑screen to appear.
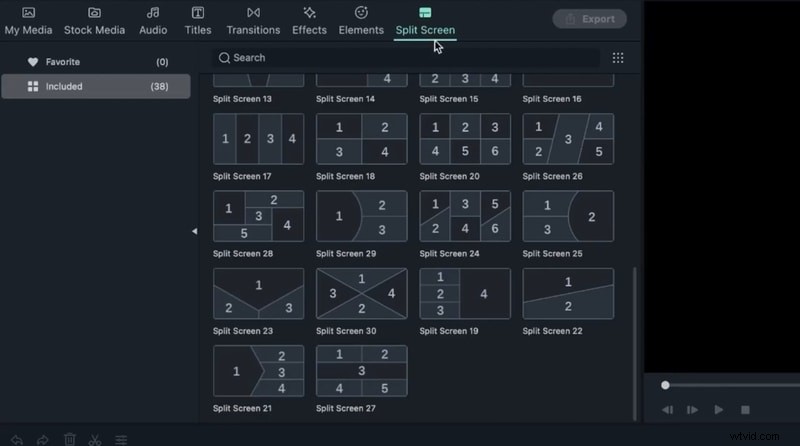
Step 2 – Choose a Layout
Go to Templates > Split Screen to explore over 86 ready‑made layouts. Double‑click a thumbnail to preview it, then drag the chosen layout onto your timeline.
Tip: By default, each split‑screen clip lasts 5 seconds. Adjust the duration by dragging the clip’s edges.
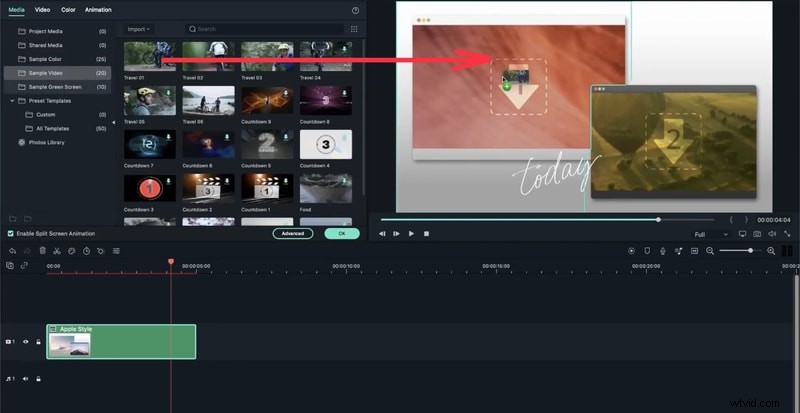
Step 3 – Add Your Clips
Drag each video clip from your media library into the corresponding window of the split‑screen preview. Filmora will automatically assign them to the correct slots.
Step 4 – Fine‑Tune Individual Clips
Click on a clip within the preview to open its settings. You can:
- Zoom: Adjust the zoom level with the slider.
- Mute: Click the mute icon to silence the clip’s audio.
- Remove: Select the clip and press Remove to delete it from the layout.
- Advanced Adjustments: Navigate to Edit > Advanced Split Screen to rotate, reposition, scale, color‑grade, or add motion effects.
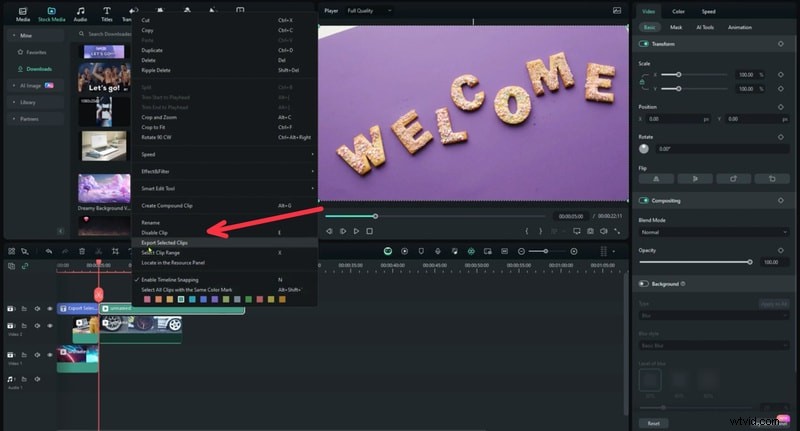
Filmora also lets you export specific segments using the Export Selected Clip feature. Right‑click a clip, choose Export Selected Clips, then set your desired output settings.
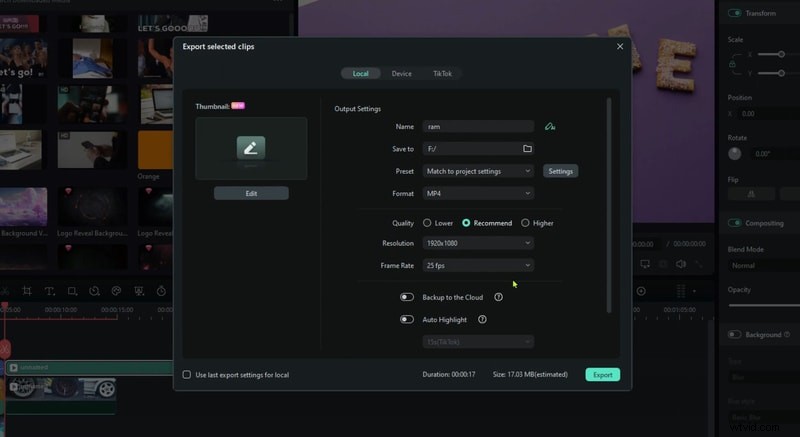
Exporting Selected Clips
After selecting the clip, a dialog will appear where you can name the file, choose the destination folder, and configure frame rate, resolution, and other export parameters. Hit Export to save the snippet.
With these tools, you can present multiple scenes at once while keeping full control over each clip’s presentation.
Part 3. Advanced Tips to Elevate Your Split‑Screen Videos
Enhance viewer engagement by leveraging Filmora’s more sophisticated features. Below are two proven techniques that add polish and clarity.
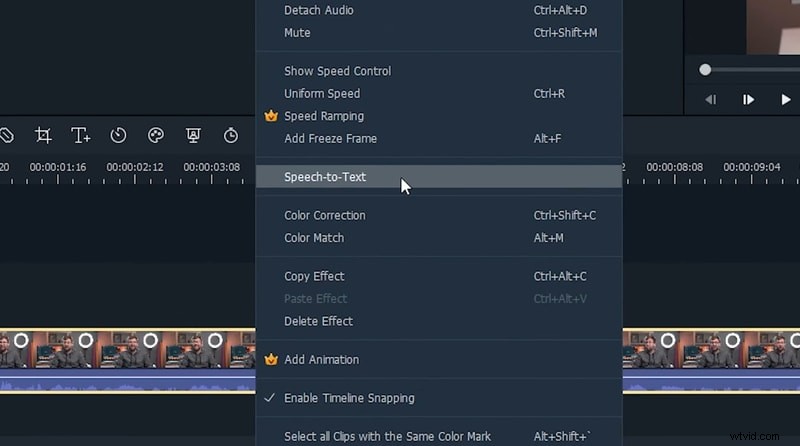
Tip 1: Use Speech‑to‑Text (STT)
Convert spoken dialogue into on‑screen captions, making your videos more accessible and easier to follow.
To activate STT, select the audio track on the timeline, right‑click it, and choose Speech to Text. Filmora will generate subtitles automatically.
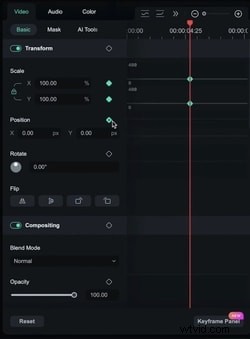
Tip 2: Apply Keyframing for Dynamic Transitions
Keyframing lets you animate properties like position, scale, and opacity, creating smooth, visually striking transitions between clips.
Here’s a quick workflow:
- Step 1. Select a clip on the timeline. In the right‑hand properties panel, navigate to Video > Basic and click the diamond icon to set a starting keyframe.
- Step 2. Move the playhead to a new point on the timeline, click the diamond again to add another keyframe, and adjust the clip’s properties (e.g., zoom in).
- Step 3. Preview the animation to ensure a smooth transition. Repeat as needed across your split‑screen layout.
By combining STT and keyframing, your split‑screen videos will feel more cohesive, professional, and engaging.
Conclusion
Creating split‑screen videos in Wondershare Filmora is straightforward and powerful. With a wide array of layouts, clip‑level controls, and advanced enhancements like Speech‑to‑Text and keyframing, you can produce content that captivates and informs. Start experimenting today—your audience will thank you for the richer visual experience.