
Picture‑in‑Picture (PiP) lets you overlay one video clip over another, creating engaging, dynamic content for tutorials, vlogs, webinars, and more. This guide walks you through the best ways to add PiP on macOS, using both third‑party software and the built‑in iMovie editor.
In this article
- Why use PiP on macOS
- Key use‑case scenarios
- Creating PiP with Filmora on Mac
- Creating PiP with iMovie on Mac
- Feature comparison: Filmora vs iMovie
- Conclusion and best‑practice tips
Why Use Picture‑in‑Picture on macOS?
PiP enhances viewer engagement by combining multiple visual streams in a single frame. It’s ideal for:
- Educational videos: Overlay instructor commentary on slide decks or screen recordings.
- Gaming content: Combine gameplay footage with the streamer’s webcam.
- Webinars & presentations: Show slides while keeping the presenter visible.
- Video tutorials: Display the creator’s face beside the instructional screen.
- Product demos: Highlight a product while narrating features.
- Social media clips: Add reaction overlays to short-form videos.
- Cooking shows: Show the chef alongside the cooking process.
- Travel vlogs: Pair scenic footage with on‑screen commentary.
Stabilize Your Videos with Wondershare Filmora
- Superior stabilization with minimal distortion.
- Extensive video, audio effects, and creative assets.
- AI‑powered tools for effortless editing.
- Intuitive interface suitable for beginners and pros.
- Compatible with macOS, Windows, iOS, and Android.


Create Picture‑in‑Picture on macOS Using Filmora (Third‑Party Software)
Filmora’s AI‑enhanced editor makes PiP creation straightforward. Follow these steps to achieve professional results:
- Install and launch Filmora. Start a new project.
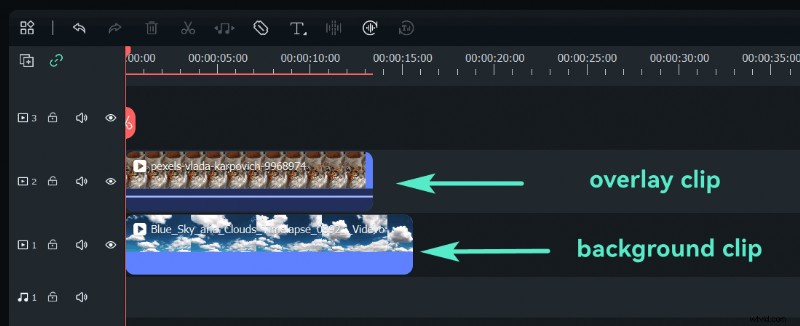
- Import media. Add your background clip to track 1 and the PiP clip to track 2.
- Position the PiP clip. Select it on the timeline, drag it in the preview window, and adjust size, shape, and mask. Use blending modes or motion effects as desired.
- Fine‑tune. Add transitions or visual filters to the PiP layer for a polished look.

- Export. Choose from multiple formats and presets for your target platform.
Create Picture‑in‑Picture on macOS Using iMovie (Built‑in Software)
For a free, native solution, iMovie supports PiP with a simple workflow:
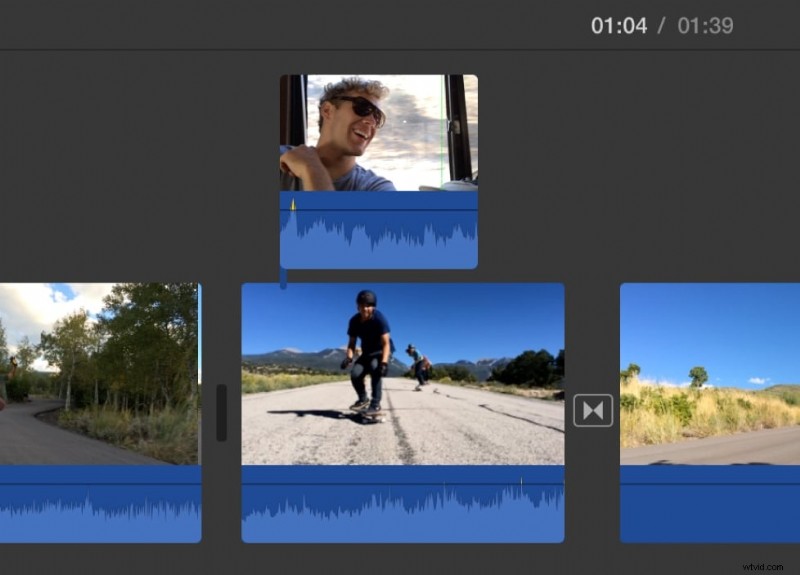
- Open iMovie. Drag a clip onto the timeline and then drag a second clip above it. When the green Add icon appears, release the mouse button.
- Enable overlay settings. Click the Video Overlay Settings button to reveal PiP controls.

- Select Picture‑in‑Picture. In the left pop‑up menu, choose Picture‑in‑Picture. Drag the inset clip to the desired position.
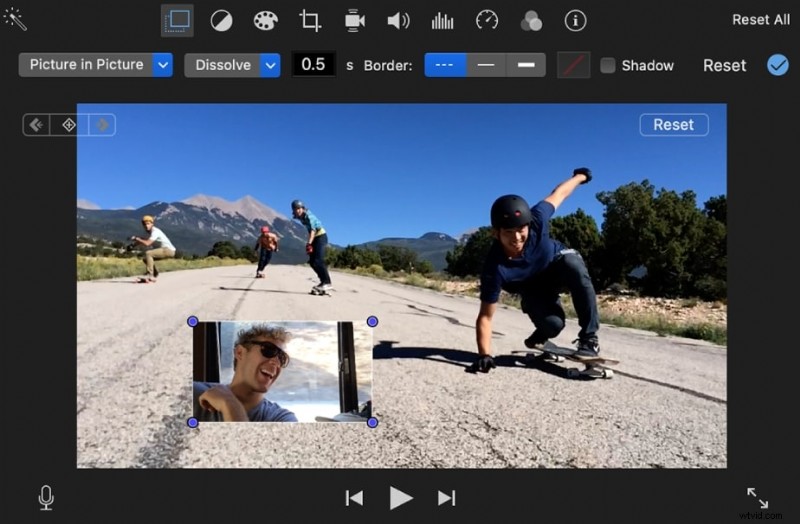
- Apply. Click Apply to confirm your settings.
Feature Comparison: Filmora vs iMovie
| Feature | Filmora | iMovie |
| User Interface | Intuitive drag‑and‑drop editor | Friendly, but limited customisation |
| PiP Functionality | Multiple layers, advanced controls | Single layer, basic controls |
| Customisation | Size, position, rotation, masks, blending, animations | Basic size and position adjustments |
| Transitions & Effects | Wide range of transitions and filters | Limited options |
| Text & Titles | Full text editing suite | Standard title templates |
| Audio Control | Advanced mixing and adjustment tools | Basic volume and fade controls |
| Export Options | Multiple formats, custom resolutions, bitrate control | Standard export presets |
Conclusion
Picture‑in‑Picture opens a world of creative storytelling possibilities on macOS. Whether you choose Filmora for its powerful, AI‑driven features or iMovie for a lightweight, native solution, you’ll be able to deliver engaging, professional‑grade videos. Experiment with different overlay layouts, effects, and transitions to match your brand’s voice and keep your audience captivated.