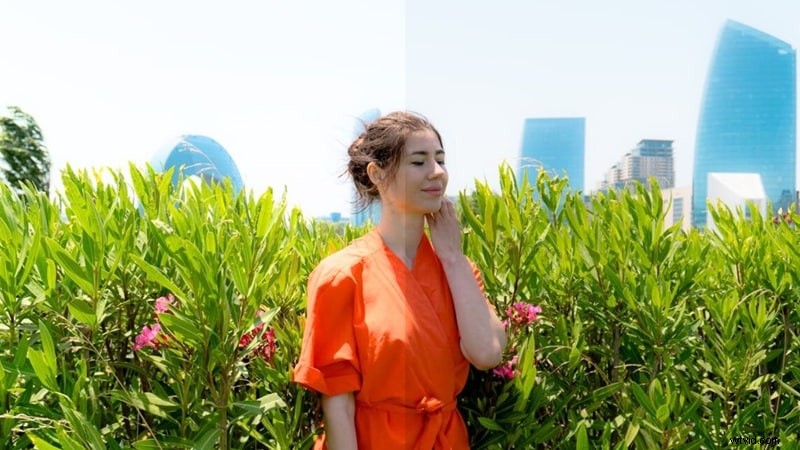
Ever capture a shot only to discover it's glaringly bright or washed out? That's the classic overexposed photo.
Such images lose crucial highlight details, turning a compelling scene into flat, unnatural white patches. Overexposure is more frequent than you suspect—complex lighting can defeat even the smartest auto‑mode cameras.
Fortunately, you can salvage most overexposed shots. This guide walks you through three straightforward recovery methods and offers preventive advice for your next session. Let’s dive in.
Part 1: Understanding Overexposure
An overexposed photo occurs when excess light floods the sensor, washing out bright areas, muting colors, and erasing detail. The result is a flat, unnatural white glare where texture and depth should be.

Typical warning signs include:
- Skies that look washed‑out and lose their blue tone.
- Faces that appear pale, lacking definition.
- White garments that show no folds, shadows, or texture.
Common causes are:
- Direct sunlight overpowering camera settings.
- Backlighting that bleaches the subject.
- Reflective surfaces—water, snow, glass—that bounce light back into the lens.
- High ISO settings that brighten the image at the expense of highlight detail.
- Slow shutter speeds that allow too much light in.
Part 2: How to Fix Overexposed Photos – Three Methods for Every Skill Level
Below are three practical techniques, ranging from a quick phone tweak to full‑featured desktop software.
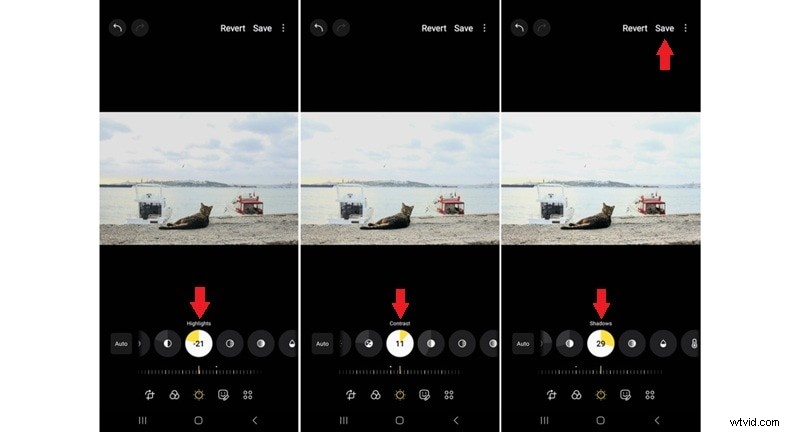
Method 1 – Phone’s Built‑in Photo Editor
Most modern smartphones include a native editor that can tone down brightness and restore some detail.
1. Open your gallery and select the overexposed photo you wish to edit.
2. Tap “Edit” or the pencil icon to launch the editor.
3. Navigate to “Tone” and adjust the “Brightness” and “Exposure” sliders until the highlights look natural.

4. If available, tweak the “Highlights” slider to bring back texture.
5. Increase “Contrast” and “Shadows” to add depth.
6. Hit “Save” to keep your changes.
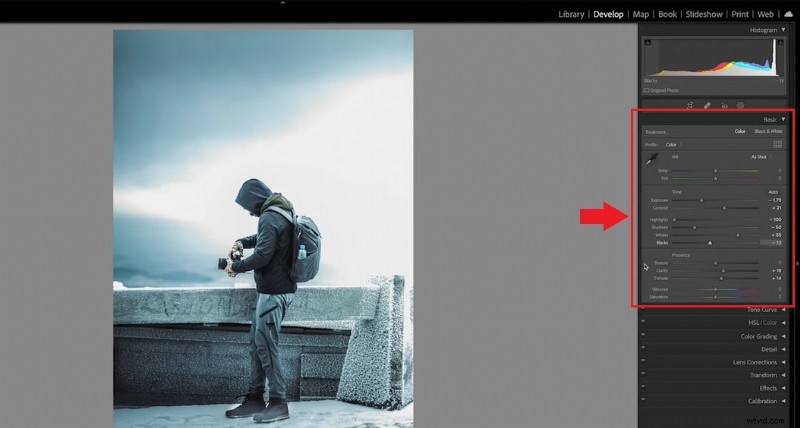
Method 2 – Adobe Lightroom (Classic & Cloud)
Lightroom offers powerful control over exposure, especially for RAW files.
1. Import the image and open the “Develop” tab (Classic) or “Edit” panel (Cloud).
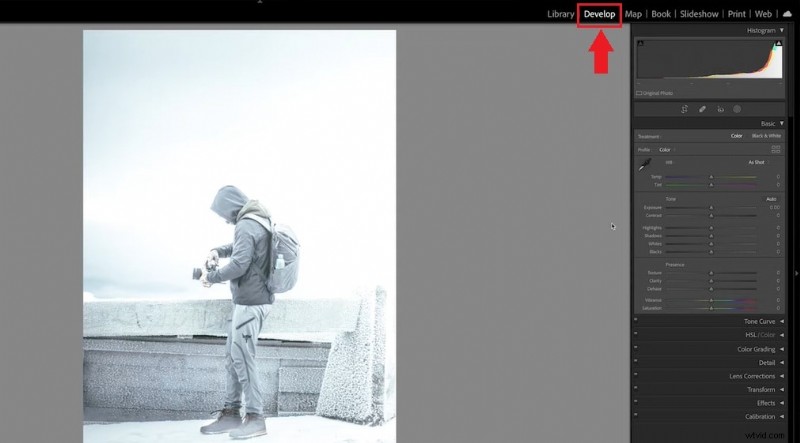
2. Reduce the “Exposure” and “Highlights” sliders to recover lost detail.
3. Adjust “Shadows,” “Blacks,” “Whites,” and “Contrast” to balance the image.
4. Fine‑tune with the “Tone Curve” if needed.
5. Export when finished.
Method 3 – Adobe Photoshop
Photoshop gives you layer‑based precision, allowing you to target specific overexposed areas.
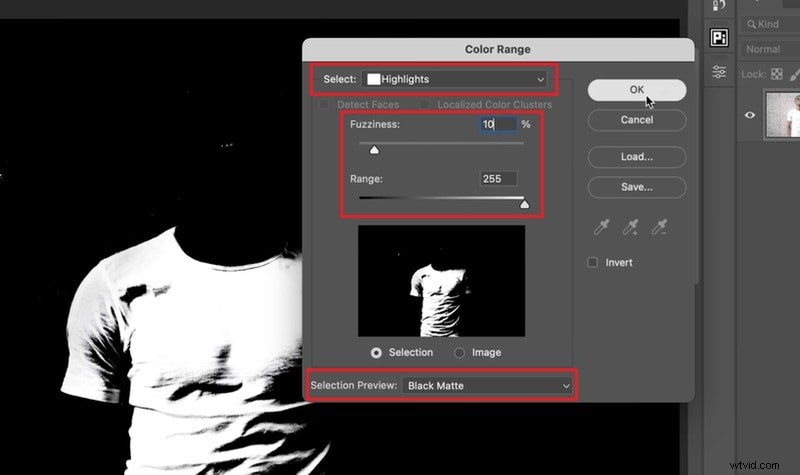
1. Duplicate the layer (Ctrl/Cmd + J) and open “Select → Color Range.”

2. From the “Select” drop‑down, choose “Highlights” to isolate bright spots.
3. Set “Selection Preview” to “Black Matte”; adjust “Fuzziness” and “Range” until only the overexposed zone remains white. Click “OK.”
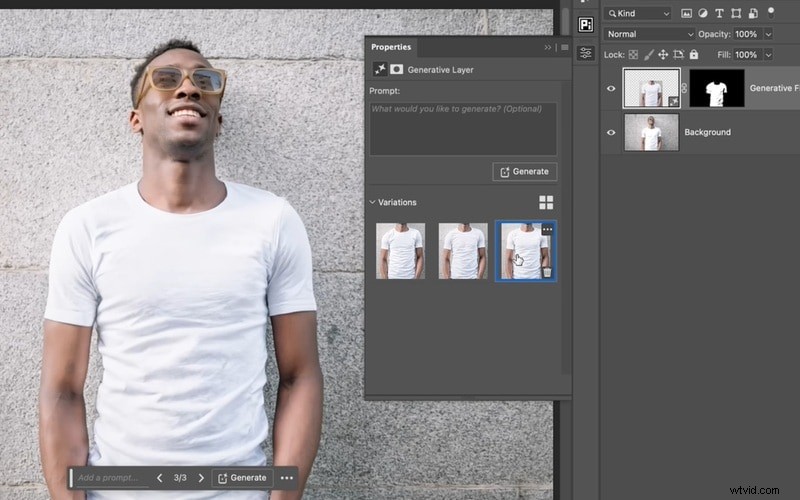
4. Use “Generative Fill” with an empty prompt to reconstruct texture where none existed.
5. When satisfied, export the image in your preferred format.
Part 3: Preventing Overexposure from the Start
Correcting a bad shot is useful, but avoiding the problem saves time and preserves quality. Try these quick adjustments while shooting:
- Lower exposure before you shoot: On a phone, tap to focus, then slide the brightness slider down. On a camera, switch to manual mode and reduce ISO, use a faster shutter, or increase the f‑stop.
- Shoot in RAW: RAW files retain more highlight information, giving you greater flexibility in post‑processing.
- Use ND filters: Neutral‑density filters block excess light, keeping exposure under control without drastically altering settings.
- Avoid shooting directly into harsh light: Backlit or midday sun can cause blow‑outs. Change your angle, wait for softer light, or add shade.
By applying these practices, you’ll minimize overexposure and reduce editing time.
Bonus: Fixing Overexposed Video Footage
Video can suffer the same issue. Bright sunlight or auto‑lighting may bleach highlights. For a quick fix, try Wondershare Filmora. Its intuitive interface lets you adjust brightness, contrast, and exposure with a few clicks—perfect for beginners.
Watch this brief tutorial to learn how to correct overexposed video clips in Filmora:
Get Started for Free – Windows 7 or later (64‑bit) | Mac OS 10.14 or later
Conclusion
Overexposure can erase detail and mood, but with the right tools and habits you can restore balance to your images.
This guide showed you three effective ways—phone editor, Lightroom, and Photoshop—to recover texture, depth, and contrast. Remember to use preventive measures on your next shoot for best results.
Start editing today and see the difference for yourself. Your next masterpiece is just a few clicks away.
Get Started for Free – Windows 7 or later (64‑bit) | Mac OS 10.14 or later
FAQs
-
What’s the difference between exposure and brightness?
Exposure is how much light the camera captures when you take a photo. Brightness is a post‑capture adjustment that lightens or darkens the image.
-
Is it better to shoot underexposed or overexposed?
Underexposure is generally preferable; you can brighten dark areas more easily than you can recover details lost in blown‑out highlights. Shooting in RAW helps preserve detail on both sides.
-
Can I fix an extremely overexposed photo?
If the shot was taken in RAW, you may recover some highlight detail. If the highlights are pure white, recovery is limited, but tools like Photoshop’s Generative Fill can help reconstruct missing texture.
-
How do I fix an overexposed face?
Use selective tools such as Lightroom’s brush or Photoshop’s mask to lower exposure and highlights only on the face, then adjust shadows and contrast to blend with the rest of the image.