
How to Apply Presets to Multiple Photos in Lightroom
Adobe Lightroom is a powerful editing suite that can transform raw images into polished masterpieces. Editing each photo individually is often the biggest bottleneck in a photographer’s workflow. Presets—pre‑configured sets of adjustments—solve this by allowing you to apply a single look to many images at once. Below, I outline three reliable methods to batch‑apply presets, so you can focus more on shooting and less on repetitive editing.
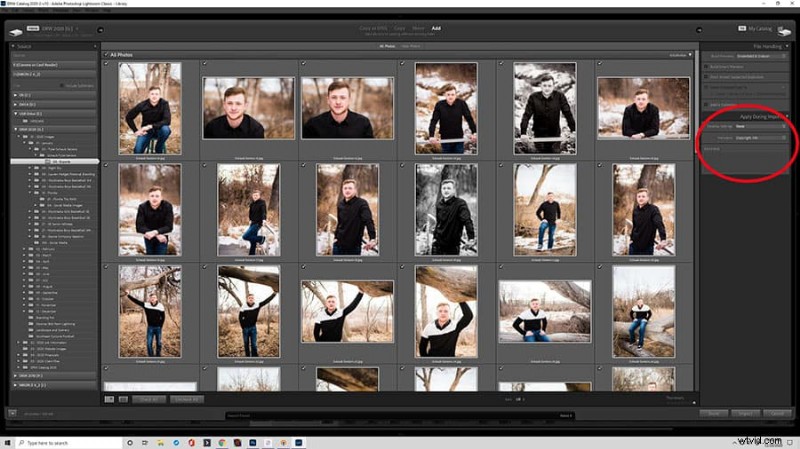
Method 1 – Apply a Preset During Import
If you consistently use a particular preset as a base look, you can have Lightroom apply it automatically as soon as you bring images into the catalog. This keeps your raw files untouched while giving you a ready‑to‑edit starting point.
- Choose File > Import Photos and Video.
- In the Source panel, select the images you want to import.
- On the left side, expand the Apply During Import panel.
- Click the arrow next to Develop Settings and pick the preset that matches your workflow.
- Add any additional metadata—such as keywords—then click Import.
- All newly imported photos will automatically receive the selected preset.
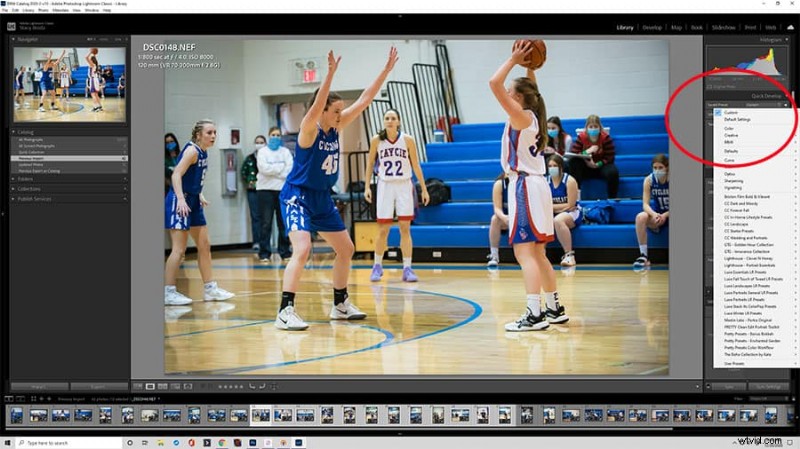
Method 2 – Use Quick Develop in Library Module
When you need to apply a preset after import, the Library module offers a fast route via Quick Develop.
- Open the Library module.
- Select multiple images in the filmstrip (hold Ctrl on Windows or ⌘ on macOS to multi‑select).
- In the Quick Develop pane on the right, click the up/down arrow next to Custom and choose the desired preset.
- If only the current photo updates, click Sync Settings… in the lower left and confirm that the preset is included in the sync options.
- Click Synchronize to apply the preset to all selected images.
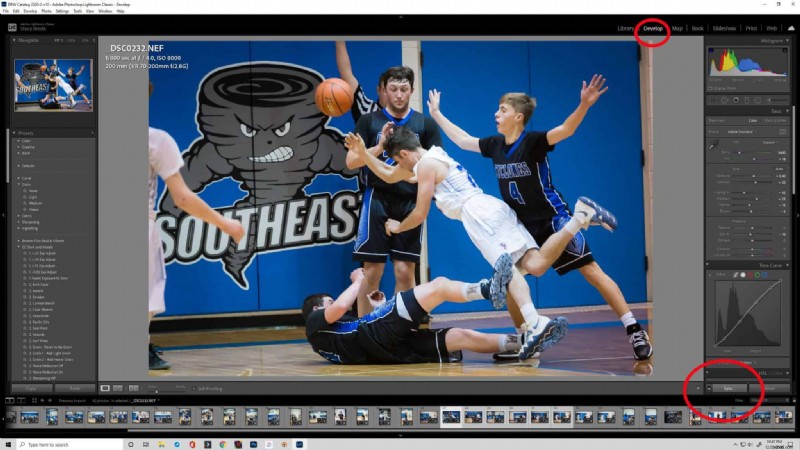
Method 3 – Synchronize Settings in Develop Module
For a small batch of images—such as a series shot under similar lighting—a quick sync from a single edited photo can be the most efficient approach.
- In the Develop module, apply the preset to one reference image and make any fine‑tuning adjustments.
- Select that reference image in the filmstrip, then hold Ctrl (or ⌘) to add other target images.
- Click Sync… in the lower left corner.
- Check the boxes for the settings you want to copy (e.g., Exposure, Contrast, Preset) and click Synchronize.
- All chosen images will now mirror the adjustments of the reference photo.
Choosing the right method depends on your workflow. Many professionals apply a base preset at import to establish a consistent look, then refine individual images in Develop and sync those tweaks to similar shots.
Batch Editing Explained
In Lightroom, “batch editing” is commonly referred to as synchronizing edits. It’s a direct parallel to Photoshop’s batch feature and achieves the same goal: applying a set of adjustments to multiple images in one go.
Take Your Workflow to the Next Level
Whether you’re a seasoned pro or just starting, mastering preset batch‑application can save you hours each session. By reducing repetitive tasks, you’ll have more time to focus on composition, lighting, and the creative aspects that make your photography stand out.
Ready to Level Up?
Explore our collection of Lightroom presets and discover how the right tools can streamline your editing pipeline.