
Adobe Photoshop is primarily a pixel‑based editor, but it also offers powerful vector tools that allow designers to create precise, scalable paths. The Pen Tool is the core of this vector functionality, enabling users to draw intricate shapes, make flawless selections, and craft professional artwork.
Many beginners mistake the Pen Tool for a drawing brush, but its real strength lies in constructing Bézier curves and straight line segments that are mathematically defined. Unlike the Lasso or Marquee tools, which work directly with pixels, the Pen Tool creates paths that are resolution‑independent and can be converted into selections or shape layers at any time.
What Is the Pen Tool?
The Pen Tool is Photoshop’s most accurate method for outlining irregular shapes. By placing anchor points and manipulating direction handles, you can craft shapes that follow the exact contours of any object—perfect for cutting out logos, isolating portraits, or creating custom shapes.
Where Do I Find It?
The Pen Tool sits beside the Type, Shape, and Selection tools in the toolbar. It is grouped with the Direct Selection (black arrow) and Path Selection (white arrow) tools because it works with vector paths rather than pixel selections.

Photo by FunkyFocus Licensed Under CC0
Why Is It Called the Pen Tool?
Historically known as the Bézier Pen, the tool is named after French engineer Pierre Bézier, who pioneered the mathematical equations that describe smooth curves. Photoshop adopted this terminology to reflect its ability to draw vector paths—hence the name “Pen Tool.”
Bézier curves use control handles attached to anchor points, allowing designers to sculpt precise curves. This mathematical foundation gives the Pen Tool its power and flexibility.

Photo by Free-Photos Licensed Under CC0
How Does the Pen Tool Work?
The Pen Tool creates vector paths by adding anchor points. A straight line connects two points; a curved segment is formed by dragging to create direction handles that define the curve’s shape.
What Is a Path?
A path is a series of line segments and Bézier curves that exist independently of the underlying pixel data. Paths can be opened (e.g., a free‑form line) or closed to form shapes. When closed, a path can be filled, stroked, or converted into a selection.
What Is a Vector?
Vectors represent direction and magnitude using mathematical formulas. Unlike raster images that are made of pixels, vector paths can be resized without loss of quality, making them ideal for sharp, scalable designs.
Using the Pen Tool in Photoshop
Mastering the Pen Tool requires practice, but the payoff is a highly precise workflow for selections and shape creation.
When you first select the Pen Tool, the Options Bar offers two modes: “Draw Path” and “Draw Shape.” For most selection tasks, choose “Draw Path.”
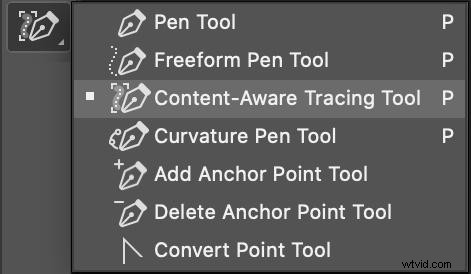
Photo by Adobe Licensed Under CC BY 1.0
Drawing Straight Line Paths
To start a straight line, click once to place the first anchor point, then click a second point. A line appears between them. Continue clicking to add more points, or press Ctrl (Windows) / ⌘ (Mac) to close the path.
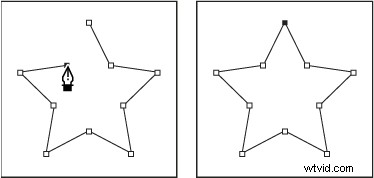
Photo by Adobe Licensed Under CC BY 1.0
Creating Curved Segments
Place an anchor point, then click and drag to generate direction handles. The further you drag, the longer the curve. Adjust the handles to refine the shape. Drag Ctrl / ⌘ to finish.
Complex S‑Curves and M‑Curves
To build an S‑curve, add three anchor points: drag the first to the left, the second to the right, and adjust handles for smoothness. For an M‑curve, drag the middle point downward and use Alt / Option to convert points into cusps.
Closed Paths
Close a path by hovering over the first anchor point until a small circle appears, then click to seal the shape. Closed paths can be filled, stroked, or turned into selections.
Combining Straight Lines with Curves
The Pen Tool excels at blending linear and curved segments. For example, to craft a heart shape, place three points in a row and a fourth below; then adjust handles to form the lobes.
Turning Paths into Selections
Once you’ve drawn a path, use the Load Path as a Selection icon (the dashed circle) in the Paths palette or press Ctrl+Enter (Windows) / ⌘+Return (Mac). The path becomes an active selection that can be filled, masked, or edited.
Mastering Direction Handles
Direction handles control the angle and length of a curve. They appear as diamonds at each anchor point. Drag a handle to adjust the curve’s shape. Holding Ctrl / ⌘ while rotating synchronizes both handles; Alt / Option lets you manipulate a single handle independently.
Moving Anchor Points
Anchor points can be moved freely by clicking and dragging. The connected line segments shift automatically, allowing you to fine‑tune your path after the fact.
Auto‑Add/Delete and Rubber Band
Check Auto Add/Delete in the Options Bar to toggle between adding and deleting points by hovering over a line segment or anchor point. The Rubber Band option provides a preview of the next curve before placement.

Photo by Adobe Licensed Under CC BY 1.0
Magnetic Pen
When the Pen Tool is in Freeform mode (Shift + P), enable the Magnetic checkbox. The path will automatically snap to detected edges, making it ideal for tracing complex silhouettes.

7 Top Pen Tool Tips and Tricks
1. Plan Your Anchor Points
Before clicking, visualize the shape’s geometry. Place anchor points where curves begin or end to reduce the number of edits needed later.
2. Click & Drag for Smooth Curves
Click to create an anchor point, then drag immediately to generate handles. This technique yields smoother curves than placing two points and adjusting afterward.
3. Use Alt/Option to Convert Points
Press Alt / Option while clicking to convert a point into a corner or to close a path. This allows you to mix straight and curved segments seamlessly.
4. Customize Path Appearance
In the Options Bar, click the gear icon to adjust line thickness and color. Choosing a contrasting color makes paths visible against any background.
5. Set Fill and Stroke to None
Before drawing, set both Fill and Stroke to “None.” This prevents accidental painting while you create the path.
6. Keep Anchor Points to a Minimum
A path with too many closely spaced points becomes difficult to edit. Use Auto Add/Delete to add or remove points efficiently.
7. Leverage Freeform Mode
For highly detailed work, switch to Freeform (Shift + P) and enable Magnetic. The Pen Tool will snap to edges, reducing the need for manual adjustments.
Additional Tips

Photo by Janeb13 Licensed Under CC0
Removing Backgrounds
Draw a closed path around the subject, convert it to a selection, then create a Layer Mask. The mask hides the background while preserving the subject.
Cutting Out Images
After converting a path to a selection, choose Edit → Cut and paste the layer elsewhere. This workflow is ideal for creating composited scenes.
Coloring Paths
Use the Options Bar to change the path color and stroke weight. Setting a stroke can be useful when you need to trace a path directly onto the image.
A Tool of Elegance
Although the Pen Tool demands patience and practice, mastering it unlocks a level of precision that sets advanced Photoshop users apart. Once you’ve mastered its mechanics, the Pen Tool becomes an indispensable part of your creative arsenal.