
Mastering image resizing in Adobe Photoshop is essential for photographers, designers, and web developers alike. While the process may seem simple, preserving sharpness and detail requires a clear understanding of resolution, interpolation, and non‑destructive techniques. This guide distills industry‑proven practices into a step‑by‑step workflow.
How to Resize an Image in Photoshop
Whether you’re adjusting a banner for a website or preparing a high‑resolution print, the core steps remain the same: decide on the target dimensions, choose the right interpolation, and apply smart editing when possible.
What Is Image Resizing?
Resizing changes an image’s width and height while keeping its pixel count intact. The result is a shift in resolution: the same number of pixels spread over a larger or smaller area.
Adjust Image Size
Open Image > Image Size to bring up the dialog. Pick pixels for digital output or inches for print. Tick Resample to modify pixel count; uncheck it for pure resolution adjustments.
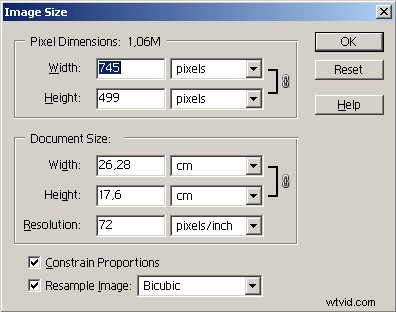
Click OK, then save with File > Save As to preserve the original.
Crop Image
The Crop tool trims unwanted areas. Hold Shift to lock the aspect ratio, ensuring proportional scaling.
Change Canvas Size
Use Image > Canvas Size to add or remove space around your image without altering the pixel data. Specify absolute dimensions or use the Relative option to add margins.
Resolution: How It’s Measured
Resolution metrics differ by medium:
- Pixels per inch (PPI) – monitors
- Samples per inch (SPI) – scanners
- Dots per inch (DPI) – printers
Print Resolution Explained
High DPI means more dots per inch, yielding finer detail. Common office printers max out at 1200x1200dpi; specialty shops can reach 2400x2400dpi or more.
Digital Resolution Explained
PPI governs on‑screen sharpness. A 3000x2000 image at 300ppi will print 10x6.67 inches; at 150ppi it prints 20x13.33 inches.
Describing Image Size
Image size = resolution × pixel dimensions. For example, a 4000x3000 image at 300ppi yields a 13.33x10 inch print.
Pixel Dimensions
Width × height expressed in pixels. Camera sensors, scanners, and digital files each have distinct pixel counts.
Document Size
In Photoshop, the document size reflects how large an image prints at a given PPI. Adjusting the document size recalculates the target print dimensions.
Maintain Proportions
Keep the Constrain Proportions box ticked in the Image Size dialog to prevent distortion. Uncheck it only if you need a custom aspect ratio.
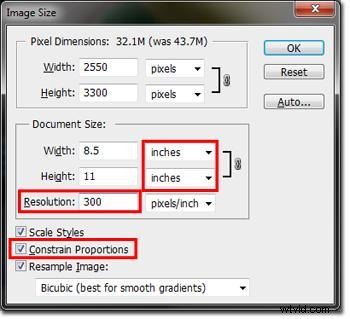
Scale Styles
When Scale Styles is enabled, layer effects (shadows, strokes, bevels) resize proportionally with the image. Disable it if you want to keep effect thickness constant.
Interpolation: The Key to Quality
Interpolation algorithms decide how new pixels are calculated during resampling. Choosing the right one depends on the image content and the direction of resizing.
Resample Image
Resampling changes pixel count: Downsample removes pixels; Upsample adds them. Both affect perceived sharpness.
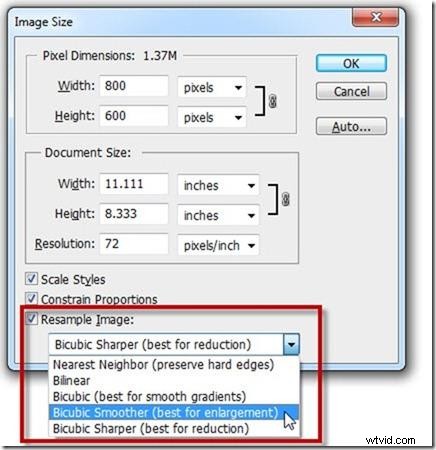
Nearest Neighbor
Fastest method; copies exact pixel values. Ideal for pixel art and sharp edge preservation but can produce blocky results on photographic images.
Bi-linear
Average of surrounding pixels; smoother than nearest neighbor. Works well for moderate resizing without extreme quality loss.
Bi-cubic Interpolation
More sophisticated, using 16 neighboring pixels. Offers the best balance between sharpness and artifact suppression.
Bi-cubic (Best for Smooth Gradients)
Preserves gradient fidelity, ideal for photographic downscaling. Avoids halos when followed by sharpening.
Bi-cubic Smoother (Best for Enlargement)
Reduces high‑frequency noise during upscaling, producing smoother results with less ringing.
Bi-cubic Sharper (Best for Reduction)
Enhances edge contrast when decreasing size, helping to retain detail. Use sparingly to avoid over‑sharpening.
Stair‑Step Interpolation
Gradual resizing (≤10% per step) can improve quality. The Stairstep Image Size plugin automates this process, applying bi‑cubic interpolation at each step.
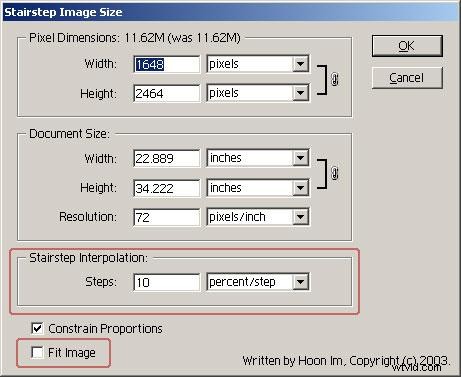
Smart Objects: Non‑Destructive Resizing
Wrapping a layer in a Smart Object preserves the source data. You can resize, rotate, distort, or apply filters at any time without degrading the original image.
- Non‑destructive scaling, rotation, perspective transforms
- Filter edits are reversible
- Linked Smart Objects auto‑update when the source changes
- Supports vector layers and masks
Choosing the Best Method
For maximum fidelity:
- Use a Smart Object for any size change.
- When downscaling, choose Bi-cubic Sharper or Bi-cubic with slight sharpening.
- When upscaling, use Bi-cubic Smoother or the Stairstep plugin.
- Always compare results before final export.
Top Tips for Efficient Scaling
- Select the interpolation that matches the image type.
- Work on a duplicate file to preserve the original.
- Decide if you’re enlarging or reducing before resizing.
- Apply gentle smoothing or sharpening after resampling.
- Leverage Smart Objects for non‑destructive workflow.
- Minimize the number of resampling steps.
Frequently Asked Questions
How far can I enlarge an image with Bi‑cubic Smoother?
Generally, doubling the pixel dimensions (e.g., 600×1200 to 1200×2400) is safe. Beyond that, artifacts become noticeable.
Can I scale logos infinitely without loss?
Yes, if the logo is created in vector format (PDF, EPS, Illustrator). Export the vector to Photoshop as a Smart Object for any size.
How do I compress images without visible quality loss?
Use File > Export > Save for Web (Legacy). Choose JPG for photos, PNG‑24 for graphics with transparency, or TIFF for lossless print quality. Adjust the quality slider while previewing.
What resolution should I target for different media?
- Screen: 72ppi
- Web: 96ppi (higher for retina displays)
- Print (magazine, brochures): 300ppi
- Desktop laser (BW): 170ppi
- Desktop color inkjet: 300ppi
Final Thoughts
Resizing in Photoshop is a balance between technical precision and creative intent. By combining Smart Objects, the right interpolation method, and careful workflow, you can resize images to any dimension while keeping them sharp and vibrant. Apply these best practices to ensure every output—whether a web banner or a high‑end print—meets professional standards.