A Guest Post by Dev Wijewardane.
Usually, to produce a well lit image of an object, photographers will need to use multiple artificial light sources. These light sources can be costly and may not be easily accessible for amateur photographers. However, in many cases, a single flash can be used to achieve the same results.
Things you will need
- A flash (it is most effective if you can use it off camera)
- Any light modifiers which you require – snoots, gobos, grid spots etc
- A tripod
- Post processing software
The Process
The first step in the process is to secure the camera to the tripod and compose the image. Once the image is composed, the tripod should NOT be moved until all the required images have been captured.
The first image to be captured should be the “base” exposure. In this example, I used a canon 430 EX at 1/8 power (I think??) to bounce the light off the ceiling and light the tiles, scrabble board and bag, evenly. A flash is not required to create the base exposure. The ambient light and a longer shutter speed will work just as well. If there are sections of the final image which you want to be left in shadow, make sure that they are in shadow on the base image. This is what will be used when producing the final version.
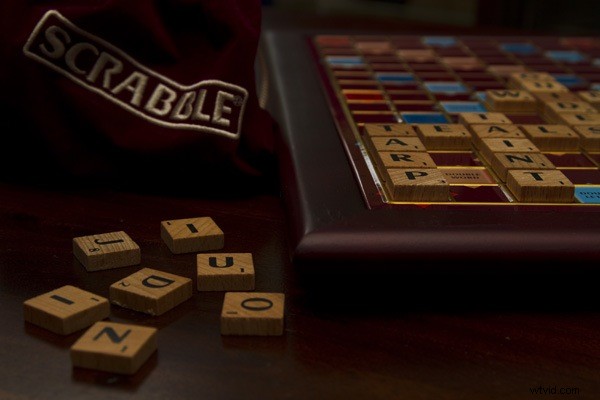
Base exposure used in this example
The next step is to use the flash as a key light and light up sections of the image which you want to emphasize. In these shots, ensure that you ONLY light up these areas. The rest of the image should be in shadow.
In this example I wanted to use two key lights.
The first of these was a snooted flash fired from the same level as the tiles, from camera right. The strobe was very close to the tiles themselves as I only wanted to emphasize the edges of the tiles and didn’t want the key light to spill onto any other part of the image.
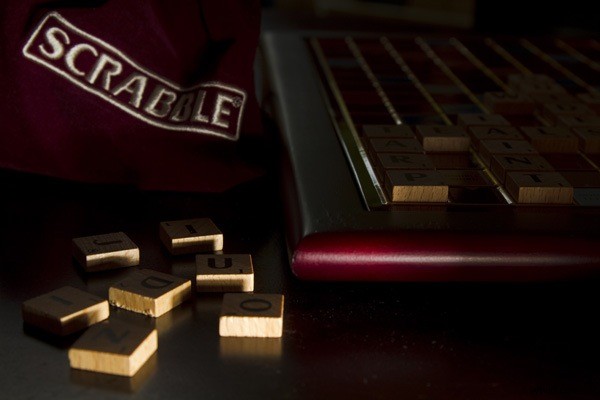
Key light used to define the edges of the tiles
I wanted the second key light to light up the area under the bag (which was in shadow in the base exposure) and the top surface of the tiles. I used a snoot once more and fired the strobe from slightly above the camera from the right.

Key light used to define the area under the bag and the top surface of the tiles
Follow this process and capture any other “key light” images that you require.
Once all the images have been captured they have to be merged together using a post processing software. When merging the images together, ensure that the brightest areas from each image are visible in the final version.
For those of you who use Photoshop, using a “star trails” action will cut down processing time significantly. There are plenty of free star trails actions which can be downloaded. Each of them will work differently but the end result should be the same. These actions generally stack images and allow the brightest parts of each image to be visible in the final version.The effect of the first key light is subtle in the final image produced in this example.
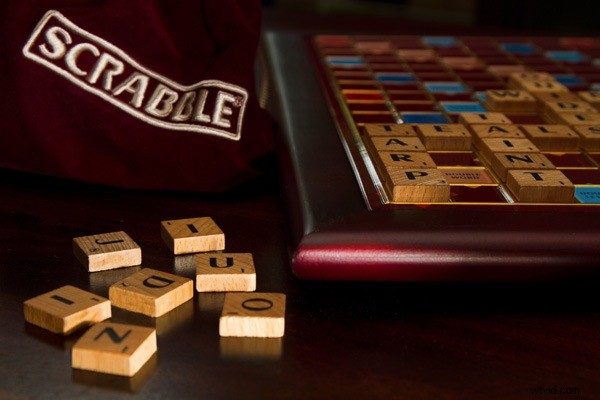
Final image which was produced by merging the “base” image and the two “key” images
Limitations
This technique can only be used on stationary objects
Advantage
It only requires a single flash and light modifiers which can be made at home!PS – I’ve photographed a car using this technique. It took around 10 shots but it worked like a charm.
Dev Wijewardane is a serious amateur photographer based in Sydney. He currently works in the IT industry and his photographic interests include wildlife, landscape and portrait photography. See more of his work on his blog and flickr account.