The Essential Graphics panel once served as Premiere Pro’s central hub for creating and customizing text and motion graphics directly within the timeline. With the 2026 update (v25.0), Adobe has removed that panel and introduced two dedicated workspaces—Properties and Graphics Templates—to streamline the process.
While the transition may feel abrupt, the new panels keep all the functionality you relied on, but split it into two focused environments: the Properties panel for editing and the Graphics Templates panel for browsing and importing.
Part 1. What the Essential Graphics Panel Was Used For
Premiere Pro’s Essential Graphics panel allowed editors to design titles, lower thirds, and other motion graphics without leaving the application. By accessing Window > Essential Graphics, users could switch between the Browse and Edit tabs:
- Browse offered ready‑made templates such as captions, credits, custom layouts, overlays, lower thirds, and slates.
- Edit let you tweak text, position, scale, opacity, and keyframes for the selected graphic.
Once a template was dropped onto the timeline, the Edit tab became the primary tool for fine‑tuning that clip.
Part 2. What Changed in Premiere Pro v25.0
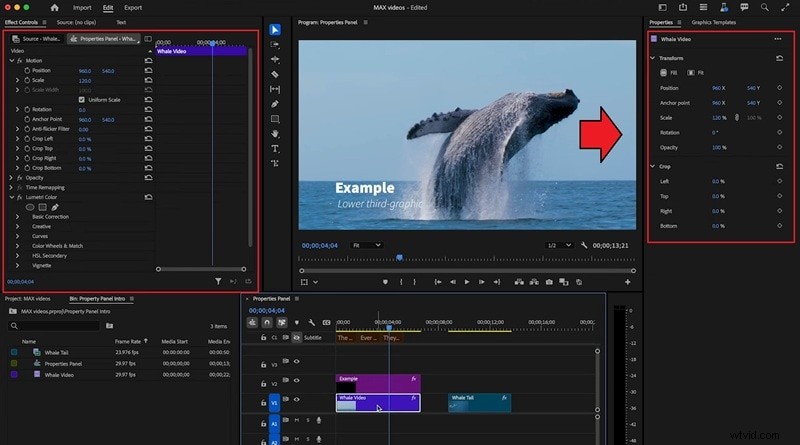
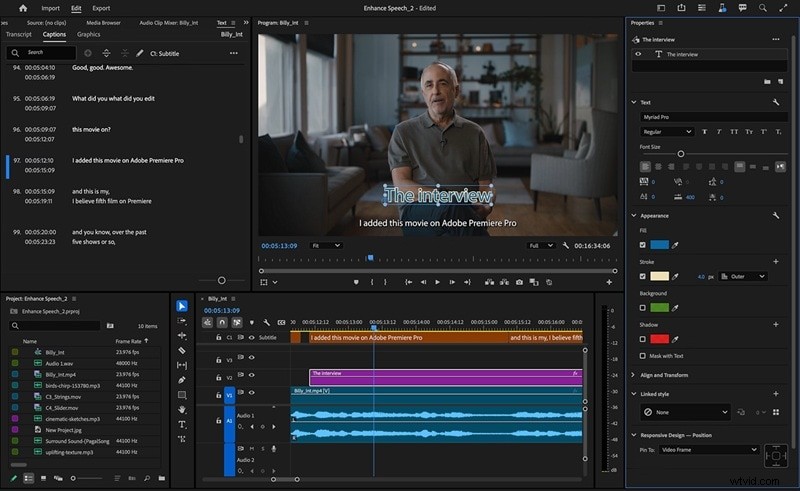
Adobe’s decision to replace the Essential Graphics panel with two separate panels aims to sharpen the workflow. The Properties panel now displays context‑aware controls based on the clip you have selected—whether it’s a video track, a graphic, or a text layer. Meanwhile, the Graphics Templates panel serves as a curated library of MOGRTs, Adobe Stock assets, and custom templates.
Workflow Differences
Below is a concise comparison of the old panel versus the new setup:
| Aspect | Old Essential Graphics Panel | New Panels (v25.0) | Key Difference |
| Access | Window > Essential Graphics | Properties & Graphics Templates | Browsing and editing are separated |
| Tabs / Layout | Browse & Edit | Two dedicated panels | Focused tasks reduce menu hunting |
| Editing Graphics | Directly in the panel | Properties panel handles adjustments: position, scale, rotation, opacity, keyframes, text/audio tweaks | Context‑aware editing; supports multi‑clip changes |
| Browsing Templates | Browse tab: captions, credits, overlays, lower thirds, custom templates | Graphics Templates panel: search, preview, import MOGRTs or Adobe Stock | Easier to locate and drag‑drop templates |
| Workflow | All tasks in one panel | Split between two panels | More organized; requires a short adjustment period |
Tip: Selecting multiple clips in the timeline lets you adjust them simultaneously in the Properties panel, speeding up your editing process.
Pros & Cons of the New Setup
Pros
- Simultaneous adjustments for several clips via the Properties panel.
- Panel adapts instantly to the selected item, eliminating menu searching.
- Direct access to essential tools keeps the workflow faster and more organized.
Cons
- Users accustomed to the old layout may need time to adjust.
- Switching between the Properties and Graphics Templates panels adds an extra step.
Part 3. A Streamlined Alternative: Wondershare Filmora
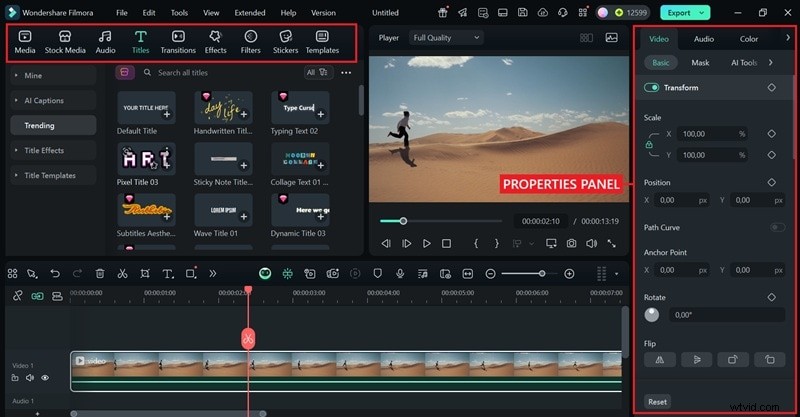
For creators who find the dual‑panel system cumbersome, Filmora offers a single, intuitive workspace that consolidates text, graphics, animations, and templates into one panel.
Filmora vs. Premiere Pro: Graphics & Template Workflow
| Feature | Filmora | Premiere Pro |
| Text Editing | One‑click animated titles, 3D fonts, hundreds of presets with instant preview | Professional‑grade tools but require manual setup and more steps for customization |
| Captioning | Auto‑Caption generates and syncs subtitles instantly; supports multi‑language transcription; manual fine‑tuning available | Captions require manual setup; auto‑captioning possible but involves extra steps or plugins |
| Graphics | Built‑in animated shapes, emojis, stickers, lower thirds, overlays; drag‑and‑drop ready; no external installs | Relies on imported MOGRTs or Adobe Stock assets; setup takes longer |
| Templates & Stock Media | AI‑powered templates for intros, slideshows, social posts; built‑in stock library (videos, images, music, sound effects) included | Adobe Stock available but requires a separate subscription and integration |
| Animation & Keyframes | Beginner‑friendly keyframing with intuitive controls; easily add smooth motion effects, transitions, or text animations | Advanced and precise keyframing, but with a steep learning curve |
| AI Features | Exclusive creative AI tools: AI Text‑to‑Video, AI Image‑to‑Video, AI Stickers, AI Sound Effects, plus AI Smart Cutout | No built‑in AI video or image generation; relies on manual effects or third‑party plugins |
| Ease of Use | All‑in‑one panel for text, graphics, and effects; drag‑and‑drop workflow; designed for beginners, educators, and casual creators | Split into Properties Panel (editing) + Graphics Templates Panel (browsing); higher learning curve |
| Pricing | Affordable with one‑time purchase option or flexible subscription; free trial available | Only available via Creative Cloud subscription, higher long‑term cost |

Filmora is an AI‑powered video editing app that makes creating polished videos simple—no experience needed.
Explore Filmora’s Ready‑to‑Use Templates & Assets
Beyond the streamlined workflow, Filmora gives you instant access to a wide range of AI‑powered templates, animated titles, stickers, and stock assets. These built‑in resources make it easy to style your videos in seconds—no need for external downloads or complex setup like in Premiere Pro.

Our Recommendation
Choose the tool that best matches your workflow and budget:
- If you prioritize efficiency, AI features, and low cost, Filmora is the best choice.
- If you need precise control, high‑complexity templates, and professional‑grade output, Premiere Pro remains the preferred option.
Part 4. Optional: Bringing Back Essential Graphics / Workspace Tips
Adobe users have requested the return of the Essential Graphics panel, but it’s unlikely to reappear soon. If you prefer the old workflow or want to adapt quickly to the new layout, try these workarounds.
1. Use an Older Version of Premiere Pro
Rolling back to a pre‑v25.0 release restores the original panel. Use the Creative Cloud Desktop app to select Other Versions for the desired build:
- Open the Creative Cloud Desktop app and go to All Apps.
- Find Premiere Pro in the installed apps list.
- Click the three dots next to the Open button.
- Choose Other Versions from the dropdown.
- Select the version you want and install it.
Tip: Contact Adobe support if you need a specific older version that isn’t listed.
2. Customize Your Workspace
Premiere Pro’s workspace is highly flexible. You can drag and dock panels to create a setup that feels natural:
Open the panel you use most often and drop it into a convenient spot—whether that’s docked to the side, stacked with other panels, or floating on the screen.
Conclusion
The Essential Graphics panel is gone in Premiere Pro v25.0, but its core functions live in the new Properties and Graphics Templates panels. By mastering these two tools—or opting for a more unified solution like Filmora—you can continue to produce high‑quality graphics and titles with confidence.