How to install Noise Gate plugin?
Audacity does not have a built-in noise gate. Hence, you will have to download and install it.
- Download Nyquist Noise Gater plug-in (noisegate.ny) following this link: https://wiki.audacityteam.org/wiki/Nyquist_Effect_Plug-ins#Noise_Gate. It will take you to the download page.
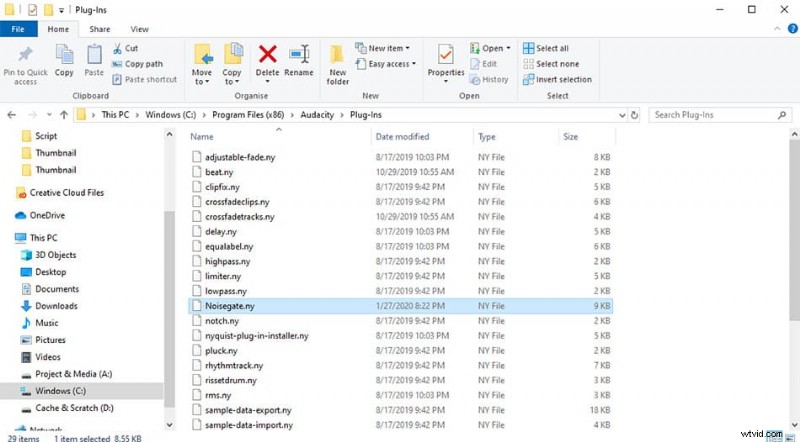
- Once you download Noisegate.ny file copy-paste it to C:\Program Files (x86)\Audacity\Plug-Ins
- Once Noisegate.ny file is in the correct folder, open Audacity.
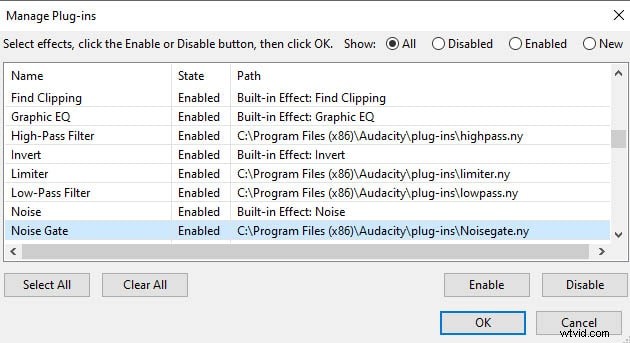
- Go to Tools -> Add / Remove Plug-ins
- Find Noise Gate plug-in (noisegate.ny), select it and click enable, then click OK.
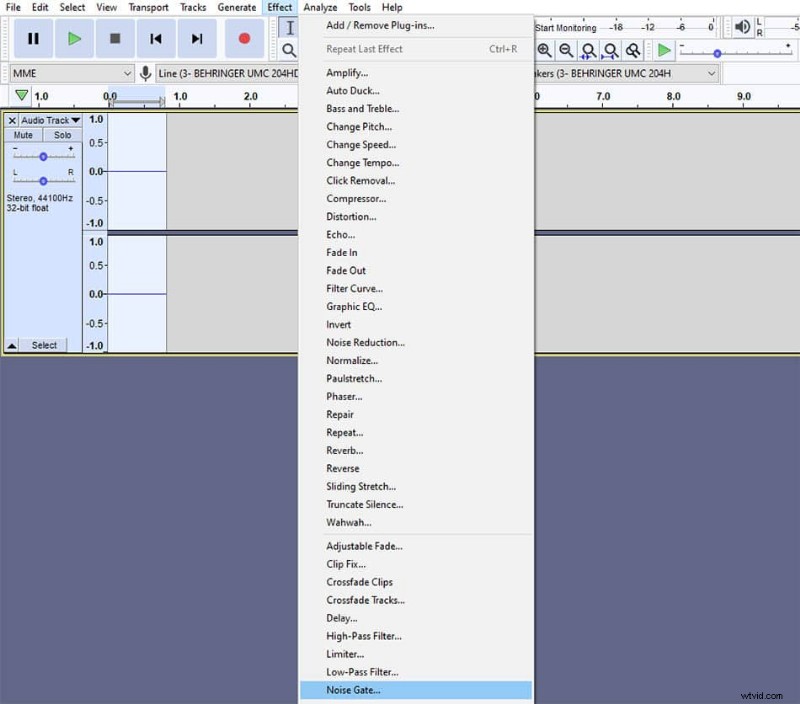
You now have noise gate plug-in installed and can use it from Effect menu.
How to use Audacity’s Noise Gate?
Noise gate works by setting a threshold below which audio is reduced. When input audio is below the threshold level noise gate closes and reduces audio volume by an amount you input in level reduction. When input audio is above the threshold level, the noise gate is open and doesn’t affect the audio. The tool is used to quickly eliminate background noise in Audacity.
I usually use these settings in Audacity’s Noise gate:
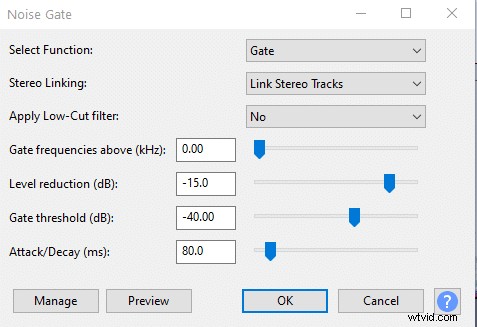
Noise gate in Audacity has three main settings:
- Level reduction – determines the significance of audio volume reduction, the lower the value the more significant audio reduction. Typically you want to leave some of the room tone for more natural sound, so in a relatively quiet environment, -10dB to -20dB level reduction is optimal.
- Gate threshold – determines the audio level threshold below which audio will be reduced. Optimal gate threshold is 3-5dB above the noise floor level.
- Attack/Decay –
- Attack is a fade-in effect that will determine the time in which noise gate will gradually open allowing the audio to pass. The higher the value the longer the fade-in. Higher attack values might cause to cut the front of the sentences.
- Decay (otherwise known as release) is a fade-out effect, it’ll determine how long it takes for a noise gate to gradually close. The higher the value, the more background noise will be allowed after going below the threshold level. Setting decay too low might cause abrupt cuts at the end of the sentence, making your audio sound choppy.
- Normally you would use different settings for attack and decay in a noise gate, but since Audacity has it as a single parameter, you’ll have to compromise. In my experience I find setting Attack/Decay to around 80ms is the sweet spot, going any lower starts to cut the end of the sentences. If you notice choppiness at the end of sentences, try to increase the value.
How to measure noise floor in Audacity?
You’ll have to measure your room tone to set optimal gate threshold for the noise gate. To measure noise floor you’ll need to stay quiet for a few seconds and record your environment. After you’ve recorded, playback the recording and check the Playback Level at the top of Audacity.
The blue line on the Playback Level will tell you your noise floor level. Your optimal gate threshold is a couple of dB above the noise floor.
