Enhance Your Presentations with High‑Quality Video Editing
PowerPoint offers powerful tools to trim, crop, and style videos directly within your slides, eliminating the need for separate editing software. Whether you’re creating an animated explainer or a concise product demo, mastering these features will keep your audience focused and engaged.
Why Trim and Crop Video in PowerPoint?
Removing extraneous footage and resizing clips to fit specific slide layouts not only improves visual clarity but also reduces file size and enhances playback performance. These adjustments help your content feel polished and professional, boosting viewer retention and impact.
How to Trim Videos in PowerPoint
Follow these straightforward steps to cut unwanted portions of a video that you have inserted from your computer.
- On a slide with a media placeholder, click Insert → Video → Video from File. Choose From a File and locate the video.
- Decide whether to Insert the file into the presentation or Link to File for a smaller file size.
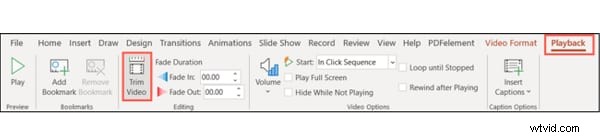
- After insertion, select the clip to activate the Playback tab on the ribbon.
- Click Trim Video in the Editing section.
- A dialog appears. Enter desired start and end times or use the draggable markers.
- Use the preview button to fine‑tune your selection, then click OK to apply.
Adjusting Trim Points Precisely
For fine‑grained control, click Play and pause at the exact moment you want to mark. Enter that timestamp into the corresponding field or drag the red (end) and green (start) markers. The Arrow keys in the boxes allow you to adjust in small increments.
Resetting or Editing a Trimmed Video
If you need to revert changes, simply repeat the trim process and move the markers back to cover the entire clip. The OK button restores the original duration.
Saving a Trimmed Video for External Use
To export the trimmed portion:
- Navigate to File → Info.
- Select Compress Media and choose an appropriate compression level. Only the trimmed clip will be affected.
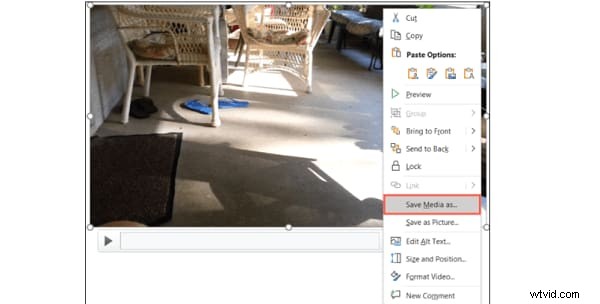
- After compression, right‑click the video on its slide and choose Save Media As.
- Pick a destination folder, optionally rename the file, and click Save.
Bonus: Advanced Video Editing Tips in PowerPoint
How to Crop Videos
After inserting a video, use the Format tab to crop:
- Select the clip and open the Format tab.
- Click Crop to reveal drag handles.
- Adjust the handles, holding Ctrl to resize two opposite sides or all four sides, and Shift for additional control.
- Press Enter or click outside the slide to apply.
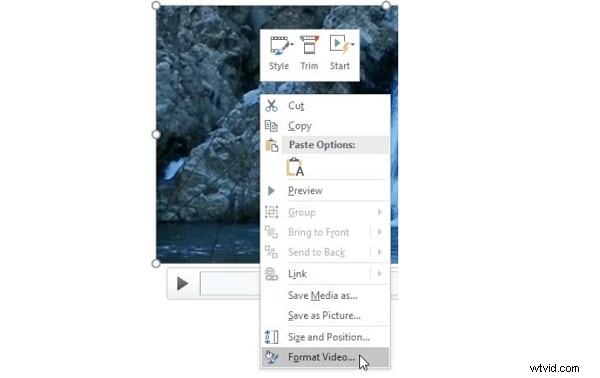
- For precise values, right‑click the video, choose Format Video, and set numeric crop parameters in the task pane.
Play Video Inside a Shape
To give your video a unique silhouette, select the clip, go to the Format tab, choose Video Shape, and pick from a variety of shapes.
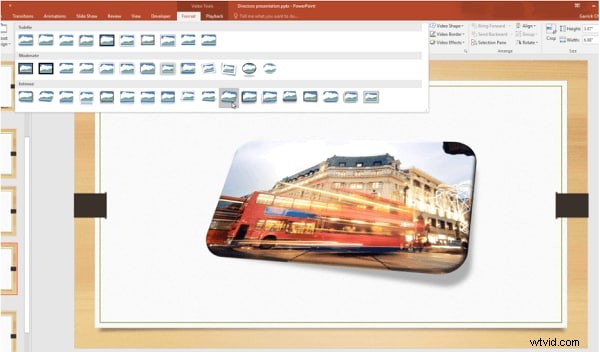
Apply Preset Video Styles
PowerPoint offers built‑in styles combining bevels, shadows, and frames. Highlight the video, navigate to Format → More Video Styles, hover over a style, and the live preview shows the effect instantly.
Conclusion
By trimming, cropping, and styling videos directly in PowerPoint, you can create clean, engaging presentations that capture and retain your audience’s attention—all without leaving the familiar Office environment.