There are several reasons why you are looking for how to blur a picture on your iPhone. Maybe you want to hide personal details for privacy, add a cool artistic touch, or simply make certain parts of your photo stand out more.
The great news is that you don't need any fancy equipment to do it. Your iPhone, along with some useful apps for more advanced effects, gives you everything you need to blur images in no time. To give you a head start, let's explore four simple methods of how to blur photos on an iPhone, starting with using the built-in camera tool.
In this article
-
- Edit background blur in existing photos
-
- More blur effects to explore on Filmora
Part 1. How to Blur the Photo Background with Portrait Mode on iPhone
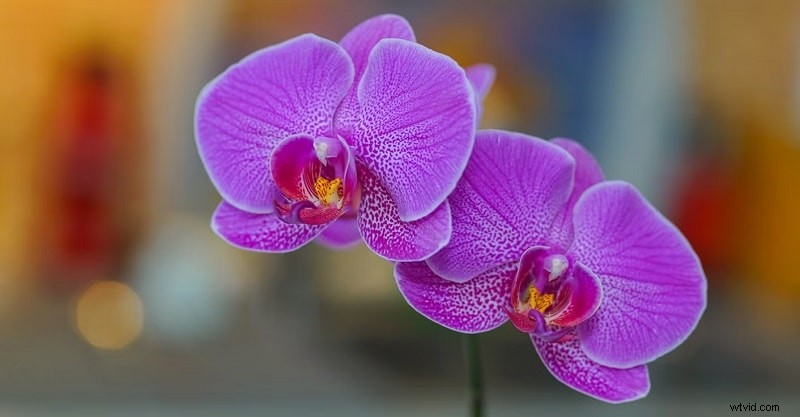
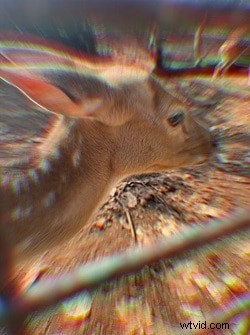
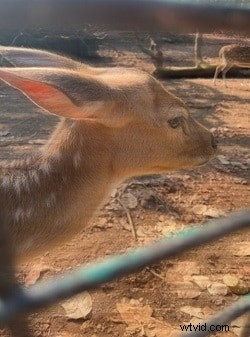
The first answer to the question "How do you blur pictures on an iPhone" is by using Portrait mode in your Camera app. Portrait mode is designed to help you capture stunning images with a sharply focused subject and a beautifully blurred background. It uses advanced depth-sensing technology to create a natural-looking blur around the subject.
This effect, known as "bokeh," is perfect for making your subject stand out, whether it's a person, pet, or object. The Portrait mode is available on iPhones starting from the iPhone 7 Plus and newer.
To learn how to blur pictures on your iPhone with the Camera's Portrait mode, follow the steps below.
Step 1: Open the Camera App
Pick up your iPhone and open the Camera app.
Step 2: Switch to Portrait Mode and Adjust the Depth
Swipe through the mode options above the Shutter button until you reach the "Portrait" mode. Once in Portrait mode, tap on the main subject you want to focus on.
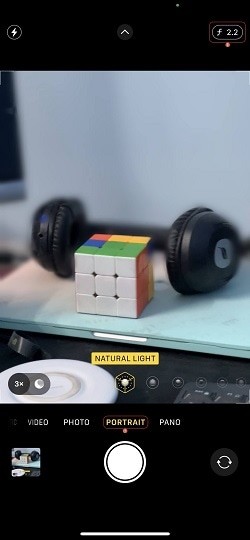
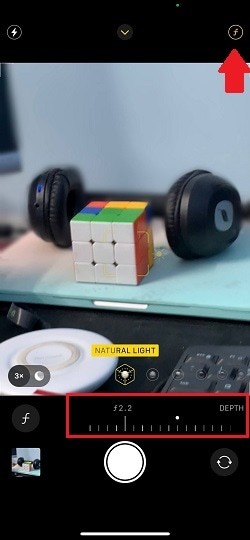
To adjust the background blur, tap the "f" (Depth) icon in the top-right corner and use the Depth slider to increase or decrease the intensity of the blur effect.
Step 3: Take the Photo and View It
Next, tap the Capture button in the bottom center to snap your photo. To view your photo, tap the Preview icon in the bottom-left corner. Or you can open the Photos app to find the photo.
Edit background blur in existing photos
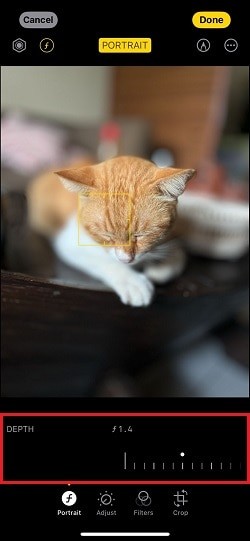
While the previous method focuses on blurring the background during photo-taking, how do I blur an existing picture on an iPhone? If you have an iPhone with Depth Control (iPhone XS, iPhone XR, or newer), you can modify the blur effect in Portrait mode photos even after they've been taken. Here's how to adjust the Depth control to blur existing pictures:
Step 1: Open the Photos app and locate the Portrait mode photo you want to edit. Then, tap Edit.

Step 2: Use the Depth slider to adjust the blur effect. Slide it left to increase or right to decrease the intensity.
Part 2. Capture a Blurred Background Photo on Older iPhones
If you're using an older iPhone model without Portrait mode, you can still create a blurred background effect by getting closer to your subject and enabling Auto Focus. Once focused, take the photo by tapping the Capture button.
For more detailed instructions on how to take blurred background photos on older iPhones, follow the steps below.
Step 1: Open the Camera App
Open the Camera app on your iPhone like before. Since you're using an older model without Portrait mode, you can stay in Photo mode.
Step 2: Enable Auto Focus
Tap and hold the main subject on the screen until the AE/AF Lock message appears at the top, indicating that Auto Focus has been activated.
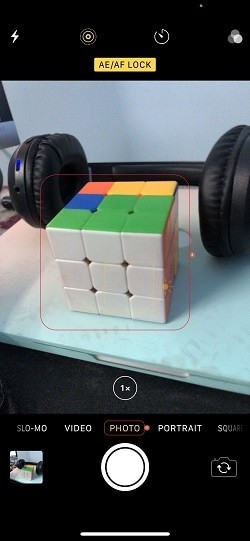
Step 3: Take the Photo
Move closer to the subject to achieve the desired background blur. As you approach, ensure the background becomes increasingly blurry. Once you're at the right distance, tap the Capture button to take the photo.
Part 3. 🤩Creative Blur Effects: How to Apply a Gradual Blur-to-Clear Effect on a Picture
For the next method, you can try a more creative approach to blurring your photos. One of the best tools for adding unique and artistic blur effects is Filmora. Filmora is a video editing app that offers a wide range of effects as part of its rich editing suite.
Get Started for FreeFor Win 7 or later (64-bit) Get Started for FreeFor macOS 10.14 or later
Among the blur video effects you can try in Filmora is the blur-to-clear effect. This effect gradually transitions a blurred photo into a sharp one. It's ideal for situations where you want to create a dramatic reveal. You can use it for promotional videos or presentations.

Here's how to blur a picture on an iPhone and then gradually transition into a sharp focus using Filmora:
Step1Download and Install Filmora on Your iPhone
Ensure you have Filmora installed on your iPhone to use it. Filmora is available for download on the App Store.
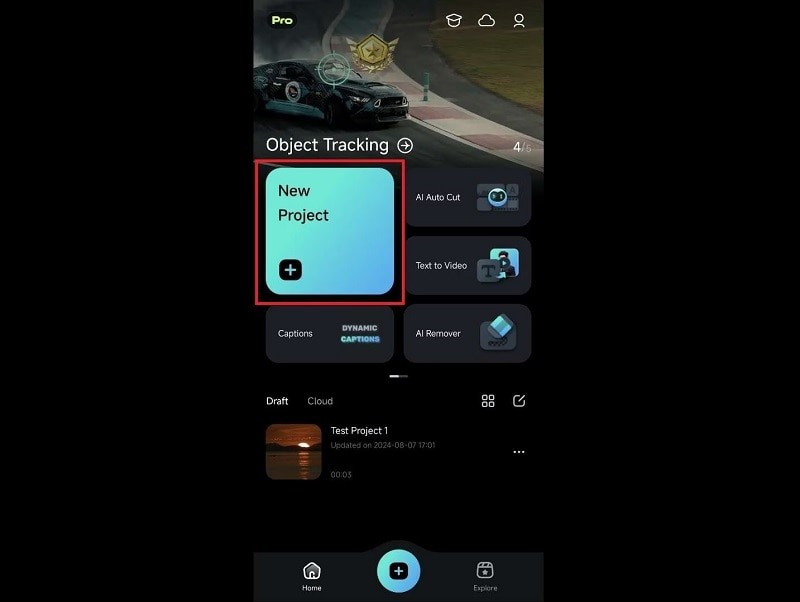
Step2Create a New Project and Import Your Photo
Open the app and tap "New Project." Then, you'll get to select your photo from your gallery. Filmora supports image formats such as JPG and PNG.
Get Started for FreeFor Win 7 or later (64-bit) Get Started for FreeFor macOS 10.14 or later
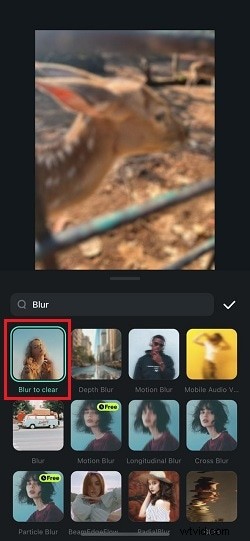
Step3Apply the Blur Effect
Go to the "Effects" menu in Filmora and search for "Blur." Locate the "Blur to Clear" effect and tap to apply it.
Adjust the duration by modifying the effect track to match the length of your photo. Once you're satisfied, tap "Export" to save it to your iPhone.
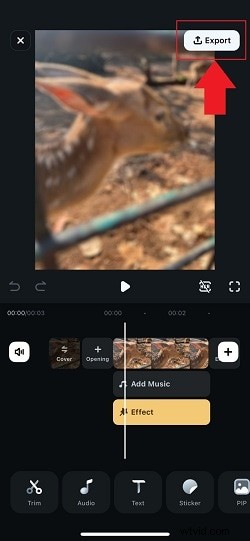

Note: Since the effect involves a transition animation, it will be saved as a video file. If you'd like to save it as an image, you can use a video-to-GIF converter.
💡More blur effects to explore on Filmora:
Aside from the Blur to Clear effect, Filmora also has several creative blur effects to apply to your photo. Some of them include:
- Radial Blur: The Radial Blur effect creates a blur that radiates from a central point, giving the image a sense of motion or focus.
- Motion Blur: The Motion Blur effect in Filmora simulates the effect of movement, blurring the image in the direction of the motion (usually horizontally) but not too much. So it will look rather aesthetic.
- Longitudinal Blur: The Longitudinal Blur effect applies a blur along a specific axis vertically. It's perfect for creating a sense of motion.

Get Started for FreeFor Win 7 or later (64-bit) Get Started for FreeFor macOS 10.14 or later
Part 4. How to Blur a Specific Part of a Photo on an iPhone
If you want to blur only a specific part of a photo you've already taken, third-party apps like Snapseed can also be a solution. This method is ideal for blurring existing images that weren't taken in Portrait mode.
Snapseed is a photo editor app that offers precise tools like the Lens Blur effect. This effect helps you blur only the areas you want while keeping the rest of the image sharp. To learn how to blur a specific part of a pic on an iPhone using Snapseed, follow the steps below.
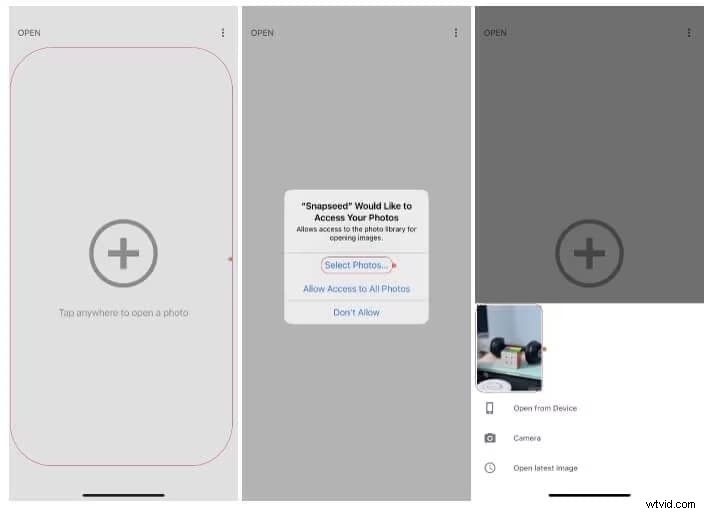
Step1Download and Open Snapseed
First, install Snapseed from the App Store. Once installed, open the app.
Step2Import the Photo
Allow Snapseed to access your photos on your iPhone. Then, select the picture you want to blur.
Step3Use the Lens Blur Tool
Find and select "Lens Blur" on the Tools menu. From there, you can manually adjust the focus area. The default shape is round, but you can choose from other available options. You can also adjust the blur strength to suit your needs.

Conclusion
Now that you've learned how to blur pics on your iPhone, you can use these simple techniques to enhance your photos and create a more professional look according to your preferences. For photos you're about to take, use the built-in Camera app with Portrait mode to create a blur effect or adjust focus manually on older models.
But if you want to add more creative and artistic blur effects to your photos, try out Effects on Filmora. With options like the Blur to Clear effect, Radial Blur, and Motion Blur, you can add visually striking elements to your photo. Or, try out Snapseed if you want to selectively blur specific parts of an image.
Get Started for FreeFor Win 7 or later (64-bit) Get Started for FreeFor macOS 10.14 or later