Do you need to quickly replace footage in after effects? In fact, it is easy to learn the skill if you can follow the right tips. In this article, you will know how to replace footage in after effects. Let’s find out how to replace clips easily.
- Part 1: How to Replace Footage in After Effects
- Part 2: The Other Ways to Start Quickly Editing in After Effects
Part 1: How to Replace Footage in After Effects
In the Available Media, you may replace the source footage for videos and link it to a new source file. While replacing footages, the clip instances are retained in the Expert timeline view and the Project panel in assets with the consistent In and Out points. The best part is every applied effect remains intact.
Still, the video clip is not linked to its original footage but, allied to the replacement footage. For instance, you may replace footage in after effects with one language soundtrack and use different language soundtrack for similar types of other footages. The edits made to the original footages is retained in the media, though the one replaced is the source footage. In order to replace footage in after effects, you need to choose the clip for which new source footage is required in the Project Assets Panel.
Firstly, select the clip and replace the footage. You may also control or right-click the clip in order to replace footage. Secondly, in the replace footage box, you can Select the new file and hit Open. As you do so, the old footage is replaced by the new one and the new footage is linked with all the instances of the old one.
You may also like: 15 Free After Effects Templates to Power up Your Video
Part 2: The Other Ways to Start Quickly Editing in After Effects
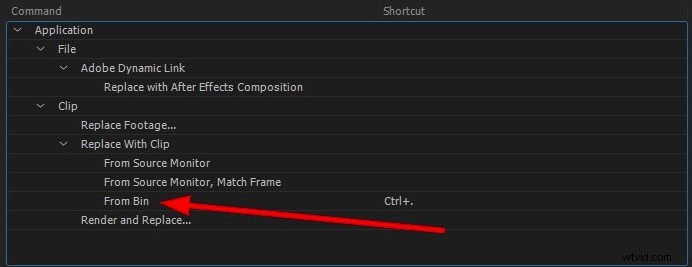
1. Use Shorts to Replace a Clip
Swapping or adding footages in a composition is a common After Effects process. You can find two useful and ready to use shortcuts to change rapidly and easily. Dragging footage to add it to the composition is always a way out available but you may also use shortcut CMD + / on Mac and CTRL + / on the PC to add the clip in the composition.
If you want to change one layer in the composition with another footage, the layer must be selected from the composition first and, then, the clip must be selected in the project and finally, the MAC users should press the CMD + OPTION + / and the PC users should press CTRL + ALT + /. Here is a After Effects shortcut list for your reference.
2. Use Proxy for Better Preference
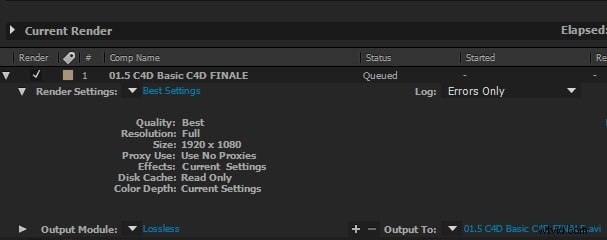
In order to speed up the previews, the low resolution still or movie is used by the Proxies. When you work on the larger files to reduce it to smaller ones, the Proxy comes in as a handy option. You just need to click on the Project video clip and select Create Proxy and then hit Movie/Still option.
In order to set the Proxy, the Render Que opens for you to set the Output Module and Render Setting. You may change the Output setting to Jpeg or as you want but the Render setting is by default drafted half size.
Once you are done with Proxy Render, beside the footage you can see a square. This shows that you are using the Proxy and it is in the active state. When you wish to stop using it, turn off the Proxy by clicking on the square that changes to outline. You can also use proxy to speed up your video editing in After Effects.
3. Change Mask Behavior
When there are several masks in your composition and AE by default has the same color for all masks, it can create confusion. So, you can change the color of each mask by clicking on Preferences, then Appearance and checking in Cycle Mask Colors.
Bonus Tip: Editing of footage in Wondershare Filmora
Wondershare Filmora is a fantastic platform for designing outstanding videos without any need for professional video editors. The whole interface is built-in and can be navigated easily. In the latest Wondershare Fimora, there is a whole toolset along the advanced features to enhance your video clips in the best possible way. Below are just simple steps for editing the footage and giving them a professional look. Select the number of options for adjusting the colours of the clips.
Features:
- You can import and export the files easily
- Addition of 5 text tracks and 10 musical tracks in your timeline
- Allow you to edit the videos at the resolutions for up to 4K
- Colour grading to make your videos look in a better way
- The colour matching feature helps match the colour of the selected video clips from one frame to another.
Starting the editing quickly in other ways by Wondershare Filmora:
You can easily enhance your videos through Wondershare Filmora. It allows you to adjust the video clips by tone, colour, light, white balance and HSL.
Step1: Enhancing the video clips:
Simply double-click on the video clip present on the timeline and select Color from the menu. Keep dragging the sliders according to the adjustment of the colours, contrast and brightness. There is also an availability of 3D LUT effects if you want to change the outlook of the video entirely just by a single click.
Step2: Advanced colour tunning:
Click on the Advanced button for entering the panel of Advance colour tuning. By right-clicking on the video clip, an advanced colour tunning window appears and select colour selection or click on the toolbar's colour icon. You can easily move any element from your video clip, even after colour tunning. You will feel more satisfied after editing the video using this feature in Wondershare Filmora.
Conclusion
Whether you are a professional or not, knowing how to replace footage after effects quickly can save you a lot of time, energy, and most importantly money. Get to the peak of your performance by applying the quick tricks.