Blender 2.8 is the newest version of the most popular computer graphics software tool set. With the EEVEE real-time rendering engine's introduction, you can refer to this version of Blender as the cross-compatible and fully functional 3D software. The uses of keyframes are crucial roles that define the time and position in a frame. Keyframing facilitates interpolated animation. Thus, just by adding a key on the last frame, you can guide the Blender to detect the property's position for all frames within this range based on the interpolation method.
Let’s dive deep into the land of Blender 2.8 keyframing!
Blender 2.8 keyframe animation involves editing different types of keyframes in various modes.
The most common Blender keyframe types are as follows.
- Normal Keyframes in the shape of a whitish-yellow diamond
- Breakdown resembles a small cyan diamond
- Moving Hold looks like a gray/orange diamond
- Jitter is similar to a green diamond
- Extreme is just like a giant pink diamond
Part 1. How to Easily Add/Create/Set a Keyframe in Blender 2.8 on Mac
In Blender 2.8, adding a keyframe is not too complicated. Given below are all the steps with regard to creating keyframes.
Steps-by-Step Guide to Create/Add/Set Blender Keyframes:
Step 1: Move to Select-Object
You need to go to the Reference Mode and then select Object from there.
Step 2: Add keyframes via different methods
Select from the two below-mentioned ways to add new keyframes.
- In 3D Viewport, press I will pop-up the menu to add keyframes.
- Now you can hover over the property and keep pressing I by RMB to select Keyframes from that menu.

Step 3: Set auto keyframing
If you are looking for hassle-free keyframing, then opt for the Auto Keyframe feature. The "record" button adds keyframes to an already specified frame if the transform type properties' value changes later on.
Part 2. How to Remove a Keyframe in Blender 2.8
Now, let’s learn how to remove keyframes in Blender 2.8 via simple steps.
Steps to Delete/Remove Blender Keyframes:
Step 1: Choose Object Mode
Firstly, you need to select the Reference mode as Object Mode.
Step 2: Delete keyframes
There are two ways to delete or remove Blender keyframes as follows.
- Press Option-I in the 3D Viewport to remove the keys from the chosen properties on the current frame.
- Keep pressing Option-I while hovering the mouse over a property. RMB a value and select to delete the keyframe from the menu.

If deleting Keyframes one by one takes a lot of time, you can also clear all the frames.
Steps to Clear Keyframes:
Step 1: Select Mode
From Reference Mode > select Object Mode
Step 2: Clear Blender keyframes
From the drop-down menu, chose Object > Animation> Clear Keyframes
It will subsequently remove all the keyframes from the chosen Object.

Part 3. Blender Shortcut Keys for Keyframe Animation on Mac
Use the following shortcut keys available for Blender keyframe animation, particularly on Mac:
- I – Insert a keyframe
- Option-I – Clear the keyframe
- Shift-Option-I – Clear all keyframes (removing all F-curves)
- Command-D – Assign a driver
- Command-Option-D – Clear the driver
- K – Add a Keying Set
- Option-K – Clear the Keying Set
Part 4. The Best Alternative to Blender 2.8 – Wondershare Filmora for Mac
Though steps to add keyframes in Blender is very useful for video editing, there are certain limitations as mentioned below:
- Steps to add Blender keyframes and corresponding actions to remove keyframes are simple but not very easy to learn for a naive user. Due to a sudden update to the 2.8 version, there came off new buttons. And the entire system became complicated.
- Moreover, Blender 2.8 can do the job throughout the CG pipeline but not specialized in any specific feature.
- Blender 2.8 does not support any external program to enhance the overall experience.
That’s how Blender 2.8 is unable to meet the expectations of the editing industry. The software industry has although a wide range of alternatives, but only a few have proven to be worthy and popular. One such useful software is Filmora by Wondershare.
Wondershare Filmora is available free of cost. But if you want to get your final video of the brand watermark, you need to subscribe at a nominal price. Despite the low cost, this software offers an exclusive range of editing tools to create a fantastic video experience. Amateur or professional, both users can import paid templates to give introductory videos a whole new look.
Download the latest version of Filmora, viz. Filmora X, which masters in motion tracking and color correction. It is best suited for beginners to reproduce professional videos with a cinematic touch.
Adding a keyframe in Wondershare Filmora for Mac is a process of three steps away.
So, let’s study what it needs to go there!
Steps to Add Keyframes via Wondershare Filmora for Mac:
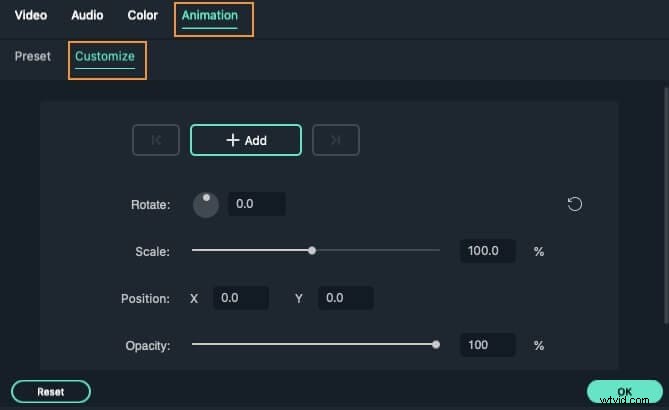
Step 1: Customize animations
Head over to the Animation tab and choose the Customize option to customize animations.
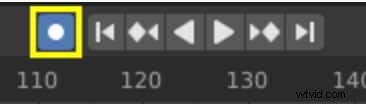
Step 2: Add the first keyframe
Move the playhead to the area you wish to set a keyframe and hit the Add button to confirm. It represents the first keyframe to mark the change from the beginning.
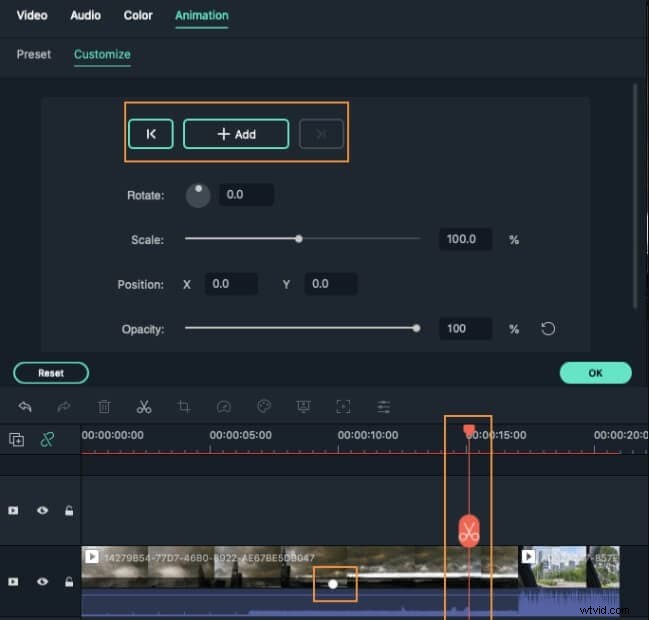
Step 3: Add another keyframe
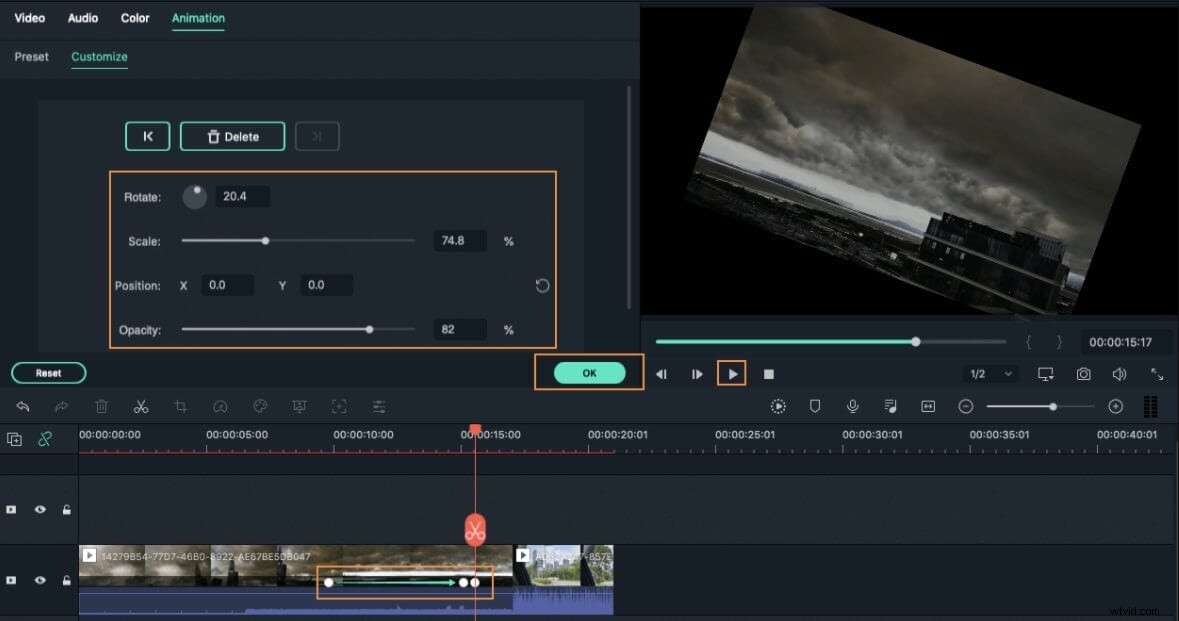
There is a need to add a second keyframe to complete the beginning. Set the playhead at the desired location and add it. You can change various attributions here, including rotation, scale, position, and opacity.
Conclusion
Finally, after carefully considering the pros and cons of Blender keyframe 2.8, we can say that it is still popular among the common mass owing to the simplicity of its interface. However, we would advise you to try out the different aspects related to keyframing in Wondershare Filmora so that it's easy to advance within this software.