Noise removal can be a frustrating endeavor. Let’s run through the process on how to reduce noise in an image using DaVinci Resolve.
DaVinci Resolve has a highly efficient user interface. And, although you can’t rearrange the workspace like you can in After Effects or Premiere Pro, you don’t need to. Everything you need is obtainable with just a single click.
Likewise, applying transitions, text, and effects is also a seamless operation. With the Resolve 16 update a few years back, you can now use many processes—such as stabilization—on the edit page. Initially, they were color page operations only.
While everything is seemingly easy to use in Resolve, noise removal can still be slightly confusing, especially to new platform users. So, let’s run through the process on how to reduce noise in DaVinci Resolve. However, before we continue, it’s important to note that the noise reduction tools are only available in the Studio version of Resolve.
Noise Reduction in Resolve
With the recent update to Resolve, you can now apply noise reduction in two ways. You can either find Noise Reduction in the Open FX library and apply it to a node. Or, open the Motion Effects panel, which is the last icon above the primary grading tools.
Both produce the same results. However, the layout in which you perform the noise reduction differs. Keeping to the traditional practice, I’ll be using the Motion Effects panel. With this panel, the noise reduction applies to whichever node is active, so be sure to select the correct node. Additionally, make sure the noise reduction is applied to the first node.
With that covered, let’s look at the panel.
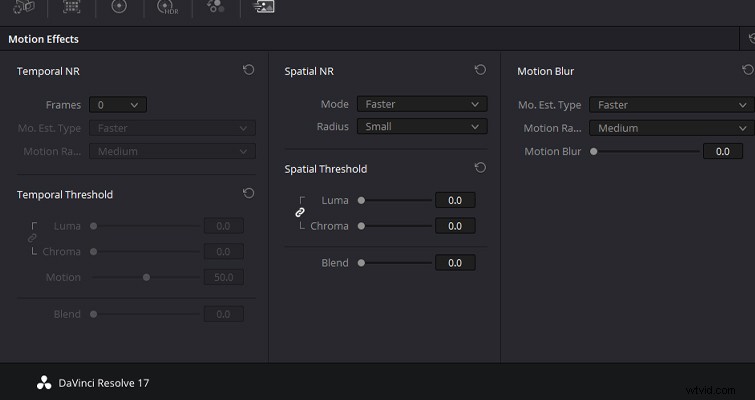
When you apply an audio noise reduction plugin, (usually) the parameters are pretty easy to understand. You can select low or high-frequency noise. There will be an adjustment gauge to increase or decrease the amount of noise reduction. And, there will also likely be some fine-tuning available. Resolve’s Noise reduction isn’t as clearcut. The panel is broken down into five areas:
- Temporal NR
- Temporal Threshold
- Spatial NR
- Spatial Threshold
- Motion Blur
Of course, NR is an abbreviation of Noise Reduction. And, we can skip looking at motion blur, as that adds artificial blur into footage, which is irrelevant to our cause.
So, we have temporal noise reduction and spatial noise reduction. What are they? Both methods of noise reduction identify and remove noise differently. However, both operations can be used independently or together. As the controls are highly customizable, you can use both functions in varying amounts to subdue the noise, as you see fit.
The Noise Reduction Premise
Okay, this is our fictional premise. I have this shot of a woman exploring an abandoned castle for a tourism advert. On the day of the shoot, the director wanted the stone corridors of the castle to drop into shadow. As such, the image was exposed like this:

However, while editing, the director now thinks the image feels more tonally like a horror movie, and not like a young woman exploring the ruins scattered around the Welsh countryside for a fun tourism advert. So, she asks for the shadows to be lifted.
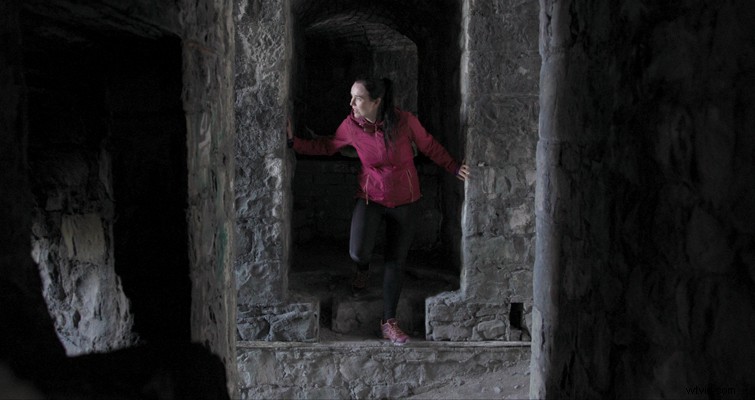
We were shooting with the Canon C300 Mk III, so we’re able to recover the information in the shadows quite significantly. However, that does come with its fair share of noise.
Okay, let’s look at how we can reduce that. First, temporal NR.
Temporal Noise Reduction
Temporal noise reduction works by identifying image detail between a set number of frames to separate the image detail from the noise. How many frames are analyzed is a setting selected by the user from the frames dropdown menu, which is between 1-5 frames. This form of noise reduction works best to reduce the noise of the non-moving parts of the image.
If your footage has motion, you can use the motion estimation settings to exclude moving subjects from this operation to prevent unwanted motion artifacts.
So, how many frames do you choose? Well, it’s ultimately going to be a trial and error process, depending on your clip. Of course, everybody is going to have a completely different type of media. This will be dependent on both the sensor of the camera, the ISO used, the amount of light available when shooting, and how much the shadows are increased while grading.
However, it should be noted that a higher frame selection will apply more frame averaging, which is an intensive operation on your PC. I often turn off the noise reduction node if I need to revisit an edit for changes, as this can stutter playback. Although, in general, noise reduction can be quite intensive. Additionally, a higher frame selection may produce unwanted artifacts if there’s a lot of motion throughout your image. If you do have moving objects within your frame, you can adjust the Mo. Est. Type and Motion Range sliders.
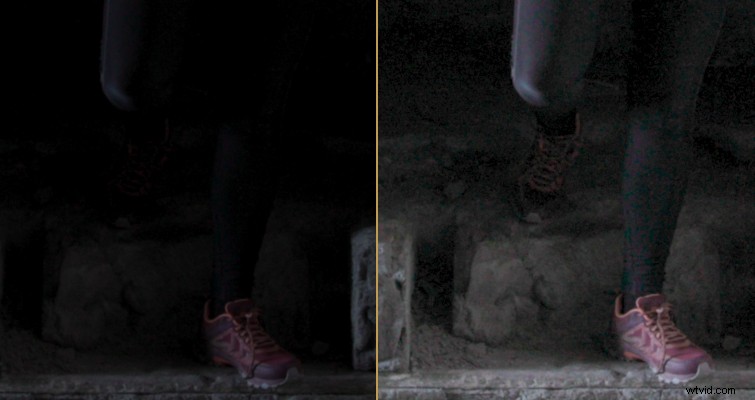
To see the noise suppressed, you’d need to adjust the luma and chroma threshold.
Both settings have a slider that ranges from 0-100, and upon increasing the slider, the noise reduction is increased. Luma will only affect the luma component (light) of the image, and chroma will affect the chroma component (color) of the image. You’ll find that if you increase the sliders too high, the image will lose detail and clarity.
It should be noted that you can raise the chroma threshold higher than the luma threshold with less noticeable artifacts.
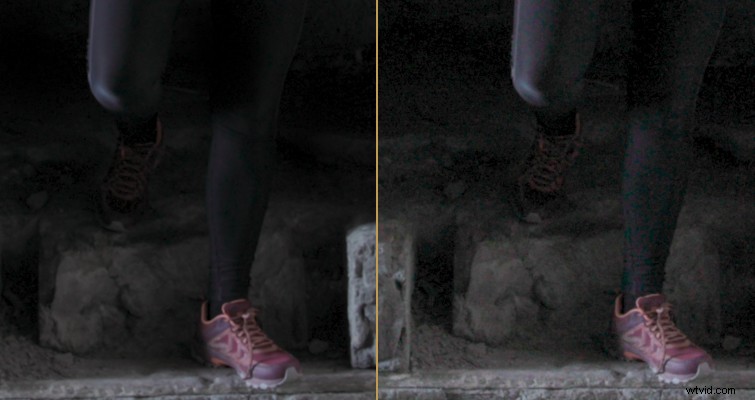
With temporal noise reduction applied to the image on the left, we can really see how much noise has been suppressed. There’s been a slight loss of detail, but it’s acceptable for such a noisy recovery.
Again, there isn’t going to be a single setting I can recommend as every form of noise differs from image to image. But, ideally, you want to adjust the slider that correlates to the type of noise in your image. If you have blocky, dark patches from an underexposed 8-bit image, use the luma slider. If you had to increase the ISO because the sun was setting and, as a result, you have noise with colored artifacts, use the chroma slider. However, both sliders are linked by default, and I tend to keep the link active during adjustments.
Spatial Noise Reduction
Moving to the spatial NR, this setting looks at details in nearby pixels to figure out the noise, then smooths out the region of high-frequency noise within that area frame-by-frame. In the panel, there’s a radius setting and by increasing the radius to analyze a larger sample area, you’ll obtain better results. However, this is at the cost of computer performance.
If you find that temporal NR is causing flickering noise patches, spatial NR is nice for smoothing out that area of noise. However, while spatial NR is noteworthy when used lightly, if you use it heavily (especially the luma slider), you’ll find that your image starts to look airbrushed, as detail is greatly lost.
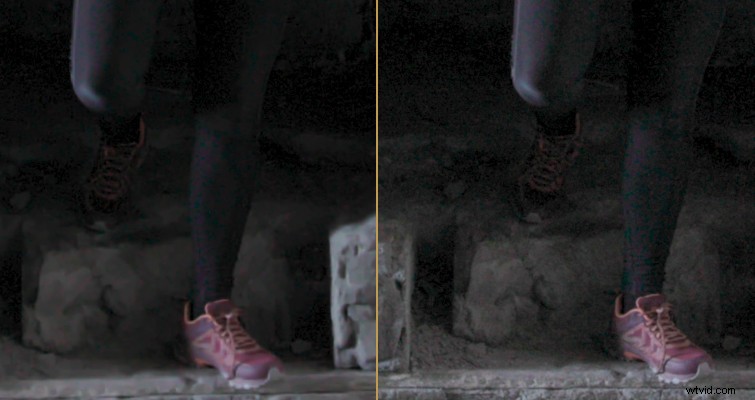
Here, I had to increase the slider to forty because of the level of noise. And, I’ve lost a noticeable amount of clarity within the rock and hiking shoe. The actress’s leg almost looks like plastic. However, as initially noted, you’re able to combine both forms of noise reduction with a varying degree of customization.
Blackmagic states:
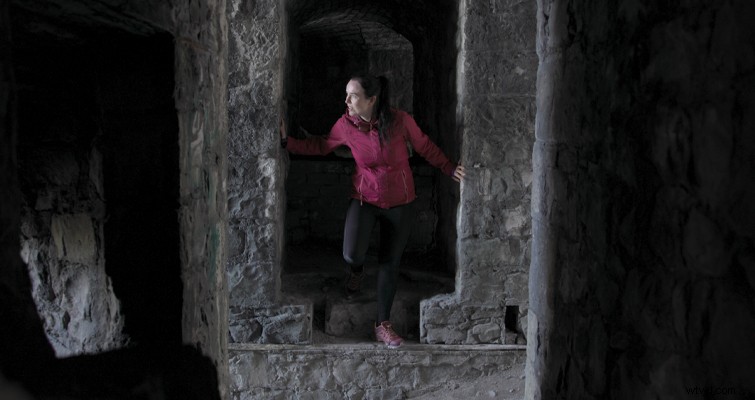
We can see that within the temporal NR example image, there’s some apparent noise still hidden within the shadows of the image. Therefore, by combining the settings from the Temporal NR and slightly adjusting the Spatial NR sliders, we can get an image that’s respectively reduced of noise.
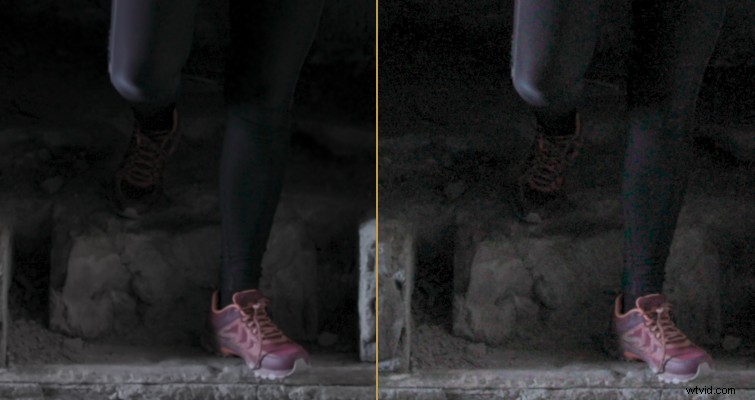
The larger picture looks rather clean!

Honest Opinion
There are also three dropdown menus I didn’t go in-depth on simply because they’re primarily gear box settings that affect how the noise reduction is applied. They are:
Temporal NR
- Mo. Est. Type: Picks the method DaVinci Resolve uses to detect motion in the image
- Motion Range: Sets the speed of motion that Motion Estimation should expect to exclude
Spatial NR
- Mode: The Mode dropdown lets you switch spatial NR between three different algorithms.
In Conclusion
So, that does lead me to my concluding paragraph. While these are the fundamentals of reducing noise in Resolve, a lot of the time, it just comes down to playing with the settings panel to see what works. I’ve been using Resolve professionally for nearly six years now. There’s never a go-to setting for when I’m trying to remove noise. It always involves me tweaking each slider and each dropdown menu until I find a setting that looks acceptable. But, these are the foundations of removing noise—temporal NR for noise in the unmoving parts of the image and spatial NR to further refine the noise if it hasn’t been subdued. Also, it’s beneficial to apply the reduction in that order.
To see Resolve’s NR in action, check out this awesome tutorial from Jamie Fenn: