Reader feedback tells me that some people are confused by Lightroom’s Export process. I think the confusion is caused by not completely understanding how Lightroom works, especially when processing Raw files. So let’s start by recapping the process that a single Raw file goes through when you import it into Lightroom.
1. Lightroom adds the Raw files to the Catalog
The Catalog is a database containing information about all the photo files you have imported into Lightroom (for further clarification on this process read my article How to Import Photos into Lightroom). Lightroom keeps track of the location (where it is saved on your hard drive) and metadata of each imported Raw file.
2. Open the Raw file in the Develop module and process the photo
The key thing to understand here that Lightroom keeps track of every single edit you make in the Develop module by storing them as a series of text commands in the Catalog. This means that (a) the Raw file itself remains unchanged and most importantly that (b) at this stage even though you can see it on your computer screen, you haven’t yet converted the Raw file into another format that other programs can use. This is where the Export function comes in.
JPEG and TIFF files
By the way, it’s a similar process if you are processing a JPEG or TIFF file. Lightroom saves the edits you make in the Lightroom Catalog, and doesn’t change the original file in any way. This only happens at the export stage, where you create a new version of the file that incorporates the changes. This is important to note, because it is different from the way Photoshop and Photoshop Elements work.
Exporting image files
All this means is that if you want to view or use your photos in a program other than Lightroom, you need to export them first and save them in a format that other programs understand.
There’s just one exception to this. If you go to Catalog Settings > Metadata and tick the Automatically write changes into XMP box, Lightroom will save the Develop settings in a .xmp file in the same folder as the original file. These files can be opened successfully using Adobe Camera Raw in Photoshop.
Note: Export in Lightroom simply means: Save As! Just like in MS Word or any other program.
The Export process
Now that you understand why you have to export photos, let’s see how to do it.
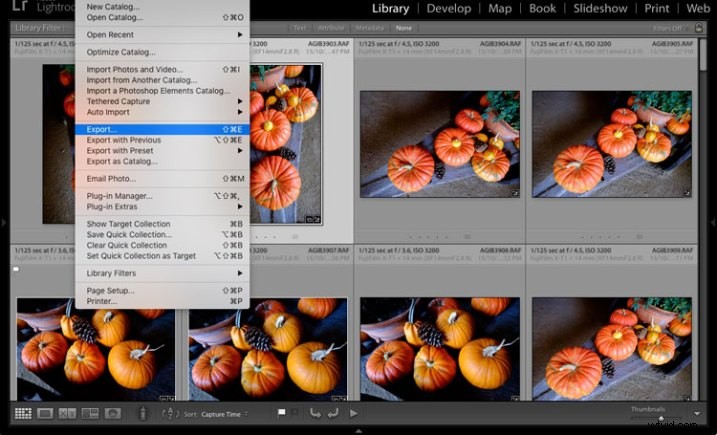
Start by selecting the photo, or photos, to be exported. It is easiest to do this in Grid View. Then go to File > Export to start the export process and bring up the Export window. This is what it looks like.
The Export to menu at the top defaults to Hard Drive. You can also choose to export the photos as email attachments, burn them to a CD/DVD or export them to a plug-in. For this article I am going to work on the basis that you have selected Hard Drive. The settings change slightly if you choose one of the other options.
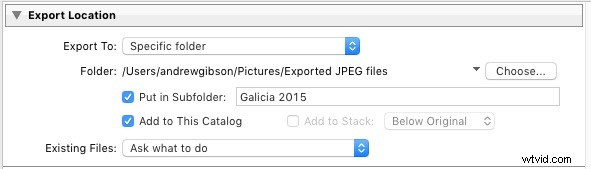
Export Location
This is where you tell Lightroom where to save the exported files. Select “Ask what to do” or “Choose a new name” for the exported file from the Existing Files menu, to avoid accidentally overwriting existing files with the same name. Tick the Add to This Catalog box if you want to add the exported images to the Lightroom Catalog. This saves time that would otherwise be spent re-importing the new images.
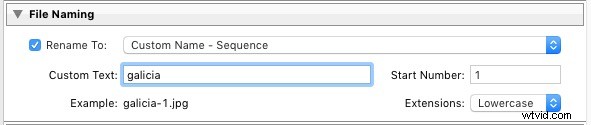
File Naming
When exporting you can opt to keep the original file names, or create new ones. What you choose to do here depends partially on whether you created new file names at import, or kept the original names made by your camera. The most obvious use here is creating a naming format for images to be sent to clients. If you are exporting photos to send to a stock library, for example, the stock library will have its own file naming requirements that you need to stick to. You have the option of selecting one of Lightroom’s naming presets, or you can create your own by choosing Edit from the Rename To menu.
Video
Only applies if you are exporting video.
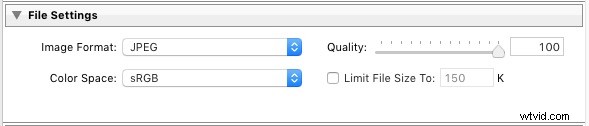
File Settings
This is where you select the format, quality, and colour space of exported files. It is important to get these settings correct, otherwise you risk creating files that are unsuitable for the intended purpose. There are five Image Format options to choose from:
JPEG: This format is for creating small files for sending to other people or uploading to websites.
For web use: Set Quality to between 60 and 80 and Color Space to sRGB. You may also wish to tick the Limit File Size box to ensure that files are below a certain size. If you are exporting photos to use on a web page, restricting file sizes to less than 150kb will help the page load faster in a browser. You also need to set the pixel size of the exported files under the Image Sizing heading.
For full size images: Set Quality to 100 and Color Space to sRGB. You should only select a Color Space other than sRGB if you instructions to do so (for example, you are sending the files to a magazine publisher who wants them in the AdobeRGB (1998) colour space).
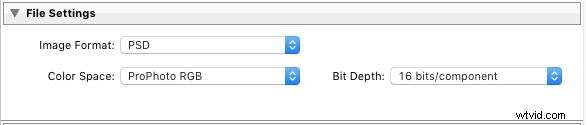
PSD: This is for creating PSD files to work on in Photoshop. For maximum quality set Color Space to ProPhoto RGB and Bit Depth to 16 bits/component. This gives Photoshop all the available information for that image, and the highest quality possible.
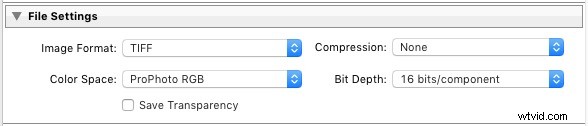
TIFF: These files are large, 16 bit files similar to PSD files. For maximum quality set Compression to None, Color Space to ProPhoto RGB and Bit Depth to 16 bits/component. The assumption here is that you are creating the file to work on in Photoshop or another plug-in.
Note that the reason I recommend using ProPhoto RGB for both TIFF and PSD files is because I’m making the assumption that when you’re finished editing the photo you will then convert it to either sRGB or AdobeRGB (1998) afterwards. If you’re not sure what colour spaces are or how they work then my article Everything You Need to Know About Lightroom and Colour Space will help.
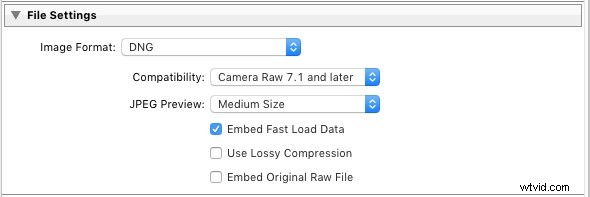
DNG: Use this setting to convert native Raw files to the DNG (Digital Negative) format. Tick the Embed Fast Load Data box to create DNG files that load faster in Lightroom.
Original: Retains the original photo file format. If the original is a Raw file, Lightroom exports the unmodified original, with a sidecar .XMP file containing the changes made in Lightroom.

Image Sizing
This option lets you alter the size of the image and set the resolution. Use this to upscale the photo for printing, or to create a smaller file for uploading to a website. If you simply want to export a full size version of your photo, you won’t need to alter any settings here.

Output Sharpening
Lets you add sharpening for display (Screen) or printing (Matte Paper and Glossy Paper). Select from three levels: Low, Standard and High. There is no need to sharpen if you are exporting photos to edit in another program such as Photoshop.

Metadata
Here you choose whether to include all metadata in the exported image, or just some of it. You may want to leave out Person Info (keywords that include people’s names) for privacy reasons, and Location Info for security or privacy reasons (for example, if you post a photo of your home online).

Watermark
Tick the Watermark box to add a watermark to your images. Select Edit Watermarks from the menu to create your own watermark. The main purpose of this is to add a copyright logo to photos that are going to be published online.

Post-Processing
Tell Lightroom what to do after exporting the images. Do Nothing is the most appropriate setting most of the time, but you may find the other options useful from time to time.

Export Presets
If you find yourself using the same export settings a lot, you can save them as a User Preset. Click the Add button in the bottom left corner of the Export window to do so. You’ll be prompted to enter a name for the Preset, and to select the folder to save it in (the default is User Presets).

As you can see, the export process in Lightroom is quite simple. If you have any questions about it, or indeed any questions about Lightroom, please let us know in the comments.
The Mastering Lightroom Collection
My Mastering Lightroom ebooks will help you get the most out of Lightroom. They cover every aspect of the software from the Library module through to creating beautiful images in the Develop module. Click the link to learn more or buy.