Split‑screen editing has become a staple for creators who want to weave multiple stories or showcase side‑by‑side comparisons within a single frame. Whether you’re producing a vlog, a tutorial, or a marketing clip, a robust split‑screen tool can elevate your visual storytelling.
With a growing array of options—ranging from web‑based services like Kapwing to full‑featured desktop software—choosing the right editor depends on your budget, skill level, and the complexity of the projects you envision. Below, we break down the best free and paid solutions, compare their core features, and provide a hands‑on guide for the top pick.
In this article
- The Best Split‑Screen Video Makers
- Comparing the Top Split‑Screen Video Makers
- How to Use Split‑Screen Effects with Wondershare Filmora
Finding the Ideal Split‑Screen Editor
A quick search will surface a variety of online tools such as Kapwing, Flixier, and Veed.io. However, if you require more sophisticated control—like multi‑layer editing, advanced transitions, or AI‑powered audio cleanup—a dedicated desktop application is often the better choice. The right tool for you hinges on factors like operating system, feature set, and cost.
Wondershare Filmora
Filmora stands out for its blend of accessibility and power. With a user‑friendly interface and an extensive library of pre‑made templates, you can lay out up to six clips side‑by‑side in seconds. The software also offers AI tools that clean up audio and isolate vocals, making it a versatile choice for both beginners and seasoned editors.
Key Features
- 250+ pre‑built split‑screen templates for up to six simultaneous scenes
- Compound Clip tools to merge multiple clips into one for streamlined editing
- Wide range of filters, effects, and stickers to enrich visual appeal
- Export Selected Clips to save individual segments without rendering the entire project
- AI Audio Denoise for clearer soundtracks
- AI Vocal Removal to create instrumental or karaoke‑style tracks
Availability: Windows, macOS, iOS, Android, iPad.
Pros
- Theme‑specific templates for social media, vlogs, sports, and more
- Supports up to six videos in a single split‑screen layout
- Quick Split Mode accelerates workflow for rapid prototyping
- Responsive customer support and frequent updates
Cons
- Free version contains watermarks and limited export options
VSDC Video Editor
VSDC offers a cost‑effective alternative for Windows users. Its non‑linear workflow lets you layer multiple videos, animate objects, and apply picture‑in‑picture or split‑screen effects with precision. While the free version is feature‑rich, the Pro tier unlocks advanced capabilities such as motion tracking and chroma keying.
Key Features
- Built‑in Voiceover Recorder for on‑the‑fly narration
- Screen Capture to record desktop activities, ideal for tutorials
- High‑performance algorithms optimized for multi‑core CPUs
- Customizable video and audio parameters
Availability: Windows.
Pros
- No watermark on exported videos
- Completely free for basic use
- Intuitive for beginners and casual creators
Cons
- Free edition lacks some advanced effects; Pro required for full feature set
- No preset layouts for automatic split‑screen positioning
Adobe Premiere Pro (Paid)
Premiere Pro remains the industry standard for professional editors. Its robust toolset—covering color grading, multi‑camera editing, and AI‑powered audio remixing—enables high‑quality split‑screen productions across a wide spectrum of genres.
Key Features
- Extensive library of effects, transitions, titles, and graphics
- Multi‑camera sequence creation for synchronized editing
- Live multicam playback and cutting during render
- AI Remix to retime music tracks to your edit length
- Motion Graphics templates for quick visual enhancement
Availability: Windows, macOS.
Pros
- Seamless integration with Adobe Creative Cloud (After Effects, Audition, Photoshop)
- Unlimited clip count for split‑screen layouts
Cons
- Steep learning curve for new users
- Subscription required for continuous access
iMovie
Apple’s iMovie is an excellent entry‑level solution for Mac, iPhone, and iPad users. With a clean interface and built‑in effects like color correction and stabilization, iMovie is ideal for quick projects that don’t demand advanced features.
Key Features
- Dynamic visual styles with customizable titles, fonts, filters, and music
- 20 storyboard templates for popular video types
- 11 animated title styles, including Split, Reveal, and Pop‑up
Availability: macOS, iOS, iPadOS.
Pros
- AirDrop and iCloud integration for seamless project transfer
- Intuitive, beginner‑friendly interface
Cons
- Only supports two side‑by‑side clips
- Limited advanced editing compared to professional software
Final Cut Pro X (Paid)
For high‑performance, professional editing on macOS, Final Cut Pro X offers powerful tools for handling large projects, high frame rates, and immersive 360‑degree video. Its native integration with Apple’s ecosystem ensures smooth workflow.
Key Features
- Multi‑camera editing for up to 64 angles
- 360‑degree VR video support
- Motion & Compressor integration for custom titles and effects
- Duplicate detection for quick timeline cleanup
Availability: macOS.
Pros
- High‑speed performance suitable for large‑scale projects
- Unlimited clip count for split‑screen layouts
- Regular updates and Apple support
Cons
- One‑time purchase ($299.99) higher than subscription models
- No built‑in split‑screen presets; manual arrangement required
Comparing the Top Split‑Screen Video Makers
Choosing the right editor involves evaluating several critical factors. Below is a concise comparison that highlights what each solution brings to the table.
- Template Variety – Quick project initiation and creative inspiration
- Customization – Flexibility in layout, size, and additional graphics
- Format Support – Compatibility with MP4, AVI, MOV, and more
- Audio Editing – Tools like auto‑sync, denoise, vocal removal, and voiceover recording
- Cost Structure – Free tiers vs. subscription or one‑time purchase models
| Software | Template Variety | Supported Formats | Audio Tools | Price |
| Wondershare Filmora | 250+ | AVI, VOB, MP4, WMV, 3GP, MKV, and many more | AI Denoise, Vocal Removal, Audio Stretch, Beat Sync, Voiceover & Background Music | Free trial; subscription from $29.99/month |
| VSDC | 100+ | AVI, MP4, MOV, MKV, etc. | Audio Converter, Real‑time Voiceover Recording | Free (Pro tier for advanced features) |
| Adobe Premiere Pro | 300+ | MP4, MOV, AVI, MXF, HEVC, and many more | AI Remix, 50+ audio effects, Mixing, Voiceover & Background Music | Free trial; $22.99/month (single app) or $59.99/month (Creative Cloud) |
| iMovie | 20+ | MOV, MP4 | Sound Effects, Music Library, Voiceover | Free |
| Final Cut Pro X | 300+ | MP4, MOV, AVI, MXF, HEVC, and many more | Voice Isolation, Audio Compression, EQ, Voiceover & Background Music | Free trial; one‑time purchase $299.99 |
Author’s Verdict
After evaluating each tool against the key criteria, Wondershare Filmora emerges as the best overall solution for split‑screen creation. It delivers an impressive library of over 250 templates, robust AI audio features, and a pricing model that’s accessible to hobbyists and professionals alike.
How to Use Split‑Screen Effects with Wondershare Filmora
Below is a step‑by‑step walkthrough that shows how to harness Filmora’s split‑screen capabilities, from importing footage to applying final polish.
Step 1 – Upload Videos to the Timeline
Launch the latest Filmora version, start a new project, and import your clips into the timeline. Arrange each clip in the order you wish them to appear.
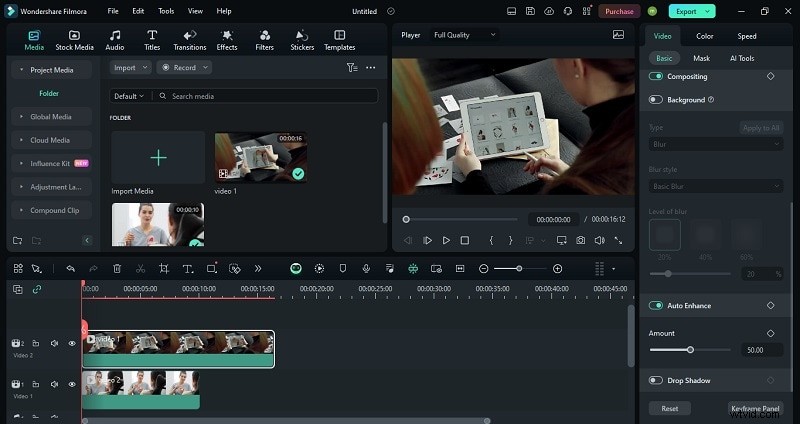
Step 2 – Edit Individual Clips
Filmora’s multitrack editing lets you tweak each clip separately. For example, apply Video → Basic → Auto Enhance to a single clip to reduce noise without affecting the others.
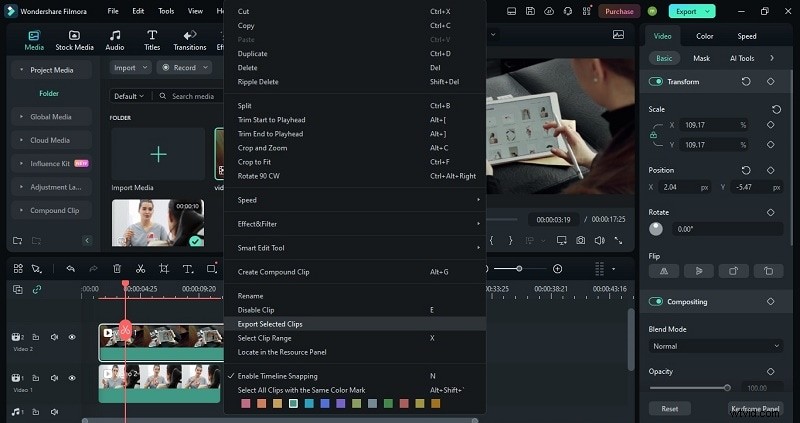
Step 3 – Export Selected Clips
Right‑click a clip and choose Export Selected Clips to render it independently. This is useful when you need a specific segment for later use.
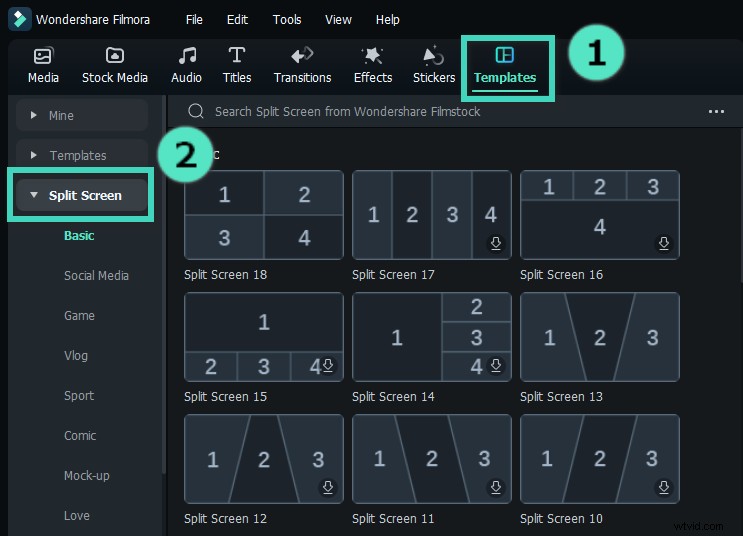
Step 4 – Apply a Split‑Screen Template
Navigate to Templates → Split Screen and preview the available layouts. Drag your chosen template onto the timeline and adjust its duration by resizing the timeline handles.
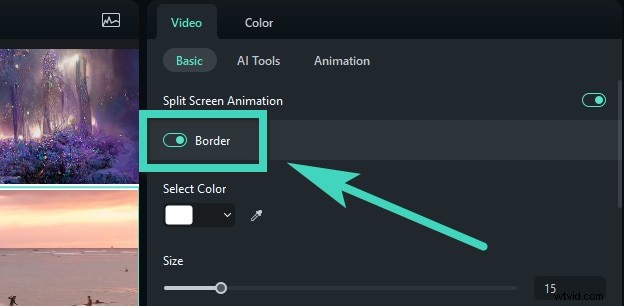
Step 5 – Fine‑Tune the Layout
In the Property Panel, enable Video → Basic → Border to add a frame around each clip. Customize color, thickness, and position to match your brand style. The Video tab also offers rotation, scaling, and sizing controls.
Step 6 – Enhance with Filters, Effects, and Stickers
Choose from Filmora’s vast library of filters, overlays, and stickers to add visual flair. Applying an effect to one clip automatically applies it to the entire split‑screen segment.
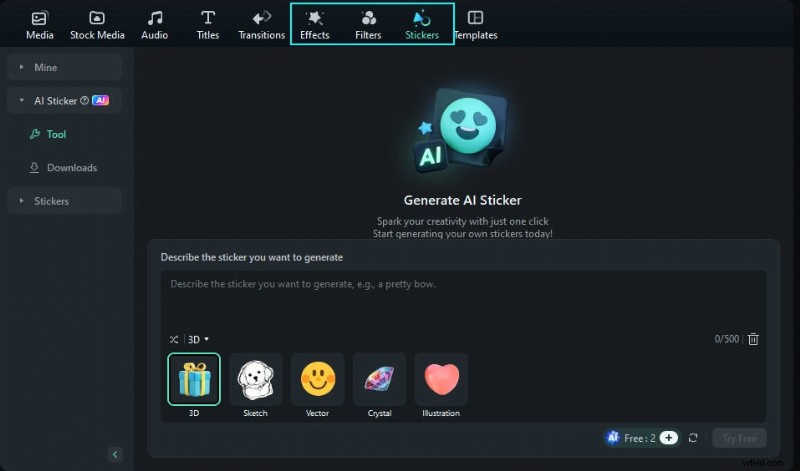
Tip: The AI Stickers feature lets you create custom stickers on the fly, eliminating copyright concerns.
Conclusion
Whether you’re a hobbyist looking for a free solution or a professional seeking advanced tools, the split‑screen landscape offers something for every need. After a thorough review, Wondershare Filmora stands out for its balance of affordability, versatility, and AI‑driven audio editing. With its extensive template library and intuitive workflow, Filmora empowers creators to produce polished, engaging split‑screen videos across any platform.