When editing videos, changing the aspect ratio is essential for different platforms like YouTube, Facebook, Pinterest, and Instagram. Videos vary in size and shape, so resizing is crucial to maintain quality and efficiency. Whether for business or personal projects, resizing saves time and money.
This guide will show you how to resize videos using DaVinci Resolve and Filmora Wondershare. Once you learn, it becomes as easy as a click. Let's dive in!
In this article
Davinci Resolve is a very powerful tool to edit videos. Let’s suppose, you have some videos shots and all the videos have different sizes, some of the videos fit in the timeline and some are out of the timeline. No matter, you are going to make a video on the same scale with the same size.
Resize the video can be done in three ways:
- Zoom in zoom out
- Cropping
- Retime and scaling
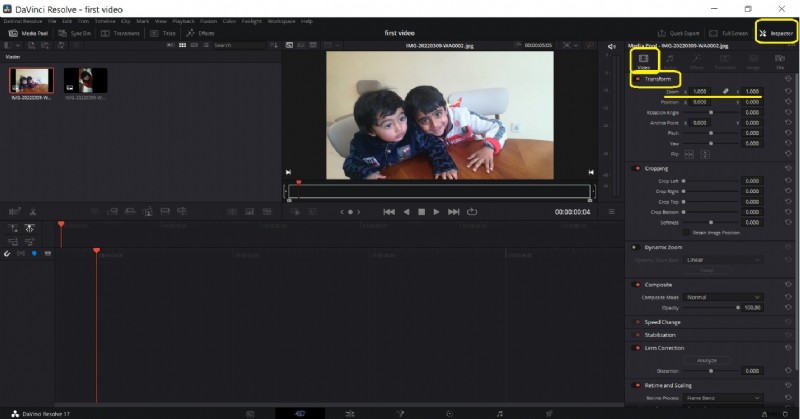
Method 1. Zoom in and Zoom out
First of all, select the videos in your timeline. You should stay in the middle of the frame to set it because it’s too wide. The timeline moves forward and backward. Let your video be 4k, go to the bottom-right corner and click on timeline format. Select timeline resolution, select ultra HD, or whatever you want from the drop-down list.

Go to the inspector from the up-right corner and select Transform under the video section. Here you can resize your image. Place the mouse over zoomx (Horizontal) and zoomy (vertical) values to drag left or right for zoom in or zoom out. The video can be resized accordingly.
Here you can also change its rotation.
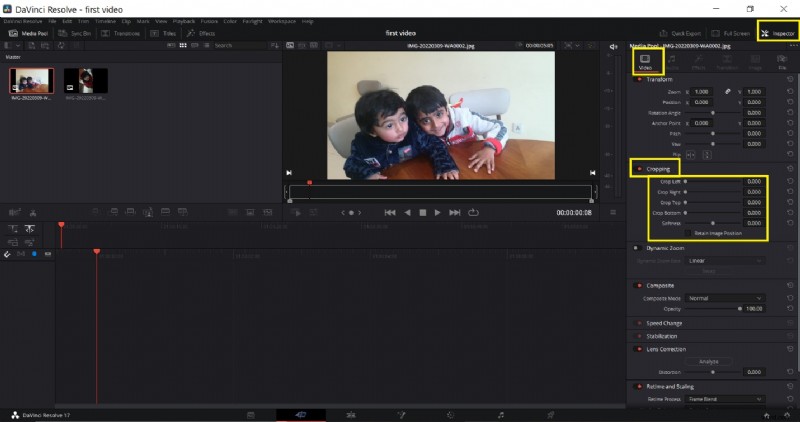
Method 2. Cropping
Go to the inspector from the up-right corner and select Transform. Now choose Cropping. Here are four options Crop left, crop right, crop Bottom, and crop Top. You can drag the scale from left to right to adjust the crop settings according to the desired result.
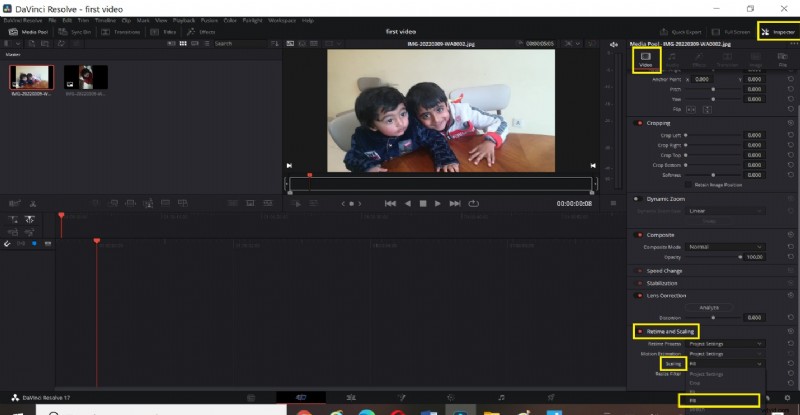
Method 3. Retime and scaling
Go to the inspector from the up-right corner and select retime and scaling. You can choose stretch, Fit, Fill, or crop for cropping the video from the drop-down list.
- The Crop function is used to remove the unnecessary or uneven part of the video.
- The Fit function is to have the video auto-center and the selected clips are formatted according to the screen dimensions.
- Stretch Function allows changing the length of the certain clip at a certain duration.
After transforming, cropping, and resizing the videos, you can copy the same settings without repeating the above steps for each video.
Part 2. An Alternative Way To Resize Videos With Wondershare
Wondershare Filmora is an easy-to-use yet powerful video editor suitable for all creators, allowing you to effortlessly convert horizontal videos into vertical ones. Notably, Filmora not only has the Auto Reframe feature but also includes an advanced compression function, and it offers a method for manually adjusting video dimensions. Wondershare Filmora is a clear winner! Its advanced video compressor makes it incredibly easy to reduce file size without any loss of quality while ensuring that your videos meet the size requirements for social media uploads.
And if that’s not enough, Filmora also has an Auto Reframe feature, along with other ways to help reduce file size. You can adjust the video resolution, tweak the bitrate and frame rate, or cut the video length. Plus, it comes with advanced features to enhance your videos before sharing them on social media.
Plus, it’s incredibly fast, with compression speeds up to 47x faster! And the best part? If you’re reducing file sizes for YouTube uploads, you can use the recommended bitrate for the best possible quality.
And if that’s not enough, Filmora also has an Auto Reframe feature, along with other ways to help reduce file size. You can adjust the video resolution, tweak the bitrate and frame rate, or cut the video length. Plus, it comes with advanced features to enhance your videos before sharing them on social media.
Multiple Ways to Help Resize Your Videos
- Auto reframe video in 16:9, 1:1, 9:16, 4:3 or 21:9.
- Offers cool video effects and filters to make your video become professional.
- Cross-platform supported - (Windows, Mac, iOS, Android).
- Resize Your Videos Without Quality Loss.


So, what are you waiting for? Give Filmora a try to reduce the size of your video files! Just follow this simple guide to get started:
Method 1: Using Advanced Video Compressor
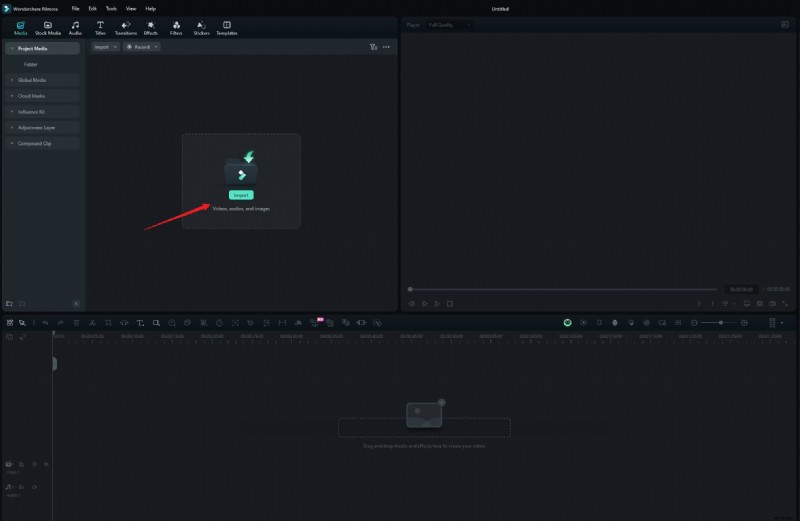
Step1Launch Filmora and upload your video
If you haven’t downloaded Wondershare Filmora yet, you can grab the latest version here. After installing, just double-click the icon to open it. Once Filmora is open, start a new project and import your video from Google Drive or Dropbox, or simply drag and drop your videos into Filmora.
Step2Compress your video
Click "Export" at the top right, then choose your video compression mode: "By Quality" or "YouTube Upload".
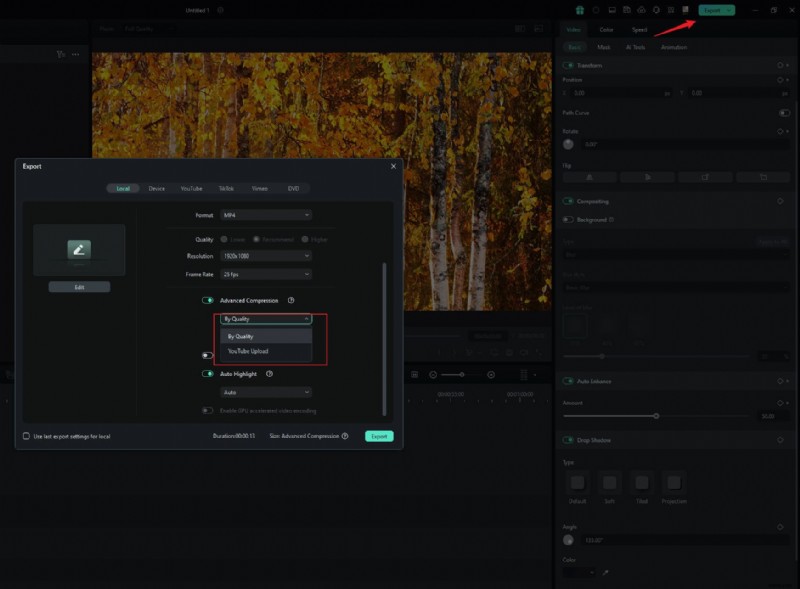
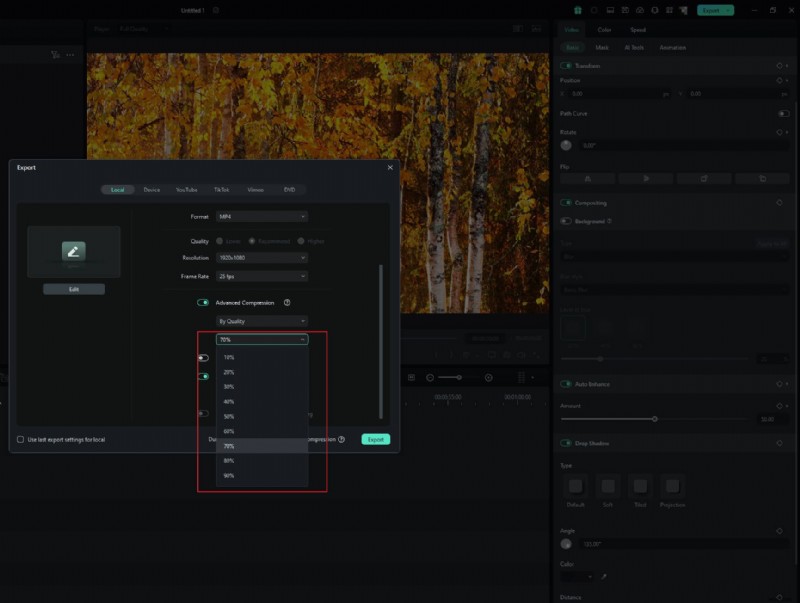
If you choose "By Quality", you can adjust the file size by selecting a quality level, from 10% to 90%. Meanwhile, if you choose "YouTube Upload", the video will automatically be compressed to the recommended bitrate for YouTube, which helps prevent blurriness when uploading.
Step3Export your video
Choose the option that works best for you, and the tool will automatically compress your video. Once it’s done, just click "Export" to save your video with the smaller file size.

Method 2: Using Auto Reframe Feature
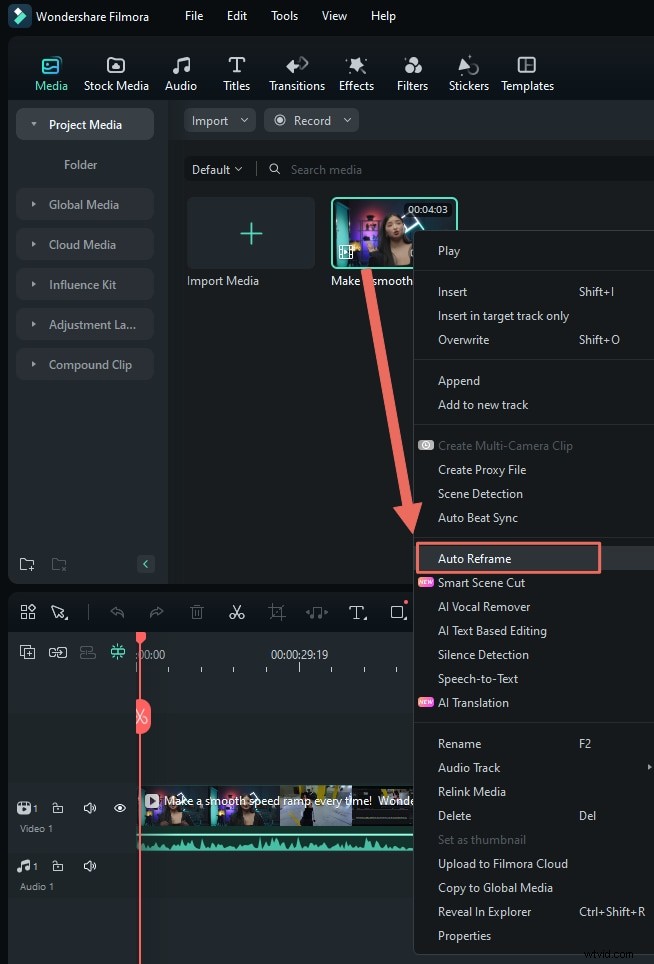
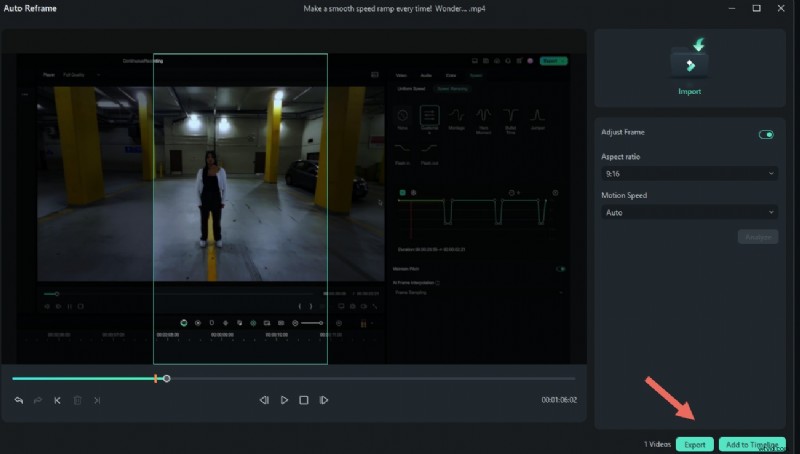
Step1Upload your video and access the Auto Reframe feature
After uploading your video to Filmora, go to Tools > Auto Reframe, or simply right-click the video in the media library and select Auto Reframe.
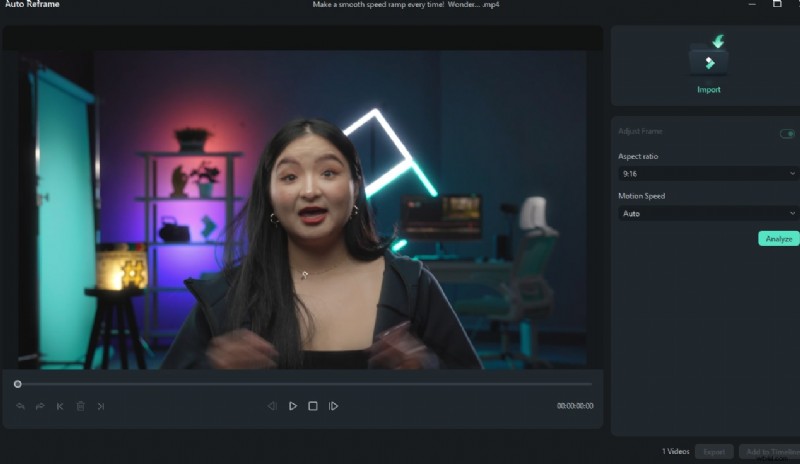
Step2Adjust aspect ratio
In the pop up window, you’ll see several aspect ratio options like square (1:1), vertical (9:16), standard (4:3), widescreen (16:9), and cinema (21:9). Choose the one that will help reduce your video size. For example, if your video was originally widescreen (16:9), switching to a square (1:1) or vertical (9:16) aspect ratio can reduce the file size.
Once you’ve made your selection, click "Analysis" to let Filmora adjust the video accordingly.
Step3Review the preview and make any additional adjustments
Once you've set everything up and reframed your video, take a moment to preview it. If you need to make changes, just pause the video and drag the frame where you want it. Do this as needed. When you're satisfied with how it looks, click "Export" or "Add to Timeline" to save your changes.
Step4Change the dimensions when exporting
The above mentions changing the dimensions of a single video or multiple videos in the media library, but you can also directly export videos from the timeline, select "Auto Reframe," and modify the dimensions.
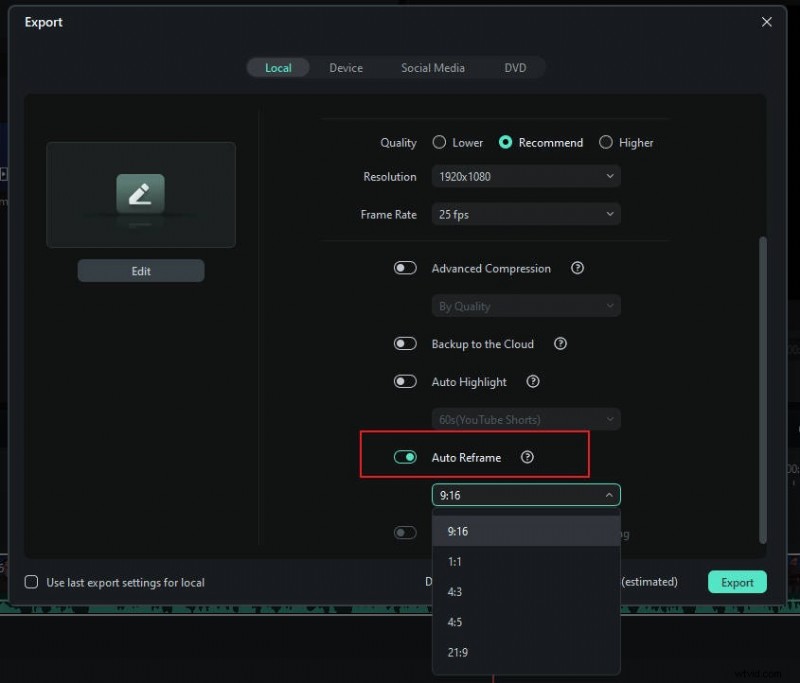

Note: If you're not satisfied with the export settings, there's an option in the bottom left corner that allows you to revert to the last settings before export.
Get Started for FreeFor Win 7 or later (64-bit) Get Started for FreeFor macOS 10.14 or later
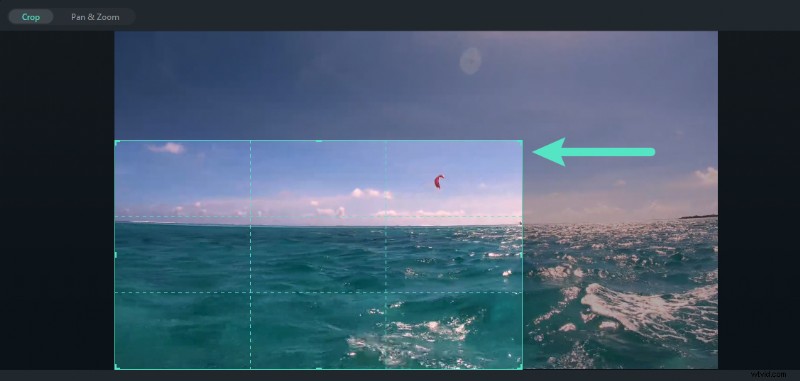
Method 3: Use The Crop Tool
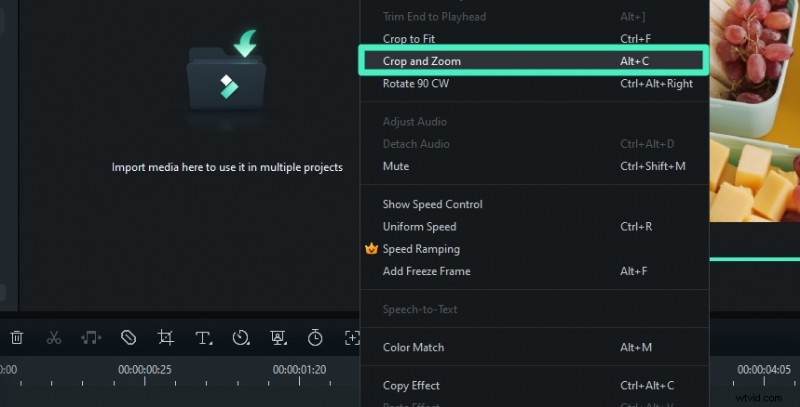
Step1Find the Crop tool
You can also reduce the size of your video by using the Crop tool to adjust the video dimensions. Just right-click on the video in the timeline and select the "Crop and Zoom" option.
Step2Select aspect ratio
In the Crop and Zoom panel, you can adjust the crop area by choosing from the available ratio presets.
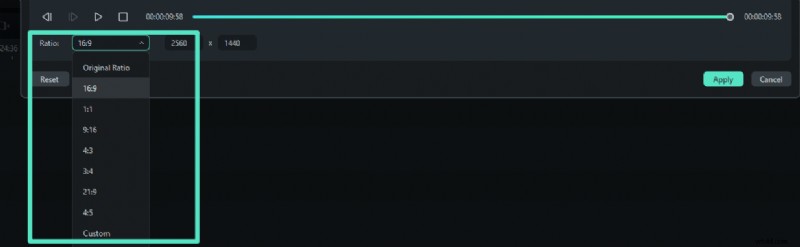
Step3Crop the video
To adjust the size and position, drag the crop box to choose the part of the video you want to keep. This will help resize your video and make the file smaller. When you're happy with it, click "Apply" to save your changes.
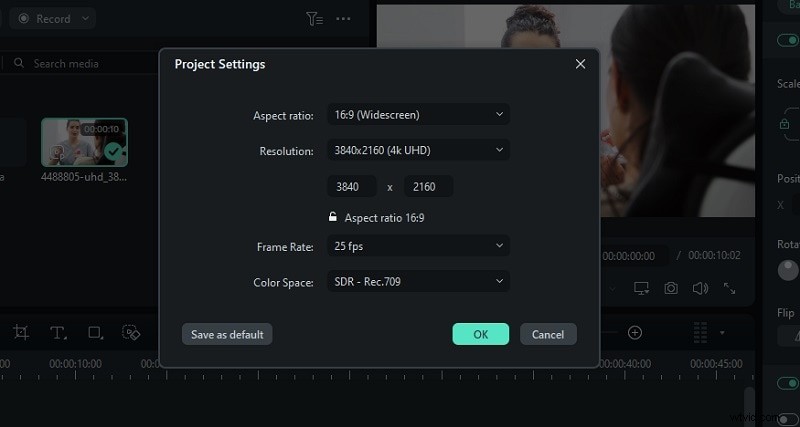
Method 4: Change Project Aspect Ratio
If you want a more straightforward approach, you can change the project aspect ratio. After importing your video to Filmora, click the Settings button and select "Change Project Aspect Ratio."
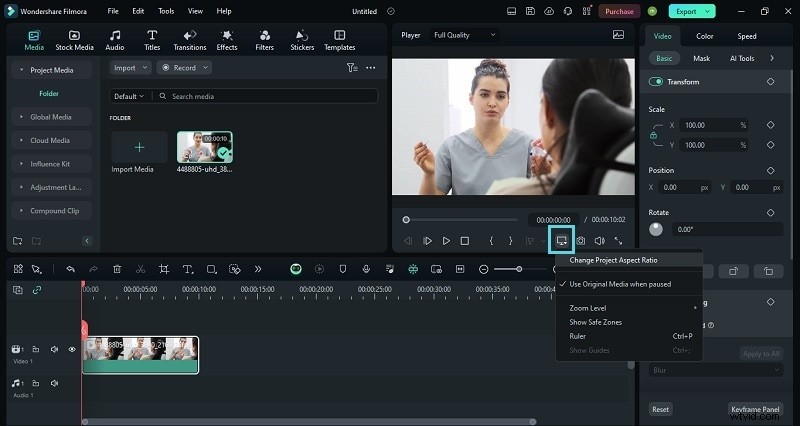
Then, you'll get to change the aspect ratio as well as the resolution and frame rate.
Part 3. Bonus Part: Use Smart Scene Cut highlight Your Video
Are you frustrated with videos being too long? Especially now, when people prefer watching videos on their phones, social media videos need to be high-quality and concise to attract viewers.
Don't worry, Filmora can help you with this issue. The Smart Scene Cut feature in Filmora can intelligently extract the highlights from your video without the need for manual editing. Below is a tutorial video for you to watch.
Conclusion
At this time, every business is using marketing to boost the economy, but video marketing is at its climax. Therefore, it is essential to take advantage of video editing tools to increase productivity and efficiency of work.
The Davinci Resolve and Filmora Wonder Share are the best video editing tools to resize videos. You can easily use these tools on your laptop, tablet, or smartphone in a very short time. Along with this, you can share your compressed videos on different social media platforms like Facebook, Twitter, YouTube, Instagram, and LinkedIn. Moreover, you can enjoy the magical effects of these free tools at the ease of your smartphone. It is beneficial for both small and large businesses for the following
- Time saver
- Economical
- Good video quality
- Presentable
- Increase engagement
Hope the content will be useful for you. If you like the article please leave a comment.
Get Started for FreeFor Win 7 or later (64-bit) Get Started for FreeFor macOS 10.14 or later