Do you notice dialogue that sounds faint while the background music feels overpowering? A fast, reliable fix is to normalize audio in Adobe Premiere Pro. This process establishes a steady loudness baseline, keeping every element of your project balanced.
Premiere Pro’s built‑in audio normalization feature smooths out abrupt volume spikes and ensures that dialogue, music, and sound effects all sit together on the same level. The result is a cleaner, more professional mix.
In this guide, you’ll discover what “normal” audio means, when normalization is essential, and three straightforward methods to apply it in Premiere Pro. We’ll also explore an AI‑powered workflow for those who want a quicker, automated solution.

Part 1. What Constitutes Normal Audio and When to Normalize
Normal audio is a consistent level that doesn’t require the viewer to keep adjusting the volume. Normalization aligns each clip’s peak or perceived loudness with a target value, ensuring a smooth listening experience.

LUFS Loudness Targets for Different Platforms
While editors often monitor levels in decibels (dB), streaming services use LUFS (Loudness Units Full Scale) to gauge perceived loudness over time. Typical targets are:
- YouTube: ‑14 LUFS
- Spotify / Apple Podcasts: ‑16 LUFS
- Broadcast & Television: ‑23 LUFS
Normalization vs Compression vs Limiting
These three techniques are frequently confused, yet each serves a distinct purpose in audio post‑production.
| Technique | What It Does | When to Use It |
| Normalization | Adjusts overall gain so peaks or loudness reach a target level. | Balancing clips with uneven overall volume. |
| Compression | Reduces the dynamic gap between quiet and loud parts. | Making dialogue clearer or smoothing music tracks. |
| Limiting | Blocks peaks from exceeding a set ceiling, preventing distortion. | Keeping audio safe from clipping during export or broadcast. |
- Normalization: Quickly adjusts overall volume without altering the original recording.
- Compression: Controls dynamic range for a more even mix.
- Limiting: Prevents peaks and distortion.
Common Scenarios for Audio Normalization
You’ll often normalize audio in Premiere Pro when:
- Combining clips recorded at different levels.
- Elevating a voice‑over that’s too quiet compared to other tracks.
- Balancing dialogue, music, and effects from multiple sources.
Part 2. How to Normalize Audio in Premiere Pro – 3 Methods
When clips come from varied sources, some may sound faint while others are loud. Understanding how to normalize audio in Premiere Pro ensures your mix remains steady. Here are three practical approaches.
Method 1: Normalize Clips with Audio Gain
This option is ideal for single or multiple clips that need individual adjustment.
1️⃣ Select the clip(s) in the timeline. To pick several, hold Shift and click each clip, or drag a selection box.
2️⃣ Right‑click the selection and choose Audio Gain.
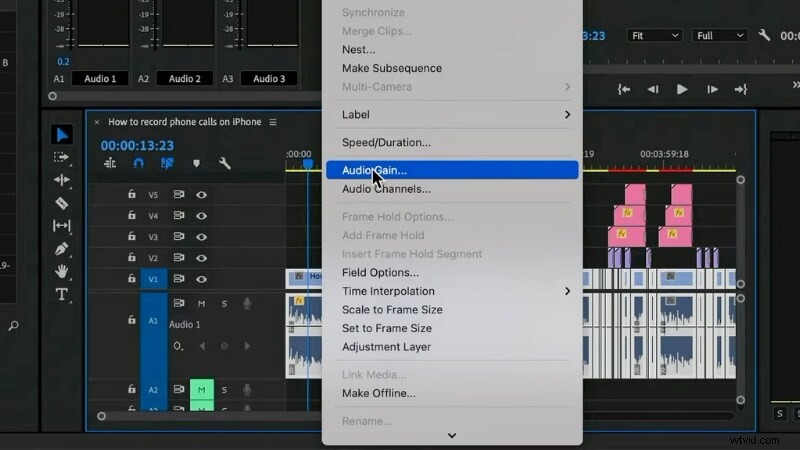
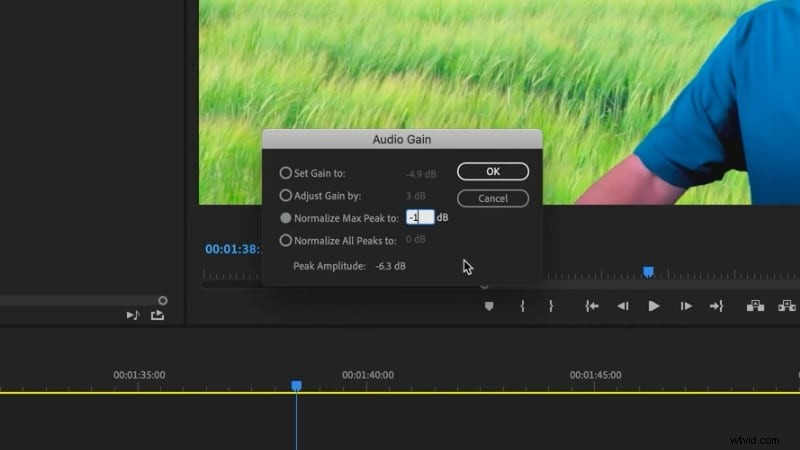
3️⃣ In the Audio Gain dialog, choose Normalize Max Peak and set the target (e.g., ‑1 dB). Click OK and Premiere will adjust the selected clips to that level.
Method 2: Normalize an Entire Track
Use this method to bring an entire audio track to a consistent level.
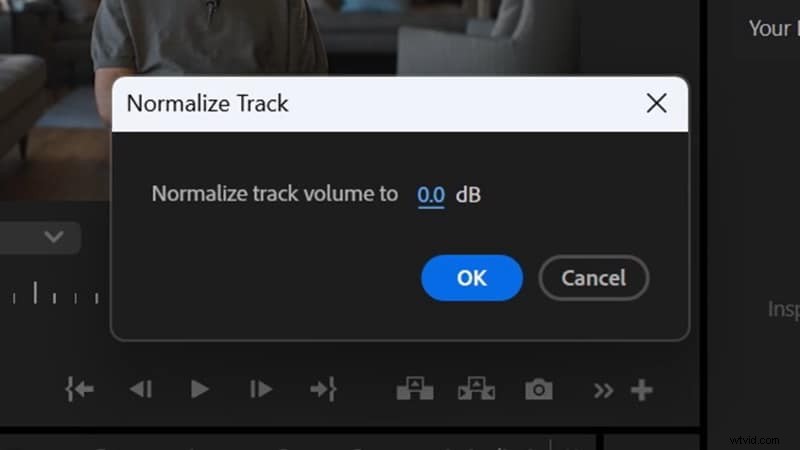
1️⃣ From the top menu, navigate to Sequence > Normalize Mix Track to open the settings window.
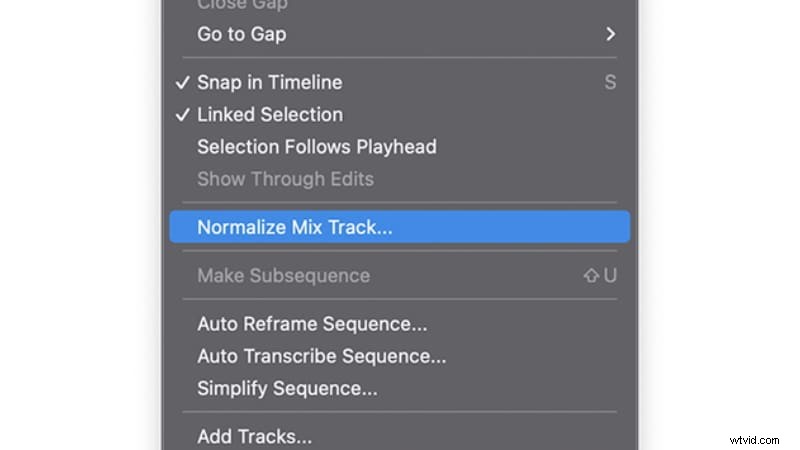
2️⃣ Enter your desired dB target (e.g., ‑1 dB) and click OK. Premiere will adjust the entire mix to that value.
Method 3: Using the Essential Sound Panel
The Essential Sound panel is especially handy for dialogue tracks that vary in level.
1️⃣ Select the dialogue clips in the timeline.
2️⃣ Open the panel via Window > Essential Sound if it isn’t already visible.
3️⃣ Assign the selected clips as Dialogue. Expand the Loudness section and enable Auto‑Match.
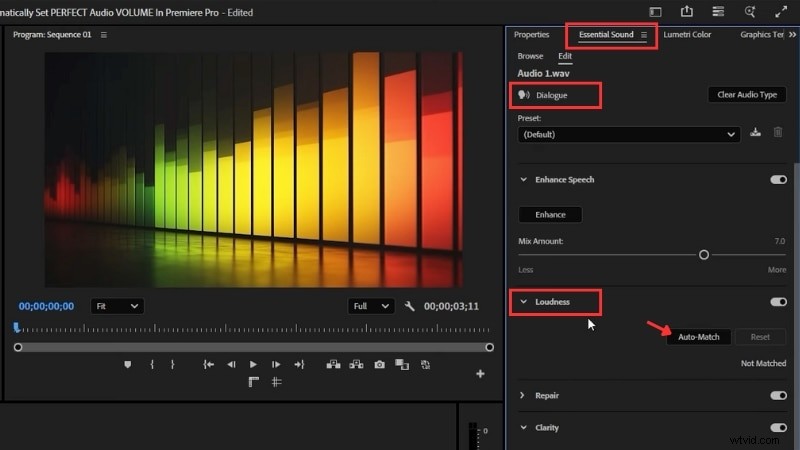
Premiere analyses the clips and aligns them to the same loudness (≈ ‑23 LUFS by default). Your dialogue tracks now play at a consistent level, simplifying the mix.
Pros and Cons of Normalizing Audio in Premiere Pro
While normalization can quickly level uneven tracks, it has limitations that depend on your project’s complexity. Below are key advantages and potential drawbacks.
Pros
- Applies to single clips, multiple clips, or entire tracks.
- Integrated into Premiere Pro; no third‑party plugins required.
- Accelerates the mixing process for projects that include dialogue, music, and effects.
Cons
- Peak normalization may not align with LUFS loudness targets.
- Dialogue often benefits from compression to retain natural dynamics.
- Auto‑Match may still require manual fine‑tuning for optimal results.
Bonus: Smarter Audio Editing with an AI‑Powered Editor
Although Premiere Pro offers three robust normalization methods, mastering gain, peak levels, and loudness standards can be time‑consuming. If you prefer an automated approach, Wondershare Filmora delivers an all‑in‑one audio toolkit powered by AI.
 Secure Download
Audio Features in Filmora
- Audio Normalization: Auto‑balances volume so quiet and loud clips play at a steady baseline.
- AI Audio Denoise: Removes background hum, hiss, or ambient noise.
- AI Voice Enhancement: Boosts vocal presence for clearer, more natural recordings.
- Auto Ducking: Detects speech and lowers background music automatically.
- EQ Presets: Ready‑made equalizer settings for music, dialogue, or effects.
How to Normalize Audio in Filmora
Follow these steps to achieve consistent levels:
1️⃣ Import your video or audio files and place them on the timeline.
Secure Download
2️⃣ Right‑click the clip(s) you wish to adjust and choose Adjust Audio. Hold Shift to select multiple clips before right‑clicking.
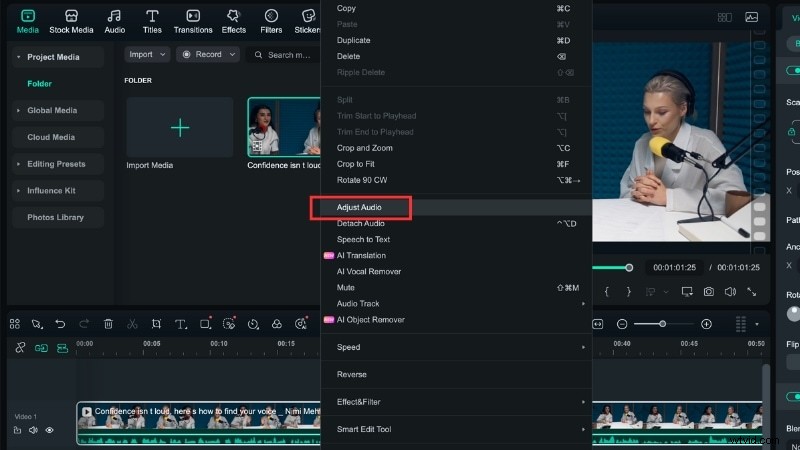
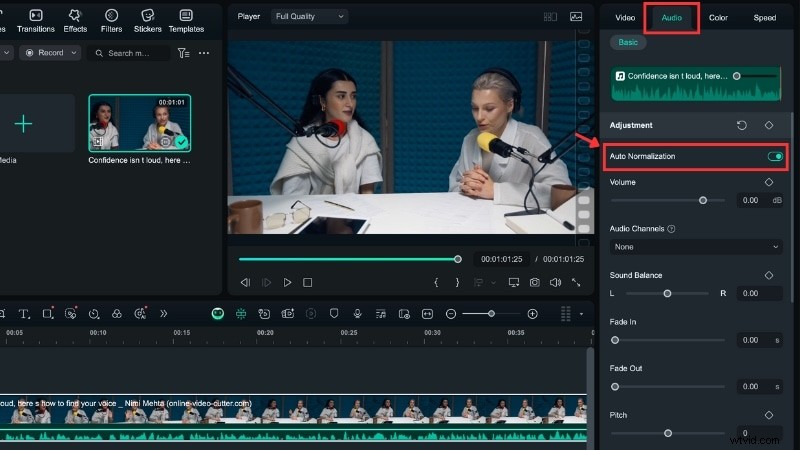
3️⃣ Go to Audio > Basic > Adjustment and enable Auto Normalize to balance the volume automatically.
4️⃣ Preview the result and export when you’re satisfied with the steady, clear audio.
Comparing Audio Editing in Premiere Pro vs. Filmora
Both editors provide audio management tools, but their workflows differ significantly in setup complexity.
| Feature | Premiere Pro | Filmora |
| Audio Normalization | Manual setup via Gain, Mix Track, or Essential Sound. | One‑click volume leveling with no settings. |
| AI Audio Denoise | Built‑in DeNoise effect with adjustable reduction strength. | Automatic AI detection and removal of hum, hiss, and chatter. |
| Voice Enhancement | Essential Sound panel offers clarity, EQ, and dynamics sliders. | AI Voice Enhancement boosts vocal presence in one click. |
| Auto Ducking | Controlled through Essential Sound with adjustable settings. | Auto lowers background music under dialogue instantly. |
| EQ Presets | Manual EQ adjustment with sliders and curves. | Ready‑made EQ presets for quick application. |
- Premiere Pro offers granular control, allowing editors to fine‑tune every detail for professional‑grade results.
- Filmora delivers rapid outcomes through AI automation, simplifying the editing process while maintaining high quality.
Watch this video tutorial to see Filmora’s AI audio tools in action:

Filmora – AI Video Editing App & Software
Best tool for making videos anywhere for all creators!
Your Perfect First Video Edit Starts Here – No Experience Needed
Conclusion
Mastering audio normalization in Premiere Pro lets you control uneven sound levels and keep your projects balanced. By selecting the right method and understanding gain, peak levels, and loudness standards, you’ll create a smoother listening experience.
While Premiere’s native tools are powerful, Filmora’s AI‑powered workflow can accelerate the process with features like noise reduction, voice enhancement, and auto ducking.