 You did it. With no notice, you jumped into remote learning, embraced technology, and tackled videos to stay connected with your students. Great job to all the teachers!
Now that you have the screencasting basics down, you can take your videos to the next level with a few editing techniques. You’ll enjoy getting more creative and be excited to show off your new lessons. Screencast-O-Matic makes it easy to elevate your screencasts to the next level with these easy editing tools.
Here are a few editing tools suggested by some of our educators.
1. Cut Out Mistakes
 The first few times recording yourself may include a few shaky moments, including ‘umms’ and long pauses. The cut tool can be your best friend to delete these awkward moments.
You can cut a few seconds of your recording or you can delete an entire section. It’s really up to you. The cut tool is flexible and easy to use.
Sixth Grade Teacher Alfonso Gonzalez of Chimacum Middle School in Washington State says he started his editing adventures with the cut tool.
He says, “When I first started using Screencast-O-Matic I didn’t really edit much. And then, I only used the cut tool because it was the only one that was showing for me.”
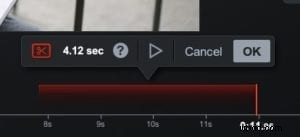
To use the Cut tool, simply choose the area you want to delete by clicking on the editing timeline. Then drag the bar to select the video you want to delete.
Don’t worry about making mistakes. You can always remove the cut or undo your edit later just by clicking on the icon. It’s that easy!
2. Add an Overlay
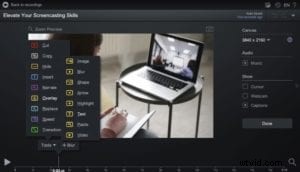 An overlay is a layer you can add to your videos. Overlays come in the form of text, shapes, images, or highlights. There are multiple overlay options in Screencast-O-Matic’s Video Editor.
Adding overlays allows you to reinforce specific messages or ideas. You can provide a better explanation and learning experience for your students and at the same time, you can add a bit of creative flair to your videos.
Gonzalez says he stumbled on the overlay tools by accident. He was using the cut tool to remove sections of his videos but when he looked further, he found the overlays. He says, “I should have known since it says Tools (plural) but I didn’t know that all I had to do was click there.”
All you need to do is click on ‘Overlays’ and a long list of overlay options are available. You can add images, videos, shapes, arrows, and more!
Gonzalez says, “Once I found the many tools, I played around with the blur (my most used tool) and then the highlight tool (my second most used tool).”
3. Import Multiple Videos
 With Screencast-O-Matic you can record multiple videos, edit them separately, and then insert them onto one timeline. This is especially helpful when you want to create a demonstration within a lesson. You can create a demo video and then insert it into your main video.
You can also save time and unearth some older tutorials by inserting an updated video introduction. You can record the introduction and add that to an existing video you already had. It’s an easy update to any video.
Teachers who record on their tablet, whether its an iOS or Android device, will find the insert tool extremely valuable. You can insert and combine mobile videos with your screen recordings. Screencast-O-Matic offers mobile screen recorder apps on both iOS and Android devices.
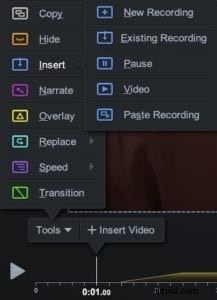
The insert tool is simple and straightforward. It’s located in the Tools menu. Use the insert tool to add a new recording, existing recording, or a video file from your computer.
Take Editing to the Next Level
This is just the beginning. There are many more tools in Screencast-O-Matic’s Video Editor. Just click on ‘Tools’ and discover all the tools you can use to add to your recordings.
Gonzalez is excited about what he has discovered. He’s implementing more tools in his videos. “I’m doing all my teaching remotely and anywhere you see blurring, highlighting, transitions, or cuts with a Zoom Meeting together with a screencast, I did that with Screencast-O-Matic!”
Utilizing these easy editing tools will save you time and speed up the editing process. You’ll also elevate your videos for a more engaged audience.
Find more video editing tips, check out this video editor cheat sheet. The cheat sheet explains what each tool does and how you can use it in your video.
Extra Resources
1-2-3 Video Editing Process
Video Editing Tutorials
Overlay Tutorials