Reading Time: 3 minutes
Published: November 25, 2025 | Last Updated: November 26, 2025

What is a vectorscope? Definition & Meaning
A vectorscope is a color analysis tool that displays hue and saturation on a circular graph. It’s used in video editing, grading, and on-set monitoring to fix color casts, match camera angles, and check skin tones for accuracy.
You find a vectorscope in DaVinci Resolve, Premiere Pro, Final Cut, Avid, and Vegas Pro. It’s one of the standard scopes used for color correction and grading, right alongside the waveform and RGB parade. In this article, I’ve used the Lumetri Scope from Adobe Premiere Pro for the illustrations.
But unlike those, the vectorscope doesn’t show brightness or luminance; it only shows color. This makes it useful when lighting, like strong window light or warm indoor bulbs, can trick your eyes into seeing colors differently.
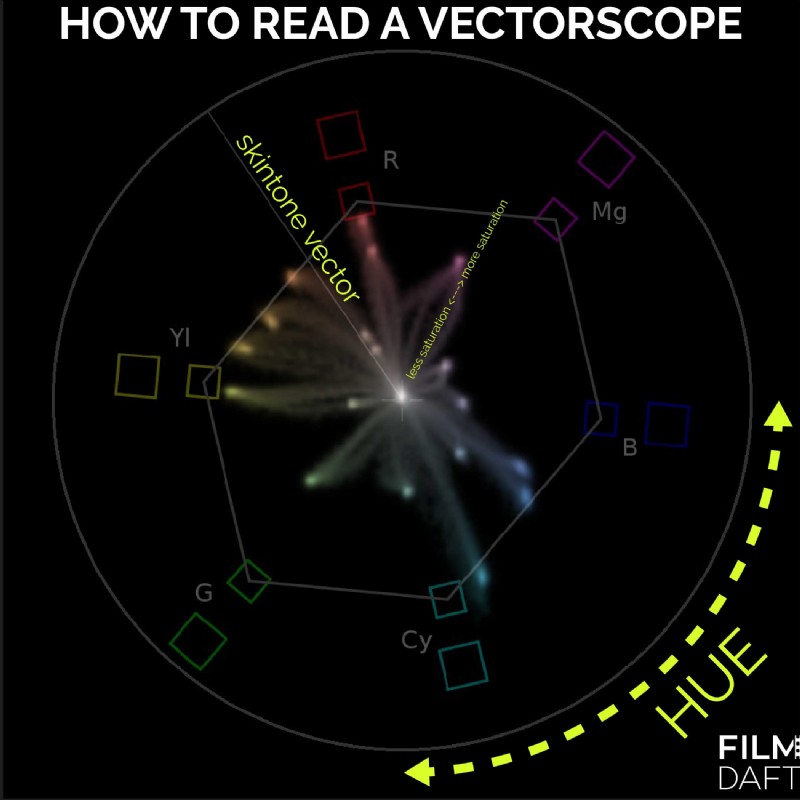 How to Read a Vectorscope: This labeled example shows how hue wraps around the circle and saturation increases outward. The skin tone vector is marked as a diagonal line between red and yellow — a useful guide for aligning skin tones during color correction.
The vectorscope looks like a circular graph. It maps color information from your image in two ways:
- Hue is the direction on the circle (red, green, blue, etc.).
- Saturation is the distance from the center (how intense the color is).
There are six reference points marked around the edge of the scope: red, magenta, blue, cyan, green, and yellow. The cluster of shapes on the graph, called the “trace,” shows where the dominant colors in your shot land.
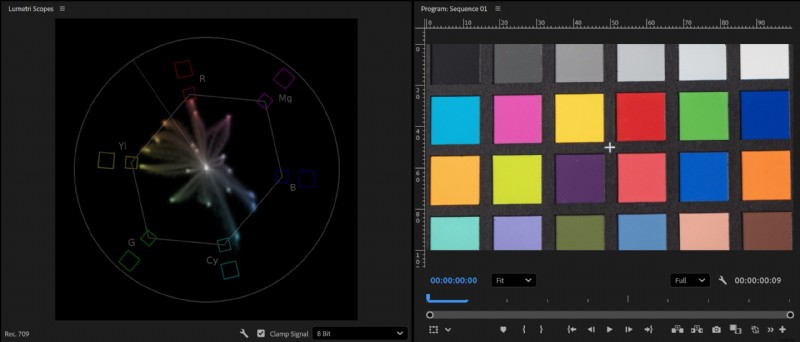 Vectorscope with Color Checker Tool: Each color patch from the chart appears as a trace on the vectorscope, confirming hue accuracy across the image. The spread shows strong saturation aligned with the primary and secondary targets.
Neutral colors and grays cluster near the center. Bold, bright colors push outward. For example, if your shot has a lot of green trees, the trace will lean toward the green side. If it’s a blue sky, the trace shifts toward blue.
How to Use a Vectorscope for Skin Tones
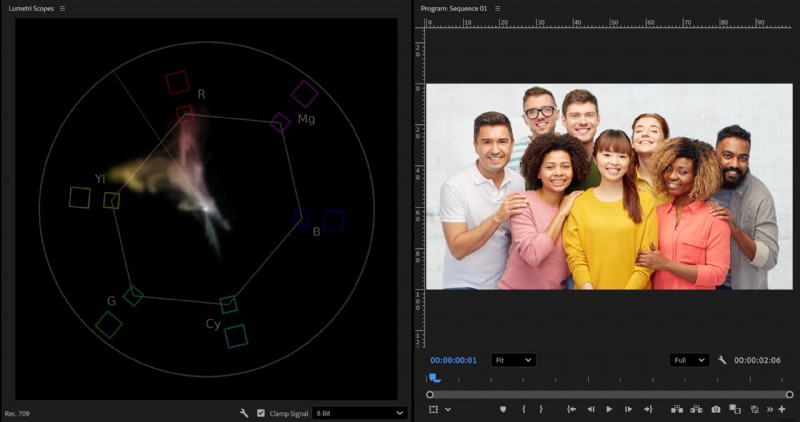 Vectorscope Skin Tone Line with Diverse Subjects: Despite different ethnicities, the skin tones of each person cluster around the same red-yellow line on the vectorscope. The trace is less defined here because their colorful shirts add overlapping hues.
One of the most common uses for a vectorscope is checking and correcting skin tones. Human skin (no matter the ethnicity) usually falls along a line between red and yellow. Most vectorscopes mark this diagonal as the skin tone line.
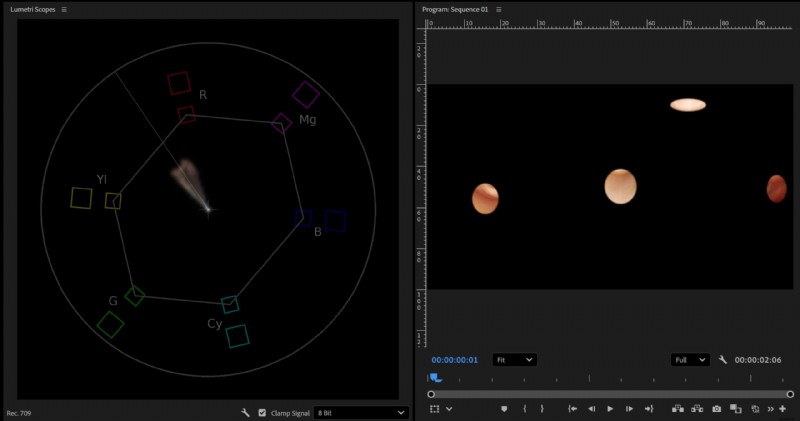 Masked Skin Tones on Vectorscope: Here, I’ve masked out different areas of the image to isolate skin tones from people of different ethnicities. The trace forms a tight cluster along the same red-yellow hue line, showing that human skin (regardless of ethnicity) shares the same hue. The difference lies mostly in saturation and brightness. Lighting, skin undertone, camera capture, and post‑processing can cause deviations from that line.
If your subject’s face looks too pink, orange, or green, the trace will drift away from that line. You can fix it using your color wheels or hue vs hue curves.
Zoom in on the subject’s face or draw a mask in your color grading panel to limit the vectorscope’s data to only skin areas. This helps you see only the color of the skin and not the background. Adjust until the trace sits cleanly along the skin tone line.
Quick Tips
These tips help you spot issues like unnatural skin tones, oversaturated colors, or a flat-looking image:
- If the trace is too far from the center, your image may be oversaturated.
- If everything sits near the center, your shot may look flat or desaturated.
- If skin tones lean toward green or magenta, adjust the tint until it lines up with the skin tone line.
Summing Up
The vectorscope helps you see color, not just by eye, but with real data. It shows hue and saturation on a circular graph, and it’s especially helpful when working with skin tones. Whether you’re doing a quick correction or a full grade, using the vectorscope gives you control and consistency across every shot.
Read Next: Ready to level up your color work?
Start with our main Post-Production hub to see how editing, sound, and color come together to build the final cut.
Then explore the full Color Grading section for guides on color theory, contrast, LUTs, scopes, and practical workflows you can use in DaVinci Resolve.

By Jan Sørup
Jan Sørup is an indie filmmaker, videographer, and photographer from Denmark. He owns FilmDaft.com and the Danish company Apertura, which produces video content for big companies in Denmark and Scandinavia. Jan has a background in music, has drawn webcomics, and is a former lecturer at the University of Copenhagen.
View all of Jan Sørup's posts.