Colors are the heartbeat of any video. Vibrant, balanced hues capture attention and reinforce brand identity—think of Starbucks’ unmistakable green and white. In this article, we’ll walk through why color correction matters, the benefits it delivers, and how Wondershare Filmora makes the process intuitive and powerful.
In this article
- Part 1: What Is Color Correction in Video Editing?
- Part 2: Benefits of Video Color Correction
- Part 3: Wondershare Filmora—A Dynamic Tool for Easy Color Grading
- Conclusion
Extensive Color Correction
The right editor helps you balance and grade your footage, turning raw clips into polished, professional content.
Part 1: What Is Color Correction in Video Editing?
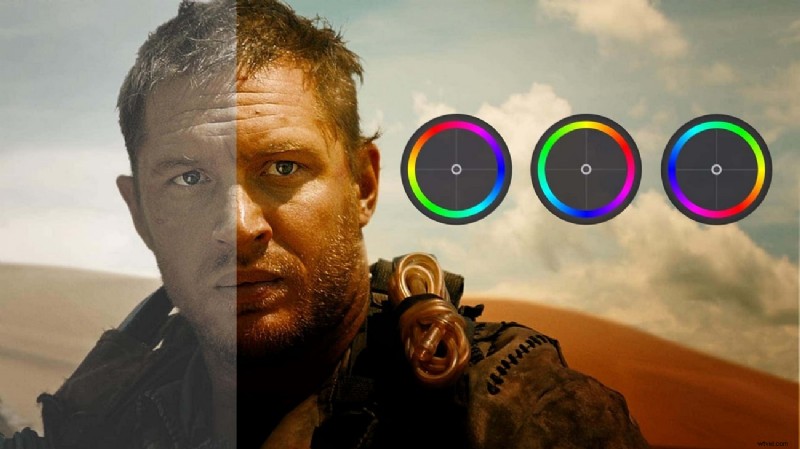
Color correction (or grading) involves adjusting hue, saturation, contrast, and exposure to achieve a natural, consistent look across all shots. The primary goal is to eliminate color inconsistencies that can distract viewers or distort the intended mood.
1. White Balance Adjustment
White balance ensures that whites and neutrals appear true, removing unwanted color casts that may stem from different lighting conditions.
2. Exposure Correction
Exposure controls overall brightness. Tweaking highlights and shadows restores detail in both bright and dark areas, creating a more balanced image.
3. Contrast Management
Contrast adjusts the dynamic range between light and dark, enhancing depth without sacrificing detail.
4. Color Balance
The color wheel or sliders let you fine‑tune the intensity of primary colors, allowing you to dampen or boost specific hues.
5. Saturation Adjustment
Saturation controls vibrancy. Lowering it can tame overly harsh colors, while boosting it can add punch where needed.
Part 2: Benefits of Video Color Correction
Color‑corrected footage offers a range of advantages that elevate the viewer experience.
1. Improved Visual Appeal
Professional, balanced colors immediately increase perceived quality and credibility.
2. Consistent Graphics
Even footage shot with different cameras or in varied locations can share a unified look, enhancing brand consistency.
3. Authenticity & Realism
Accurate color reproduction makes scenes feel true to life, strengthening storytelling.
4. Enhanced Contrast & Depth
Proper contrast emphasizes shadows and highlights, adding dimensionality to your footage.
5. Lighting Corrections
Color tools can resolve lighting issues—correcting over‑ or under‑exposed areas and ensuring a coherent visual narrative.
Part 3: Wondershare Filmora—A Dynamic Tool for Easy Color Grading
Filmora blends a user‑friendly interface with robust color‑grading features. Whether you’re a beginner or a seasoned editor, Filmora’s AI‑powered tools streamline the workflow and help you create videos that stand out.
Key Color Correction Features in Filmora
- Access a dedicated color settings panel for precise control.
- Use masks and blending to target specific areas of your frame.
- Choose from a library of presets, filters, LUTs, and video effects to set the tone instantly.
- Add adjustment layers for global or selective color tweaks.
Step‑by‑Step Guide to Color Correcting in Filmora
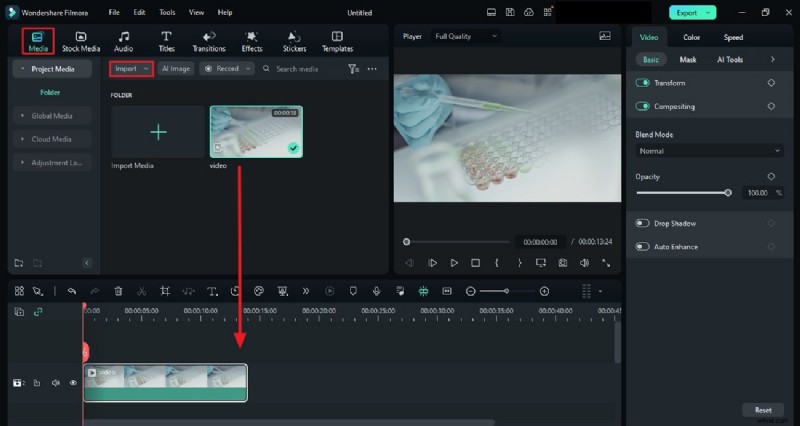
Step 1: Import Your Media
Start by adding footage to the "Project Media" panel and placing it on the timeline.
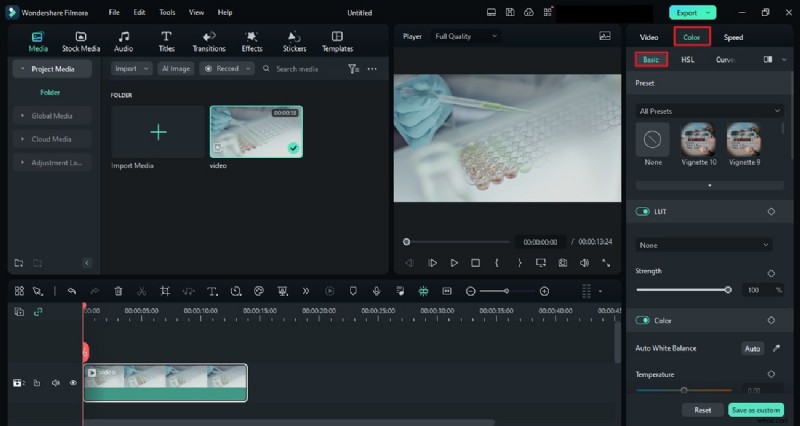
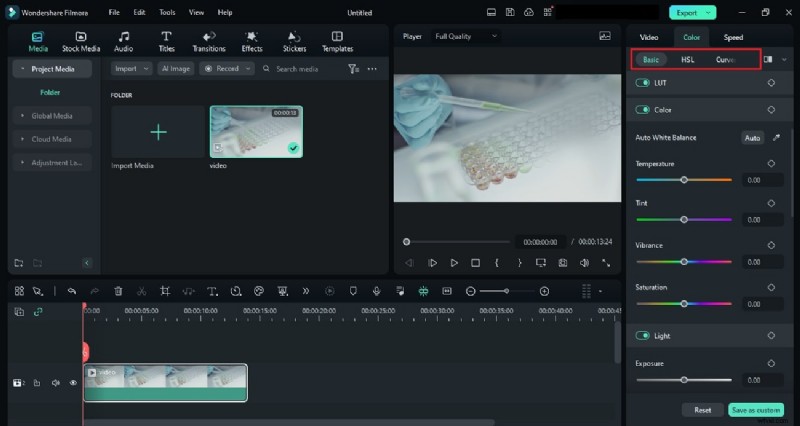
Step 2: Open the Color Panel
Navigate to the "Color" tab and select "Basic" to access foundational adjustments such as white balance, exposure, and saturation.
Step 3: Explore Advanced Options
Use the arrow to reveal advanced tools—HSL, Curves, and Color Wheels. Experiment with these settings to fine‑tune the look to your preference.
Conclusion
Color correction is essential for producing engaging, professional‑looking videos. With Wondershare Filmora’s intuitive interface and powerful color tools, you can effortlessly elevate your footage. Try Filmora today and see how a few adjustments can transform your content.