How to Create a Retro Intro in Filmora
Establish a strong first impression with a retro‑style intro using Wondershare Filmora. This guide walks you through every step—from importing assets to applying glitch effects and finalizing the video—so you can create a polished, nostalgic intro in minutes.
What You’ll Need
- A computer (Windows or macOS)
- Your video footage or clips
- Wondershare Filmora video editor (latest version recommended)
- PNG snapshots of a line and a square (or any shapes you prefer)
- A vintage TV PNG image for the final overlay
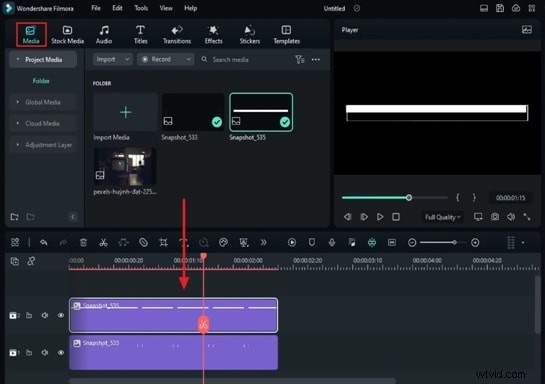
Step 1: Import Media and Arrange on Timeline
Launch Filmora and create a new project. Import the line and square snapshots, as well as the vintage TV PNG, from the Media tab. Drag the line and square onto separate tracks and set each to a 10‑second duration. Align them on the screen by adjusting the Scale and Position settings under the Image tab.
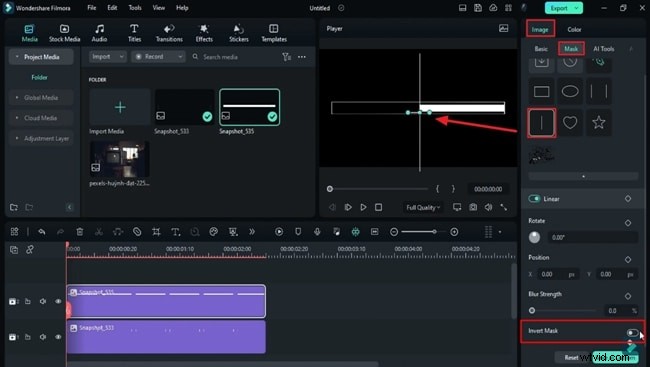
Step 2: Apply Linear Mask for Loading Bar Animation
Place the playhead at the start of the second track. In the Mask panel, select a Linear mask and enable Invert Mask. Move the mask to the left side, add a Position keyframe, then slide it to the right over the next few frames, extending it to the end of the clip.
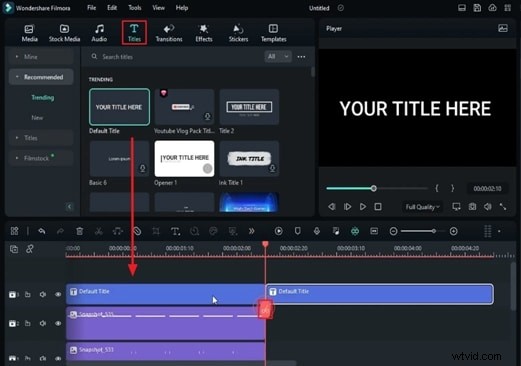
Step 3: Add a “Loading” Text
Drag a Default Title onto a new track. Split the clip at 2 seconds 10 frames to match the line and square durations. Edit the first part, typing Loading, choosing the “Press Start 2P” font at size 40, and positioning it on screen.
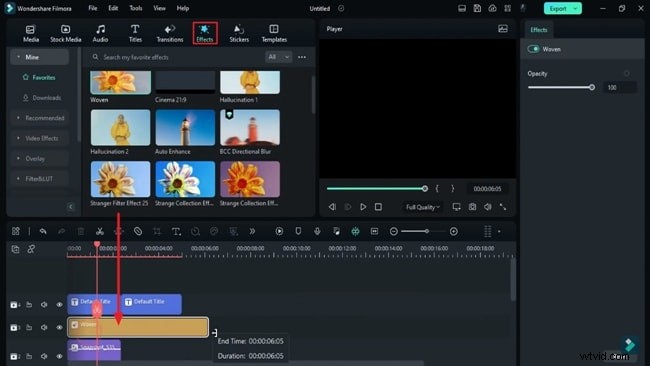
Step 4: Layer Glitch Effects
Move the edited “Loading” title to a higher track. From the Effects panel, drop the “Woven” effect onto the track and stretch it for 12 seconds. Add the “Glitch Dispersion” effect on a new track, matching the duration of the loading text, and apply “Glitch Strip 2” on another track. Adjust its parameters: Frequency 0.1, Amount 0.2, Strength 0.1.
Step 5: Insert Main Intro Text
Extend the second Default Title to 11 seconds 10 frames. Type your main title, choose the “Dave Valencia” font, set a light‑pink color, and position it appropriately.
Step 6: Add Glitch Transitions
Split the main title at 5 seconds 22 frames. Apply a 6‑frame Glitch transition on the split segment, then a 10‑frame Glitch Countdown transition between the loading and main titles.
Step 7: Create a Misty Gray Background
Drag the “Misty Gray” color from Filmstock onto track 2. Stretch it to 12 seconds, then split it at 5 seconds 22 frames, 7 seconds 24 frames, 8 seconds 24 frames, and 10 seconds 10 frames. Delete the unwanted parts and apply color adjustments to enhance the retro feel. Copy the effect to the remaining segments.
Step 8: Add Gradient Colors
Insert a Gradient Color between the split segments on track 2. Adjust its opacity and apply short glitch transitions (6–10 frames) at each intersection.
Step 9: Insert Secondary Text Layer
Add another Default Title on track 5 at 6 seconds 9 frames. Type “Press Start,” set the “Press Start 2P” font at size 28, and animate its opacity: start at 0, fade to 100 % after 10 frames, then fade back to 0 over 10 frames, repeating until 9 seconds 15 frames.
Step 10: Add Animated Icons
Navigate to Stickers → Filmora Legacy Pack. Drop three animated icons at the 9‑second mark, set each to 40 % scale, and adjust positions. Add 8 solid color clips on track 9, each lasting 5 frames.
Step 11: Mask and Color the Icons
Use a rectangle mask (35 × 35) on the first icon, set radius to 21, and choose a suitable blending mode. Duplicate the mask across all icons, randomly adjusting positions. Apply a gray color on track 10 for 2 seconds, then add red color segments as needed.
Step 12: Apply Overall Mask and Effects
Overlay a grey solid color on a track above the icons, duplicate it to cover the full duration, and use a circular mask (50 × 50, 200 % scale) with Invert Mask to frame the TV screen. Add a VHS & Glitch effect on track 11 for the final 2 seconds, then a Glitch Lines effect on track 12. Apply a Vignette (radius 100, opacity 54) for a subtle fade.
Step 13: Final Export and Cleanup
Export the composed sequence at a higher frame rate. Once exported, delete all temporary clips from the timeline.
Step 14: Composite the Intro Over Your Main Clip
Import the exported intro into a new project. Place the vintage TV PNG on track 2, scale and position it to frame the screen. Draw a mask around the TV screen using the Pen tool. Add your main video clip on track 1, adjust its scale to fit within the TV, and ensure both tracks share the same duration. Render a preview and export the final video.
Show More >> Show Less >>