The Rule of Thirds is one of the first composition techniques every photographer learns, and for good reason. By placing your subject along specific grid lines instead of dead center, you create images that feel more balanced and natural. It works for landscapes, portraits, street photography, and just about every other genre.
In this guide I’ll explain how the Rule of Thirds works, show you how to apply it with real examples, and cover when it makes sense to break it entirely.
Table of contents
- What is the Rule of Thirds?
- How to Apply the Rule of Thirds
- How to Enable the Rule of Thirds Grid
- When (and How) to Break the Rule of Thirds
- Frequently Asked Questions
- Wrapping Up
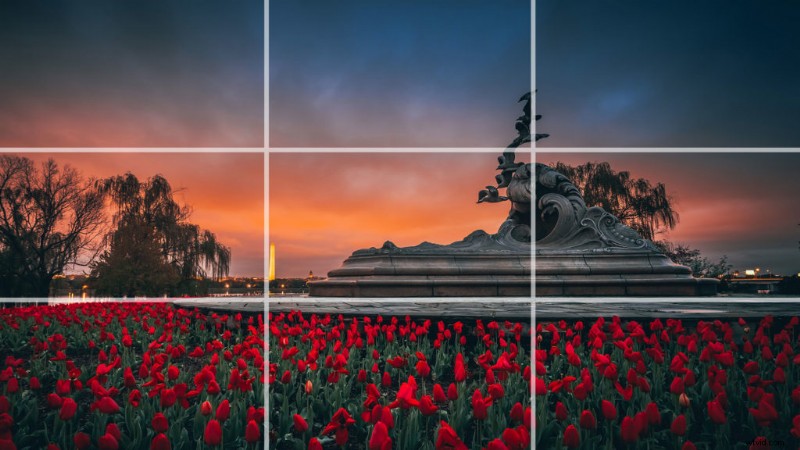
 Rule of Thirds example using an overlay
The Rule of Thirds divides your image into nine equal parts using two horizontal lines and two vertical lines, creating a 3×3 grid. The four points where these lines cross are called power points (or intersection points). Placing your main subject on or near these power points creates a more dynamic composition than centering everything in the frame.
The concept dates back to 1797, when painter John Thomas Smith described it in his book on rural scenery. Since then it has become the most widely taught composition rule in photography. The reason it works is simple: our eyes are naturally drawn to points slightly off-center in an image. A centered subject can feel static, while an off-center subject creates visual tension and movement that holds attention longer.
The Rule of Thirds isn’t just for photography either. Filmmakers, graphic designers, and painters all use the same principle to create balanced compositions.
How to Apply the Rule of Thirds
 Example of the Rule of Thirds
Placing your subject
Instead of centering your subject, position them along one of the vertical grid lines. For portraits, place the subject’s eyes along the upper third line. This creates a natural focal point because viewers look at eyes first. For full-body shots, align the person with the left or right vertical line and let the remaining two-thirds of the frame show their environment.
Horizon placement
Landscape photographers use the Rule of Thirds to decide where to place the horizon. If the sky is dramatic (colorful sunset, storm clouds), place the horizon on the lower third line to give the sky two-thirds of the frame. If the foreground is more interesting (flowers, rocks, water reflections), place the horizon on the upper third line. Avoid splitting the frame exactly in half unless you’re going for a symmetry shot.
Balancing elements
When you place your main subject on one side of the frame, the other side can feel empty. The Rule of Thirds helps you balance this by positioning a secondary element on the opposite side. A tree on the left third balanced by a mountain on the right third, for example. This visual weight distribution keeps the viewer’s eye moving across the entire image instead of fixating on one spot.
Leading lines and movement


Leading lines (roads, fences, rivers, paths) naturally guide the viewer’s eye through an image. When you align these lines so they start in one third and lead toward a power point in another third, you create a strong sense of depth and movement. In the lighthouse photo above, the boardwalk leads from the lower portion of the frame directly toward the lighthouse positioned at an upper power point.
Negative space

Negative space is the empty area surrounding your subject. By placing your subject on one of the power points and leaving the rest of the frame open, you create a sense of emphasis that draws attention directly to your focal point. This technique works especially well for minimalist compositions, wildlife photography, and any scene where you want your subject to feel small against a larger environment.
How to Enable the Rule of Thirds Grid
Most cameras have a built-in grid overlay you can display in the viewfinder or on the LCD screen. On Canon cameras, go to Menu > Shooting Settings > Grid display and select the 3×3 grid. Sony, Nikon, and Fujifilm cameras have similar options in their display settings. Smartphones also have this feature: on iPhone, go to Settings > Camera > Grid. On Android, open the Camera app settings and enable “Grid lines.”
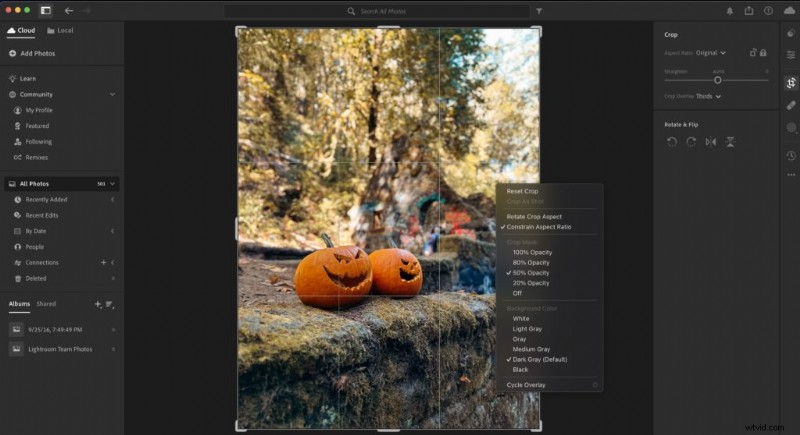 Rule of Thirds grid in Adobe Lightroom
You can also apply the Rule of Thirds when editing. In Adobe Lightroom and Photoshop, the crop tool displays a Rule of Thirds grid by default. Press the O key while cropping to cycle through different grid overlays. This makes it easy to recompose an image after the fact if you didn’t nail the framing in camera.
When (and How) to Break the Rule of Thirds
The Rule of Thirds is a guideline, not a law. Some of the most striking photographs deliberately ignore it. The key is knowing why you’re breaking the rule and what effect it creates.
Dead Center (Symmetry)
 Sunrise at the Lincoln Memorial Reflecting Pool
Centering your subject works when the scene has strong symmetry. Reflections, tunnels, long hallways, and architectural facades all benefit from a centered composition. In the photo above, the reflecting pool and the Lincoln Memorial create perfect symmetry that would be weakened by off-center framing. When a scene is naturally symmetrical, lean into it.
Extreme Off-Center
Pushing your subject to the very edge of the frame creates tension and drama. This works well for storytelling images where you want to show context: a person standing at the far right of the frame with a vast empty landscape stretching to the left, for example. The emptiness becomes part of the story. Street photographers and documentary shooters use this technique to create a sense of isolation or scale.
Diagonal Placement
Instead of following the Rule of Thirds grid, try placing your subject along a diagonal line from one corner to the opposite corner. This adds energy and movement to the composition. It works especially well for action shots, sports photography, and any scene with natural diagonal lines like staircases, hillsides, or leaning buildings.
Frequently Asked Questions
Does the Rule of Thirds work for video?
Yes. Filmmakers use the Rule of Thirds constantly. Interview subjects are almost always placed on a left or right power point rather than centered. Horizon lines in establishing shots follow the same upper/lower third guidelines. Most video editing software and camera monitors offer a thirds grid overlay.
Should I always use the Rule of Thirds?
No. It’s a starting point, not a requirement. Use it when you want a balanced, natural-looking composition. Break it when centering, extreme framing, or diagonal placement better serves the image. The best photographers know the rule well enough to break it with purpose.
Can I apply the Rule of Thirds when cropping?
Yes, and this is one of the easiest ways to improve existing photos. In Lightroom or Photoshop, the crop tool shows a Rule of Thirds grid by default. Adjust your crop so the key elements align with the grid lines or power points. Even a small shift can make a big difference in how balanced the final image feels.
What is the difference between the Rule of Thirds and the golden ratio?
Both are composition guidelines, but they place subjects in slightly different positions. The Rule of Thirds divides the frame into equal thirds. The golden ratio (roughly 1:1.618) places the grid lines closer to center, creating a tighter spiral pattern. In practice, the difference is subtle. The Rule of Thirds is simpler to use in the field, which is why it’s taught first.
Wrapping Up
The Rule of Thirds is the most useful composition tool you can learn as a photographer. Turn on the grid in your camera, practice placing subjects on the power points, and you’ll see an immediate improvement in your images. Once it becomes second nature, experiment with breaking it for more creative results.
For more ways to improve your photography, check out my travel photography tips and my guide to shooting during golden hour.