Time-lapses are an easy way to add spice to your video productions, but sometimes parts of your scene look awful when displayed over long periods of time. In this tutorial, I'll show you how you can use real-time video to improve objects with oscillating movements.
By combining video and time-lapse footage, you can create what I call a "hybrid time-lapse" that looks much more natural while still showing the dramatic movement of time.
Time-lapse is simply a term that is used to describe any video that shows the passage of time, faster than ordinary. Time-lapses can be created by taking a series of still photographs and playing them back to back, or it can be as simple as speeding up an existing video so that it plays much faster than normal. Regardless of how you create your time-lapse, certain elements in your scene can look great in time-lapse form while others can look unnatural and jittery. Usually, cloud movement, people walking, cars, and car light trails all look pretty interesting when played back quickly. However, some movements, especially those that oscillate or remain mostly stationary usually do not look very pleasing when played back in this method. Things like trees blowing in the wind, waves crashing on a beach, wind blowing across bodies of water, and objects floating on water almost always look strange and out of place.
Using a Slow Shutter
One solution to making your time-lapses look more natural is to use a slow shutter so that each frame has a bit of motion. If you shoot video, usually you are stuck at using a shutter no slower than 1/25th of a second (due to the limits of 24fps video), but if you can shoot with a variable frame rate, or if you simply take still photographs using your intervalometer, you can easily slow your shutter down to 1/2 second or longer. Having a slower shutter helps blur any objects that are moving and gives their motion a more fluid movement compared to the jarring movement we are used to seeing with frames capture with a fast shutter.
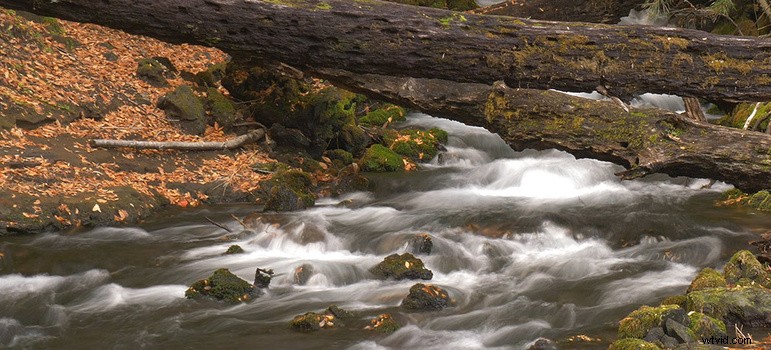
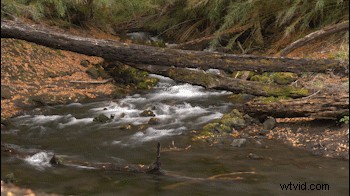
You might think then that you could simply slow your shutter down to 2 seconds and create a time-lapse that would solve this problem. After all, a landscape photograph with a long exposure does make waterfalls and waves look pretty surreal. However, even if you smooth out water movement, tree motion, and floating objects like boats with a long shutter, the jarring motion of these objects comes right back once you stack 24 frames back to back and play them in video form. Below you can see a time-lapse I created using a shutter of about 2 seconds, and while each individual frame looks pretty good, the waterfall doesn't look great.
The Solution: Blend in Video
The best way I have found to resolve this problem is to not use long exposures at all, but rather use video shots with normal shutter speeds. My thought was, if I can capture a normal time-lapse and then film the exact same scene in real-time video, maybe I could combine the two sequences to produce something more pleasing to the eye. In other words, if I could capture a time-lapse with fast movement and then mask in video with slow movement, maybe I could have the best of both worlds.
I first tried this technique while working on Elia Locardi's Photographing the World 3 series. We were staying in Atrani, Italy off the Amalfi coast and had this amazing view of the little town, beach, and Mediterranean sea. I wound up capturing a cool time-lapse, but after reviewing it from the camera, I noticed how awful the waves looked crashing on the beach. The cars driving through the town looked great, the clouds in the sky looked cool, the shadow creep on the mountain was interesting, but the waves crashing over and over had this cheap stop motion effect. Since I had not moved my camera yet, I decided to shoot two video clips both in 24p and 60p in hopes that I could blend one of the video clips in with the time-lapse clip. The results worked perfectly, and from that point forward I tried to create these hybrid time-lapses any chance I could.
Using Masks in Adobe Premiere
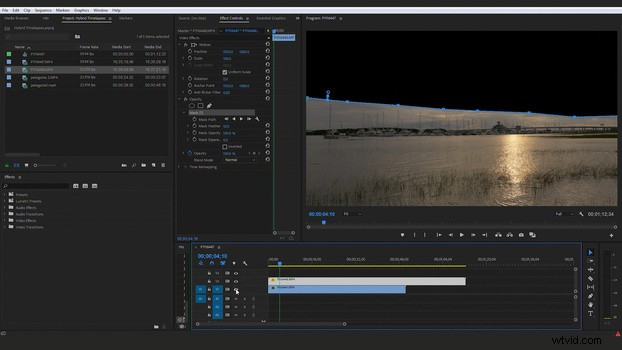
Most photographers are familiar with using multiple layers in Photoshop and masking in different elements from different photos. While not quite as versatile as Photoshop, Adobe Premiere also has some simple to use masks built into almost every effect. For this technique, you simply need to stack two of your video clips on top of each other, and use one of the mask options on the opacity effect. Some other effects can be used too like the crop effect but for the sake of this tutorial, I'm just going to use the opacity. Once you make a selection around the section of your scene that you want to be transparent, you can either leave the transition hard or you can feather the transition to help make the blended border more subtle.
Now that you have your two clips properly aligned and masked, you can now adjust the speed of both your time-lapse video and your normal video. By using the speed duration option, you can set your time-lapse clip to play double, triple, or quadruple speed to make the passage of time even more extreme. Likewise, you can play your 24p footage back natively or if you shot video at a higher frame rate like 60p, you can set the speed duration to 40% to give your footage a slow motion look.
Once you have the two videos synced up properly and the top layer masked to reveal the layer below it, you can simply nest the entire sequence so that you are left with a single file that can easily be moved around in your project. You can also now add zoom and pan keyframes to this nested sequence without your hybrid time-lapse accidentally becoming out of sync or disrupted. Keep in mind, sometimes it's helpful to add the warp stabilizer to all of your footage first before building your hybrid time-lapse so that small movements over the course of your video do not cause your mask to move. Nothing is worse than seeing a parallax movement along your mask path because one of your videos slightly moved during filming.
I hope you found this article and video tutorial useful and it opens up some ideas to think about when filming your own time-lapses. If your background is more photograph based and less on the video side of things, let me encourage you to start learning to shoot and edit video because it can really help both your branding and advertising as well as open up some amazing business opportunities that still photography alone doesn't always offer. If you find Adobe Premiere Pro intimidating like I first did, Lee Morris recently produced a full length tutorial called Intro to Premiere which you can find in the Fstoppers Store. It's a fast guide to learning the most powerful tools in Premiere so that you can learn video editing quickly and easily.