Setting a custom white balance is the best way to ensure accurate tones in your images when working with challenging light conditions. If you’re a Canon EOS 200D / Rebel SL2 user, it’s very easy to set a custom white balance, which we’ll show you how to do in this quick step-by-step tutorial.
Why use custom white balance?
Your EOS 200D / Rebel SL2’s custom white balance setting effectively lets you adjust your tones for a specific light source at wherever you may be shooting. This ensures tones are as accurate as possible and helps reduce unwanted colour casts.
Setting a custom white balance in the Canon 200D / Rebel SL2 Guided Menu
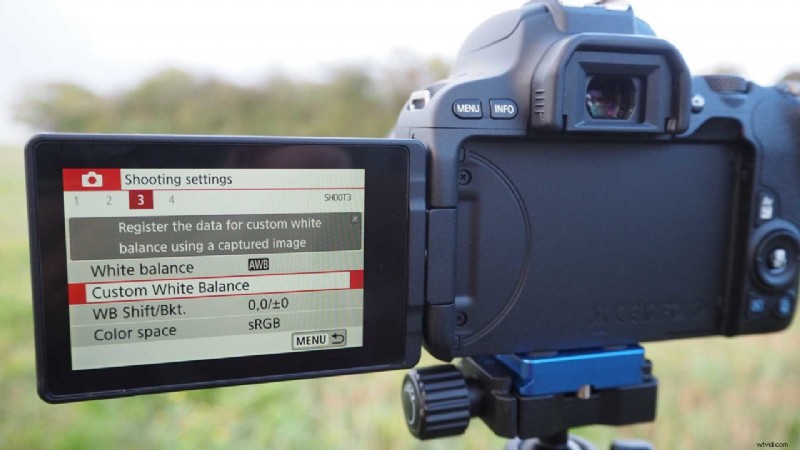
- In the Guided Menu on your Canon EOS 200D / Rebel SL2 you can find the custom white balance option on Menu > Shooting Settings, page 3. Once here you’ll see all the preset options, and on the far right is the custom white balance. Press the custom white balance option on the touchscreen.
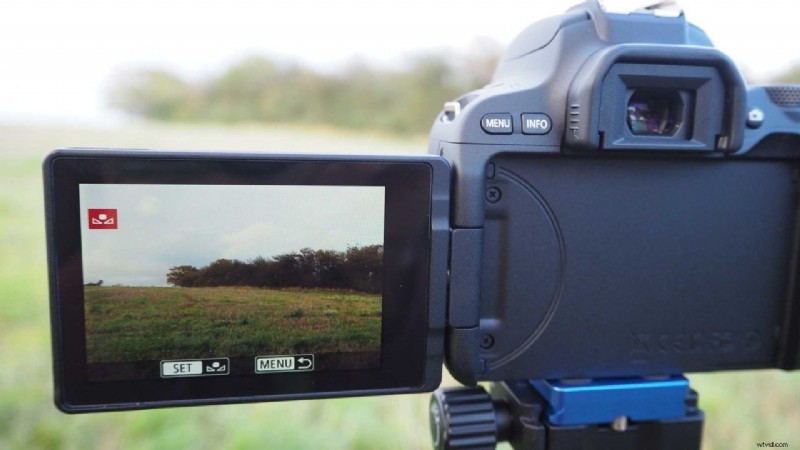 You’ll then be prompted to take an image in your current lighting conditions, which the 200D / Rebel SL2 will use to base its white balance.
Alternatively, you can press the Menu button to go back and select the custom white balance option beneath your white balance row, where you can select one of your images and set that as the custom white balance.- To do this, photograph a white subject – a piece of paper works just fine – using any of the 200D / Rebel SL2’s white balance settings. Then repeat Step 1 above.
- In the custom white balance menu, select the image you photographed above in Step 4. Press Set, then OK and your new white balance data will be imported.
- Press Menu to exit.
- Canon EOS 200D / Rebel SL2 review
Setting a custom white balance in the Canon EOS 200D / Rebel SL2 in Standard Menu
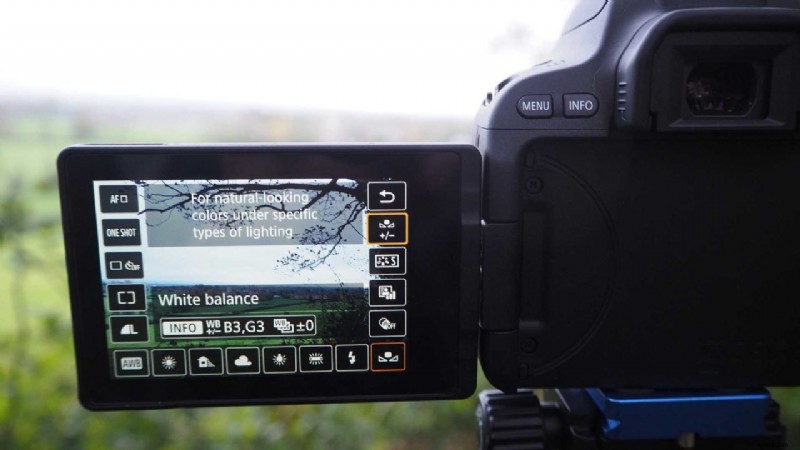
In Standard Menu, press the Q button either in the centre of your four-way control or on the lower right corner of the touchscreen. This opens up your options and you can press the white balance option (you’ll see it by the cloud or sun or icon of whatever option you’re using currently).
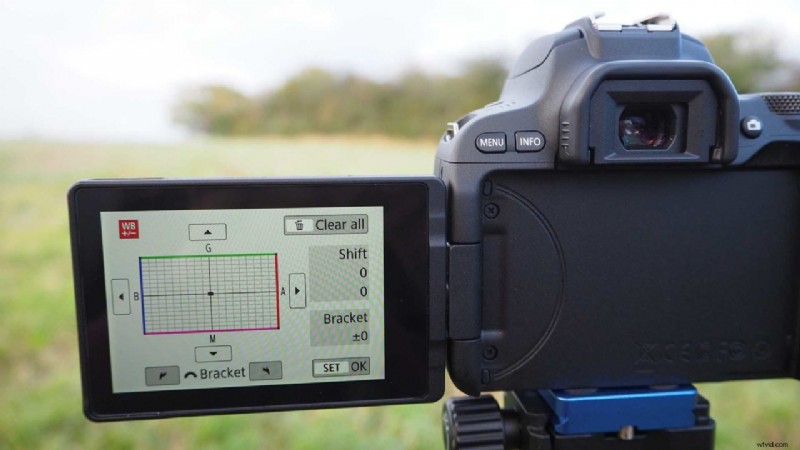
You can also set a white balance bracket here. Press the icon and a grid appears showing your colour range.
Scroll the wheel on your camera’s top plate and bracket up to BA +/-3. You can also shift colours up and down or left and right across the spectrum.
Setting a 200D / Rebel SLD custom white balance in Live View
Setting a custom white balance in Live View on the Canon EOS 200D / Rebel SL2 is slightly different than above.
- Press the Q button at top of your camera back to reveal your exposure settings.
- Press the White Balance option and then press Custom.
- A little info bar now appears which displays your current white balance value. Press this and a colour grid appears.
- You can now use the wheel on the finger grip to set a bracket, or use the four way controller or your finger to shift the tones.
Correcting white balance for specific tones
The Canon EOS 200D / Rebel SL2 also allows you to correct a white balance that has already been set. This is handy for when you want to fine tune your colours to compensate for a specific light source. You can correct each colour to one of nine levels. Here’s how…
- Go to page 3 of your Shooting Settings in the Guided Menu and select WB Shift/Bkt.
- As above in the Live View menu, you can use the four-way controller or simply touch and drag the marker around the grid to adjust your tones. The colours in your image will then be adjusted according to the direction you’re moving the marker.
- You’ll also notice values change in the Shift box as you do this. These figures indicate the direction of the adjustment and the amount of correction applied.
- You can cancel any changes simply by pressing the Trash button.
White balance auto bracketing
Within this same WB Shift/Bkt menu you can also set up a bracket based on your current white balance setting. Enabling this will then instruct the EOS 200D / Rebel SL2 to take up to +/-3 levels.
- As above when shifting tones, in this same screen simply turn the dial on your top plate to set up your bracket.
- Turning it clockwise sets a bracket for a Blue and Amber bias. Counterclockwise sets a Magenta and Green bias.
- Again, pressing the Trash button cancels your settings.
- You can also set white balance correction and Auto Exposure Bracketing in conjunction with your white balance bracketing.
- How to shoot a timelapse on the Canon EOS 200D / Rebel SL2