
Producing cinematic, professional‑looking footage demands more than just flying high; it requires refined control and an understanding of your drone’s capabilities.
The key to stunning results lies in mastering targeted flying techniques. Even a basic drone can deliver cinematic footage if piloted with deliberate, controlled motion.
By grasping your drone’s specifications and applying proven cinematic principles, you can craft high‑quality narratives that immerse viewers in a rich 3D visual experience.
This article focuses on manual piloting, rather than device‑specific settings, guiding you to develop your own skill set.
Below are five essential drone maneuvers that deliver the most compelling, engaging shots across any setting.
The Essential Foundation: Cine Mode
Prior to executing any advanced maneuvers, enable Cine Mode—also called Tripod or Cinematic Mode—if your drone offers it.
Cine Mode delivers the mandatory smoothness by dampening the drone’s responsiveness. In contrast to Normal Mode’s snappy reaction to stick inputs, Cine Mode offers a measured, gradual acceleration and deceleration, eliminating jerky starts, abrupt stops, and hasty corrections that can undermine a professional look.
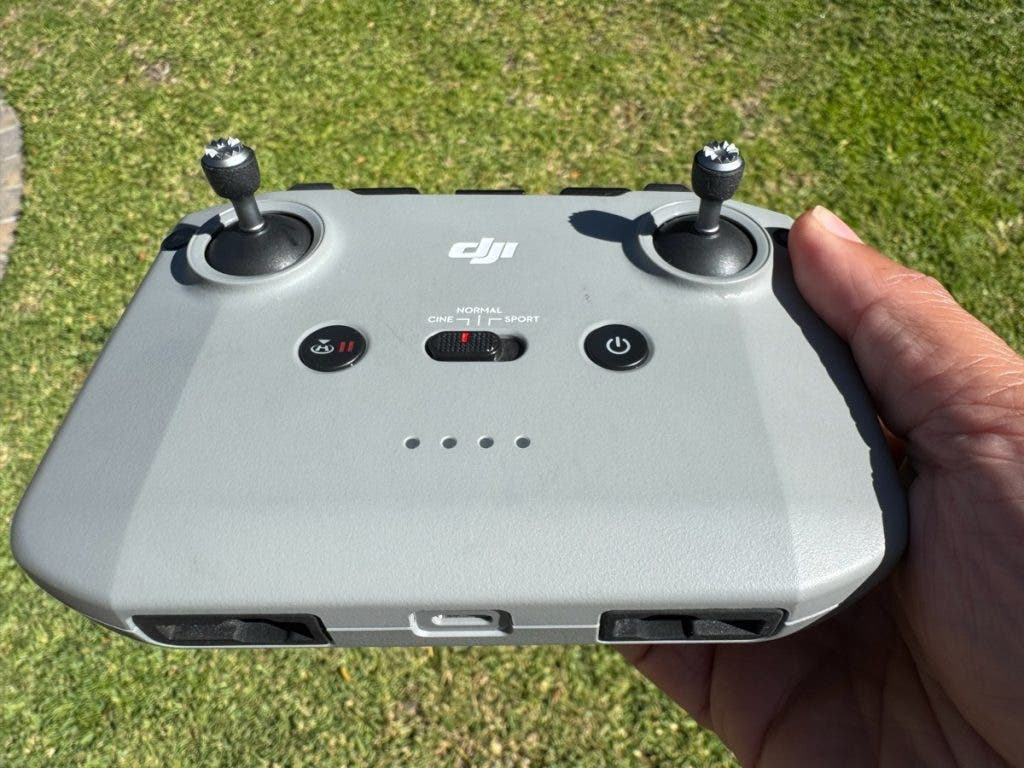 The Cine Mode button, the left stick, and the right stick. (Photo by Muji)
| Stick | Direction | Channel | Function (Movement) |
| Left Stick | Up/Down | Throttle | Controls the drone’s vertical movement. |
| Left Stick | Left/Right | Yaw | Controls the rotation of the drone on its vertical axis: Left spins the nose left, Right spins the nose right. |
| Right Stick | Up/Down | Pitch | Controls forward/backward tilt and movement: Up moves the drone forward, Down moves it backward. |
| Right Stick | Left/Right | Roll | Controls the side‑to‑side tilt and movement: Left slides the drone left, Right slides the drone right. |
1: The Orbit (Circle of Discovery)
The Orbit creates instant depth and context. It involves flying a flawless circle around a fixed point—whether a landmark, person, or structure—while the camera maintains constant focus on that centre subject.
Why This Move Works: This technique lets viewers absorb the subject from every angle while simultaneously establishing its relationship with the surrounding environment.
Manual Execution:
- Initial Placement: Position the drone at a close radius to the subject, but as high as needed to capture the ideal view of the subject and its surroundings.
- Coordinated Controls: The execution requires simultaneous input on both controller sticks: the left Yaw stick (move left or right) rotates the drone, and the right Roll stick (move left or right) flies the drone laterally.
- Synchronisation: Apply smooth, consistent pressure to both sticks, adjusting the yaw and roll inputs to maintain a perfect, circular path with the camera centred on the target.
The clip below showcases an Orbit shot at Namibian sunrise, revealing the surrounding landscape while centering on a lone tree.
01 The Orbit Cinematic Move
2: The Dronie (The Grand Reveal)
The Dronie delivers a powerful visual, akin to an aerial dolly‑zoom: it starts close on a subject and gracefully pulls back and ascends, unveiling the vast scale of its surroundings.
Why This Move Works: The shot begins with intimacy and connection, focusing on the subject, and concludes by providing a broad, sweeping context that establishes the location, scale, and environment.
Manual Execution:
- Start Position: Position the drone close to the subject, a few feet away, ensuring the subject fills a significant portion of the initial frame.
- The Pullback: Smoothly push the throttle stick (left stick, up) to gain altitude while simultaneously pulling the pitch stick (right stick, back) to move the drone away from the subject.
- The Reveal: Maintain the combined ascent and backward motion until the subject is visually small, and the whole landscape is revealed.
Pro Tip: For maximum drama, pause for 2‑3 seconds at the initial close‑up before beginning the pullback.
02 The Dronie Cinematic Shot
3: The Cable Cam (The Straight Track)
The Cable Cam—or Straight Track—offers a simple yet effective approach: it mimics a camera gliding along a straight, invisible overhead cable.
Why This Move Works: It is ideal for following a moving object in parallel or for smoothly showcasing the flow of a road, river, or coastline.
Manual Execution:
- Initial Placement: Position the drone parallel to the direction of the desired movement.
- The Track: Apply gentle, consistent pressure to the Roll stick (right stick) to move the drone sideways, forward, or backwards. Keep the camera’s gimbal fixed in one direction.
Pro Tip: When following a moving subject, a gentle input on the Yaw stick can keep the subject centered as the perspective changes.
03 The Cable Cam Cinematic Shot
4: The Rocket (The Vertical Climb)
The Rocket is a dynamic vertical ascent that dramatically transforms the viewer’s perception. The drone climbs straight up—starting low—with the camera either facing straight down or fixed on the horizon.
Why This Move Works: It is a quick, efficient way to establish height and inject a burst of energetic motion into an edit.
Manual Execution:
- Camera Angle: Set the gimbal angle before takeoff, usually between 30 and 45 degrees, or straight down at 90 degrees.
- Launch: Apply a smooth, firm, and consistent input to the Throttle stick (left stick, up) to initiate a perfectly vertical climb.
- Pace: Maintain a consistent speed during the ascent. This movement often benefits from speed ramping in post‑production, starting slowly and accelerating the footage.
Here are a few clips of the Rocket shot. For maximum visual impact, I used speed ramping to retain viewers’ attention.
04 The Rocket Cinematic Shot
The Tilt Reveal (The Look‑Up Push‑In)
The Tilt Reveal is effective for transitioning from a detailed focus to a wide landscape shot. The drone moves forward while the camera gimbal slowly tilts upward, revealing the horizon and the scene ahead.
Why This Move Works: This move generates a strong sense of momentum and discovery. It creates a feeling of travelling into the landscape.
Manual Execution:
- Start Position: Position the drone from where you want to start. Tilt the camera gimbal down, nearly to 90 degrees, focusing on the immediate foreground.
- Coordinated Movement: Gently push the Pitch stick (right stick, forward) to initiate forward flight. Simultaneously, and very slowly, adjust the Gimbal Wheel to tilt the camera upward toward the horizon.
Pro Tip: Since this requires two simultaneous inputs and gimbal control, Cine Mode is non‑negotiable. Do not pause at any stage while moving the gimbal wheel upwards because it will cause discontinuity in the reveal, and you will have to do it all over again.
05 The Tilt Reveal Cinematic Movement
Conclusion
Creating a professional video clip requires meticulous editing, thoughtful sound design, and careful colour grading to deliver a fully immersive experience. By mastering these manoeuvres through practice, you’ll develop a distinctive style and refine subtle techniques that go beyond built‑in tracking modes. Enjoy the flight and the craft!
Mujahid Ur Rehman
Mujahid Ur Rehman, known by Muji, is a professional photographer and independent filmmaker located in Cape Town, South Africa. His focus is on storytelling through his photography, short films on YouTube, and a newsletter covering life, people, travel, nature, and motivation. His work can be accessed through www.mujahidurrehman.com, https://www.instagram.com/muji.drifts or via https://www.youtube.com/@muji.drifts.