Subtitles bridge language gaps and boost accessibility, turning any video into a globally‑comprehensible experience. Whether you’re learning a new language, preparing training material, or sharing content on social media, adding captions is essential. Below is a curated list of the top 10 free online subtitle makers, each offering unique features that cater to beginners and advanced users alike.
1. Adobe Creative Cloud Express
Adobe Creative Cloud Express (formerly Adobe Spark) lets you add subtitles directly in the browser without downloading any software. It also includes tools to convert videos to GIFs, reverse footage, merge clips, and adjust video speed. The core features are free; a $9.99/month premium plan unlocks the full asset library and advanced templates.
- Visit Adobe Creative Cloud Express and click “Add subtitles to your videos now.”
- Choose a template or start from scratch, then upload your video.
- Select a subtitle layout, adjust text size, and preview the timing.
- Download the finished video to your computer.

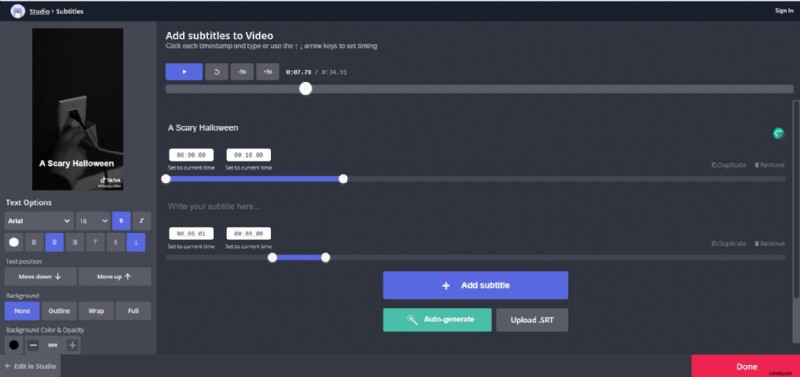
2. Kapwing
Kapwing is a versatile online editor that supports three subtitle methods: upload an SRT file, type them manually, or let the platform auto‑generate captions. Subtitles can be placed anywhere on the screen and fully customized.
- Go to Kapwing Subtitles and upload your video.
- Select the subtitle method you prefer and sync the timestamps.
- Click “Export Video” to download the clip with embedded subtitles.
Free users can export videos up to 30 minutes; longer exports require a $16/month subscription. A watermark is removed once an account is created.
3. Clideo
Clideo allows you to add subtitles in any of the official languages listed on its platform. After adding captions, you can reposition them with a few clicks. Free users receive HD exports but videos will contain a watermark.
- Visit Clideo Add Subtitles and register.
- Upload your video from local storage, Google Drive, or Dropbox.
- Choose “Manual” to type subtitles and set the timings.
- Download the final video or share it directly online.
Additional options include adding titles, leader lines, and subheadings with adjustable font, color, and background.
4. Veed.io
Veed.io offers automated subtitling for YouTube videos and any other clips. You can type captions manually or upload an SRT file, then customize font, color, and background. The platform is free to start; paid plans unlock higher resolution exports and additional features.
- Open Veed’s auto‑subtitle generator and click “Get Started.”
- Upload your video, then add subtitles manually or via SRT.
- Adjust timing, style, and alignment on the timeline.
- Export the video and save it locally or share it directly to social media.
5. Flixier
Flixier excels at auto‑subtitle generation across all common video formats (MP4, MOV, AVI, etc.). The cloud‑based editor allows you to edit subtitles after generation and export videos quickly.
- Navigate to Flixier Auto Subtitle Generator and click “Get Started.”
- Upload your video from your device or a cloud service.
- Drag clips onto the timeline and click “Generate Auto Subtitle.”
- Fine‑tune subtitles on the timeline, then export the finished video.
Export times are reduced thanks to Flixier’s cloud rendering engine.
6. Subtitle Horse
Subtitle Horse is a browser‑based subtitler with real‑time validation, an interactive timeline, and keyboard shortcuts. The free version allows you to create, edit, and export subtitles in SRT, TimedText, WebVTT, and more.
- Visit Subtitle Horse and choose “Create subtitles with the free version.”
- Upload your video or add a URL.
- Set the frame rate and waveform, then start subtitling.
- Download the subtitles for free or purchase HD‑quality MP4 exports.
7. Subtitle Bee
Subtitle Bee supports automatic translation in over 120 languages with a 95% accuracy rate. Upload a video, choose the source language, and let the AI generate captions in the target language. Free use is limited to 10‑minute videos and watermarked outputs.
- Go to Subtitle Bee and click “Add subtitles now.”
- Select the language of the audio.
- Upload the video or paste a YouTube/Vimeo URL.
- Edit captions as needed and choose the desired social platform.
- Download the video with embedded subtitles.
8. Fastreel
Fastreel offers a free membership that lets you create videos with subtitles, adjust font, size, color, and position, and access a library of stock media. Paid subscriptions start at $5.95 per video.
- Open Fastreel Add Subtitles and click “Add subtitles now.”
- Upload any MOV, MKV, AVI, WMV, or MP4 file under 500 MB.
- Upload an SRT file to add subtitles, then edit timing and text.
- Adjust styling options and download the subtitle file if needed.
- Export the video, selecting your preferred format and name.
9. EZGIF
EZGIF is best known for GIFs but also offers a simple video subtitle tool. You can upload files up to 100 MB or use a URL. If your video is larger, EZGIF can compress it before adding subtitles.
- Visit EZGIF Video Subtitles and upload your video.
- Enter subtitles manually in the provided box and set the display time.
- Click “Add Subtitles” and then “Save output.”
10. Promo
Promo is a free online video creation platform that allows you to add basic subtitles from your browser. The free version includes a watermark; the ad‑free version costs $99/month.
- Go to Promo Add Subtitles and upload your video.
- Select a professional template or start from scratch.
- Click the pink plus icon on the timeline and choose “Add Caption.”
- Position, style, and preview your subtitles, then click “Save & Preview.”
- Export or publish your finished video.
Conclusion
Choosing the right subtitle maker depends on your specific needs—whether you’re looking for a quick, free solution or a feature‑rich tool with advanced editing options. Explore the tools above and select the one that best fits your workflow to make your videos accessible and engaging for everyone.